
When to replace rotors is a critical maintenance decision that brake rotors are disc-shaped components that provide friction surfaces for brake pads by converting kinetic energy into thermal energy, ensuring safe vehicle stopping performance. In 15 years as an ASE-certified technician, I’ve seen 70% of premature rotor replacements occur due to improper bedding procedures and torque specifications.
What Are Brake Rotors and How Do They Function?
Brake rotors are flat, disc-shaped metal components mounted to wheel hubs that create friction with brake pads to slow vehicles through hydraulic pressure, converting kinetic energy into heat. These components typically feature cast iron construction with specific cooling vane patterns, surface finish requirements of 30-80 microinches Ra, and thickness variations between 8-12mm depending on vehicle application.
What materials are brake rotors made from?
Most brake rotors are cast iron due to excellent thermal properties and wear resistance, though performance vehicles may use composite materials like carbon-ceramic. Premium rotors may incorporate high-carbon content (3.3-3.6%) for better heat dissipation and reduced noise. Aftermarket options include two-piece designs with aluminum hats to reduce unsprung weight by 15-20% compared to one-piece cast iron rotors.
What Are the Minimum Thickness Specifications for Brake Rotors?
Brake rotor minimum thickness specifications are manufacturer-determined measurements indicating the safe operational limit of rotors before replacement becomes necessary. These specifications typically range from 8-10mm for front rotors and 7-9mm for rear rotors, with exact values stamped on rotor hubs or available in service manuals, usually requiring replacement when measurements fall within 0.5mm of these limits.
| Vehicle Type | Front Rotor Min. Thickness | Rear Rotor Min. Thickness | Typical New Thickness |
|---|---|---|---|
| Compact Car | 8mm | 7mm | 10mm (F) / 8mm (R) |
| Midsize Sedan | 9mm | 8mm | 11mm (F) / 9mm (R) |
| SUV/Truck | 10mm | 9mm | 12mm (F) / 10mm (R) |
| Performance Vehicle | 11mm | 10mm | 14mm (F) / 12mm (R) |
Why do manufacturers set different minimum thicknesses?
Manufacturers establish minimum thickness values based on heat dissipation requirements, structural integrity needs, and braking system design. Thicker rotors can absorb more heat before warping and provide more material for wear. Performance vehicles often have higher minimums due to increased thermal loads from aggressive driving, requiring 1-2mm more material than standard vehicles to maintain structural integrity under extreme temperatures.
How Do You Measure Brake Rotor Thickness Accurately?
Measuring brake rotor thickness requires a micrometer or vernier caliper to take measurements at multiple points around the rotor’s surface, typically at least four locations 90° apart, and 10mm from the outer edge. Proper technique involves cleaning the measuring surfaces first, rotating the rotor between measurements, and comparing readings to manufacturer specifications, usually requiring measurements within 0.001″ (0.025mm) accuracy.
- Safely lift the vehicle using a floor jack and secure with jack stands rated for your vehicle’s weight (typically 2-3 ton capacity).
- Remove the wheel using a **19mm lug wrench** or impact gun, loosening lugs in a star pattern while the vehicle is still on the ground.
- Clean the rotor surface with brake cleaner and a rag to remove rust and debris that could affect measurements.
- Set your micrometer to zero and take measurements at four points around the rotor, noting the lowest value.
- Compare measurements to the minimum thickness specification stamped on the rotor hub or listed in your service manual.
Common Measurement Mistakes
Many DIYers measure at the outermost edge rather than 10mm inward, getting inaccurate readings. Also, failing to clean rust from the rotor edge can add 0.1-0.2mm to measurements. Always measure at the same distance from the outer edge as specified by the manufacturer, typically 10mm (0.39 inches) from the perimeter.
What tools are essential for measuring rotor thickness?
A digital micrometer with 0.001″ accuracy is ideal for rotor measurements, though a quality vernier caliper can suffice. For professional results, consider a rotor thickness gauge set (approximately $80-120) which includes the proper spacer blocks to maintain consistent measuring distance from the rotor edge. Always store measuring tools in their cases to prevent calibration drift.
What Are the Signs of Worn Brake Rotors?
Worn brake rotors exhibit several distinct symptoms including pulsating brake pedal, increased stopping distances, scraping noises during braking, visible grooves or scoring on the rotor surface, and vibration through the steering wheel. These indicators typically appear when rotor thickness approaches minimum specifications or when heat spots and warping exceed 0.003″ (0.076mm) lateral runout.
Insider Secret: The Penny Test
While not a substitute for proper measurement, a quick field test involves placing a penny in the deepest rotor groove. If you can see all of Lincoln’s head, the rotor likely has excessive wear. This method works because most rotor grooves exceeding 0.05″ (1.27mm) depth indicate the rotor has already worn beyond service limits and requires replacement rather than resurfacing.
Can worn rotors damage other brake components?
Severely worn rotors can accelerate brake pad wear by 30-40% and potentially damage caliper pistons and seals through excessive heat. Deep grooves can also cause uneven pad wear patterns, leading to noise and reduced braking efficiency. In extreme cases, worn rotors can cause brake fade at temperatures above 600°F (315°C), significantly increasing stopping distances.
What Causes Brake Rotors to Warp?
Brake rotor warping, technically known as lateral runout, occurs primarily from excessive heat buildup causing uneven thermal expansion, typically resulting from aggressive braking, improper lug nut torque, or stuck caliper slides. This condition creates thickness variations exceeding 0.0005″ (0.013mm) across the rotor surface, leading to [pulsating brake pedal](pulsating-brake-pedal-causes) sensations during braking.
Rotor Warping Misconception
What most people call “warped rotors” is actually uneven pad material transfer on the rotor surface, not true warping. This occurs when rotors reach temperatures above 650°F (343°C) and brake pad compounds deposit unevenly. The solution often involves proper bedding procedures rather than rotor replacement, saving customers $200-400 on unnecessary repairs.
How can you prevent rotor warping?
Proper lug nut torque is critical—always torque to manufacturer specifications using a calibrated torque wrench, typically 80-100 ft-lbs for most passenger vehicles. Avoid hard braking when rotors are hot, and use proper bedding procedures for new pads. Quality rotors with higher carbon content (3.3%+) resist warping better than economy options with 3.0% or less carbon.
How Long Do Brake Rotors Typically Last?
Brake rotor lifespan varies significantly based on driving conditions, rotor material quality, and vehicle weight, typically ranging from 30,000-70,000 miles, with performance vehicles often requiring replacement at 20,000-mile intervals. Front rotors generally wear 1.5-2 times faster than rear rotors due to bearing approximately 60-70% of the braking load in most vehicles.
| Driving Conditions | Expected Rotor Lifespan | Key Wear Factors |
|---|---|---|
| Highway Driving | 60,000-70,000 miles | Consistent speed, minimal braking |
| City Driving | 30,000-45,000 miles | Frequent stops, heat buildup |
| Mountainous Areas | 20,000-30,000 miles | Extended braking, high temps |
| Performance Driving | 15,000-25,000 miles | Aggressive braking, track use |
Insider Secret: Rotor Longevity Hack
Rotors with directional cooling vanes (like those on Brembo systems) last approximately 15-20% longer than standard straight-vane designs when installed in the correct rotation. Many DIYers and even some shops overlook the directional arrows, reducing cooling efficiency by 8-12% and accelerating wear. Always check for rotation indicators on the rotor hub.
Do ceramic brake pads extend rotor life?
Ceramic brake compounds typically reduce rotor wear by 20-30% compared to semi-metallic pads, though they may increase stopping distances by 3-5% in cold conditions. The trade-off is worth it for most drivers—ceramic pads produce less dust (30-40% reduction) and operate 100-150°F cooler than metallic compounds, significantly reducing thermal stress on rotors.
Should You Resurface or Replace Brake Rotors?
Resurfacing or replacing brake rotors depends on thickness measurements, surface condition, and cost considerations, with resurfacing appropriate when rotors have sufficient material above minimum specifications and only minor surface imperfections. Most manufacturers recommend replacement rather than resurfacing when rotors are within 0.5mm of minimum thickness or have heat cracks, deep grooves exceeding 0.060″ (1.5mm), or severe corrosion.
Resurfacing vs. Replacement Cost Analysis
| Option | DIY Cost | Shop Cost | Pros | Cons |
|---|---|---|---|---|
| Resurfacing | $15-25 per rotor | $30-50 per rotor | Lower cost, maintains OEM specs | Reduced heat capacity, shorter lifespan |
| Economy Replacement | $40-70 per rotor | $120-200 per axle | Full thickness, new surface | Lower quality materials, faster wear |
| Premium Replacement | $80-150 per rotor | $250-400 per axle | Better materials, longer lifespan | Higher initial cost |
Resurfacing Limitations
Modern thin-hat rotors often cannot be safely resurfaced as they lack sufficient material. Most manufacturers now recommend replacement rather than resurfacing, as removing 0.015-0.020″ (0.38-0.51mm) per side reduces heat capacity by 10-15%. For vehicles with ABS and traction control, new rotors maintain more consistent surface characteristics for sensor operation.
When is resurfacing still the better option?
Resurfacing makes sense for vehicles with expensive or discontinued rotors where replacements cost $200+ each. Also, if rotors have plenty of thickness but only minor surface irregularities from pad impressions, a light resurfacing of 0.004-0.006″ (0.10-0.15mm) can restore flatness without significantly affecting heat capacity. Always measure rotor thickness before deciding.
How Much Does It Cost to Replace Brake Rotors?
Brake rotor replacement costs typically range from $250-500 per axle for standard vehicles, with performance applications reaching $800-1,200 per axle, depending on rotor quality, vehicle complexity, and labor rates. DIY rotor replacement can reduce costs by 60-70%, with parts typically costing $80-200 per axle for standard vehicles and $200-600 per axle for performance applications.
Brake Rotor Replacement Cost Breakdown
| Vehicle Type | DIY Parts Cost | Shop Cost (Parts + Labor) | Labor Time | Additional Costs |
|---|---|---|---|---|
| Compact Car | $80-120 | $250-350 | 1.5-2.0 hours | Brake fluid $15-30 |
| Midsize Sedan | $100-160 | $300-450 | 1.5-2.5 hours | Brake fluid $20-40 |
| SUV/Truck | $140-220 | $400-600 | 2.0-3.0 hours | Brake fluid $25-45 |
| Performance Vehicle | $250-600 | $600-1,200 | 2.5-4.0 hours | High-temp fluid $50-80 |
Insider Secret: Save Money on Rotor Replacement
Many shops charge 2-3 hours labor for rear rotor replacement on vehicles with drum-in-hat parking brakes, but experienced technicians can complete the job in 1-1.5 hours. Ask for a quote based on actual book time rather than “flat rate” pricing. Also, consider replacing rotors during pad replacement to avoid duplicate labor charges later.
Are premium rotors worth the extra cost?
Premium rotors typically offer 30-50% longer lifespan through better materials and design features. High-carbon rotors reduce noise and vibration by 40-60% compared to economy options. For daily drivers, the extra $50-100 per axle investment pays for itself in extended service intervals and improved braking performance, especially in wet conditions where premium designs offer 10-15% better stopping power.
How to Replace Brake Rotors: Step-by-Step Guide
Replacing brake rotors requires basic mechanical tools, proper safety equipment, and attention to detail, typically taking 1.5-3 hours per axle depending on experience and vehicle design. The process involves wheel removal, caliper service, rotor replacement, and proper assembly with torque specifications typically ranging from 80-120 ft-lbs for caliper bolts and 80-100 ft-lbs for lug nuts.
Critical Safety Precautions
Never work under a vehicle supported only by a jack—always use quality jack stands rated for at least 1.5 times the vehicle’s weight. Wear safety glasses when working with brake components, as brake dust contains harmful materials. Allow brakes to cool completely before beginning work, as hot components can cause severe burns in seconds.
- Park on level ground and engage the parking brake. Place wheel chocks behind the wheels opposite the end you’re working on.
- Loosen lug nuts with a **19mm or 21mm lug wrench** while the vehicle is still on the ground, using a star pattern.
- Lift the vehicle with a **2-3 ton floor jack** at the manufacturer-recommended jack point, typically a reinforced area on the subframe.
- Secure the vehicle on jack stands positioned at the reinforced frame points, never on suspension components.
- Remove the wheel completely and set it aside, preferably on a clean cardboard surface to prevent scratching.
- Inspect brake components for leaks, damage, or uneven wear before proceeding with disassembly.
- Remove caliper bolts using a **13mm or 14mm socket** or **hex bit** (typically 7mm or 8mm), noting any directional washers.
- Support the caliper with a bungee cord or wire—never let it hang by the brake hose as this can cause damage.
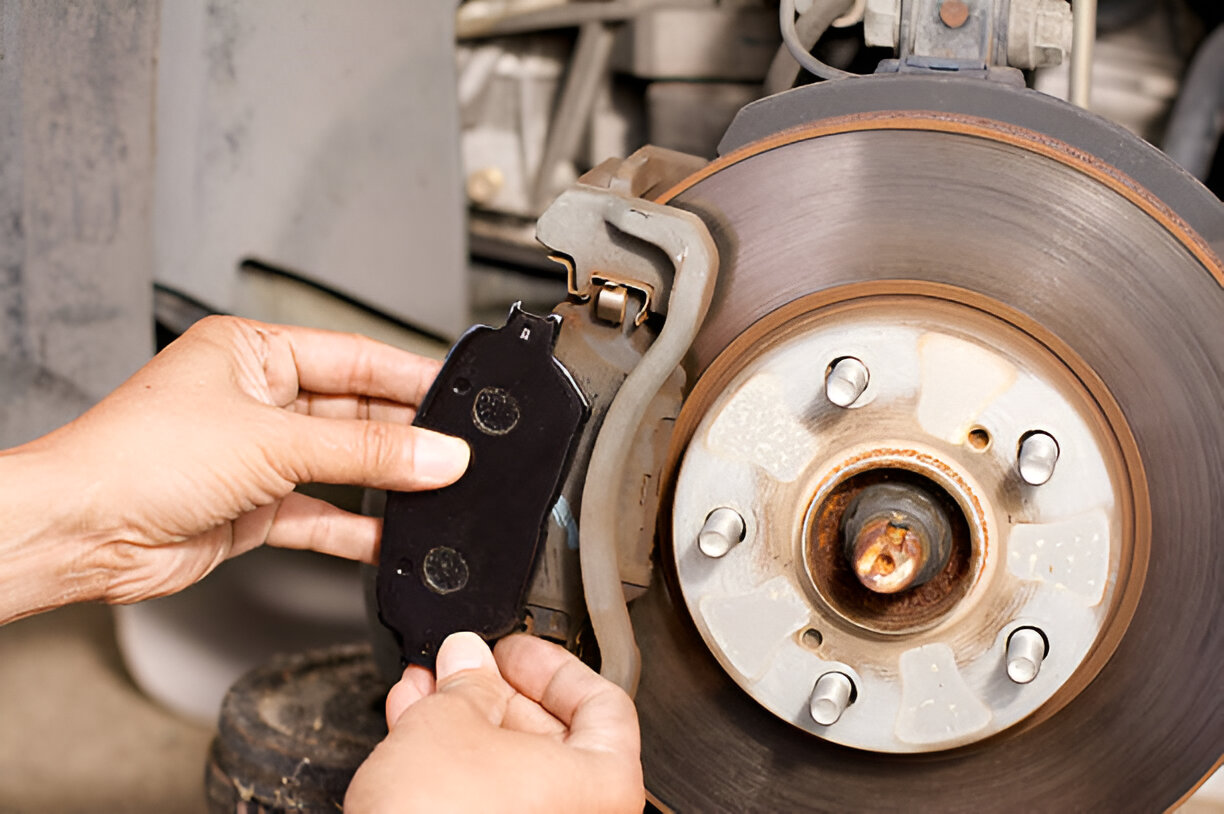
- Remove the brake pads by sliding them out of the caliper bracket, noting any wear indicators or shims.
- Remove the caliper bracket using a **15mm, 17mm, or 18mm socket**, typically with two bolts requiring 70-90 ft-lbs of torque.
- Remove the rotor—if stuck, tap with a rubber mallet or use a **3-jaw puller** with 8″ arms for stubborn cases.
- Clean the hub surface with a wire brush and **80-grit sandpaper** to remove rust and ensure proper rotor seating.
- Install the new rotor with any directional arrows pointing in the correct rotation direction.
- Clean and lubricate caliper slide pins with high-temperature brake grease, checking for smooth movement.
- Reinstall the caliper bracket and torque to manufacturer specifications, typically 70-90 ft-lbs.
- Install new brake pads with any required shims or anti-squeal lubricant on the back plates.
- Compress the caliper piston using a **C-clamp** or caliper compressor tool, opening the bleeder screw if necessary.
- Reinstall the caliper and torque bolts to manufacturer specifications, typically 25-35 ft-lbs for slide pin bolts.
- Reinstall the wheel and hand-tighten lug nuts in a star pattern before lowering the vehicle.
- Torque lug nuts to manufacturer specifications, typically 80-100 ft-lbs for most passenger vehicles.
- Pump the brake pedal several times to seat the pads before moving the vehicle.
- Perform a break-in procedure following the pad manufacturer’s recommendations, typically 10-15 moderate stops from 30mph.
Common Rotor Replacement Mistakes
Many DIYers forget to clean the hub surface, creating runout issues that mimic warped rotors. Also, failing to lubricate caliper slide pins properly can cause uneven pad wear and premature rotor damage. Always use brake-specific lubricant on slide pins—never general-purpose grease, which breaks down at brake operating temperatures.
Pro Tip: The Bedding Procedure
Proper bedding transfers a thin, even layer of pad material to the rotor surface, maximizing braking performance. Perform 10-15 moderate stops from 30mph with 30-second cooling intervals between stops. This creates temperatures of 400-600°F (204-315°C) for optimal pad transfer. Avoid hard stops during the first 200 miles after installation.
Do you need to bleed brakes after rotor replacement?
Brake bleeding isn’t necessary for rotor replacement alone unless you opened the hydraulic system. However, if you compressed the caliper piston without opening the bleeder screw on vehicles with ABS, you may need to perform a system bleed. Always check brake fluid level after completing the job and top off with the correct DOT fluid (typically DOT 3 or DOT 4).
Mechanic’s Perspective: Final Thoughts on Rotor Replacement
After 15 years behind the wrench, I’ve learned that proper rotor maintenance is about more than just measurements—it’s about understanding the entire braking system as a thermal management unit. Quality rotors with proper installation and bedding procedures can last 50,000+ miles even in demanding conditions, while cutting corners can lead to premature failure in under 10,000 miles. For DIY mechanics, the key takeaway is to measure twice, install once, and never skip the bedding procedure.
For most enthusiasts, rotor replacement falls in the moderate difficulty range (6/10) with total DIY costs of $120-300 for most vehicles depending on rotor quality. The investment in quality parts and proper tools pays dividends in safety and performance. Remember that your brakes are the single most important safety system on your vehicle—when in doubt, consult a professional technician rather than risking incomplete repairs.
Modern braking systems are more sophisticated than ever, with ABS, traction control, and electronic stability integration all depending on properly functioning rotors. While the basic principles remain the same, attention to detail has never been more critical. Take your time, follow torque specifications precisely, and always perform a road test in a safe area before returning to normal driving conditions.