
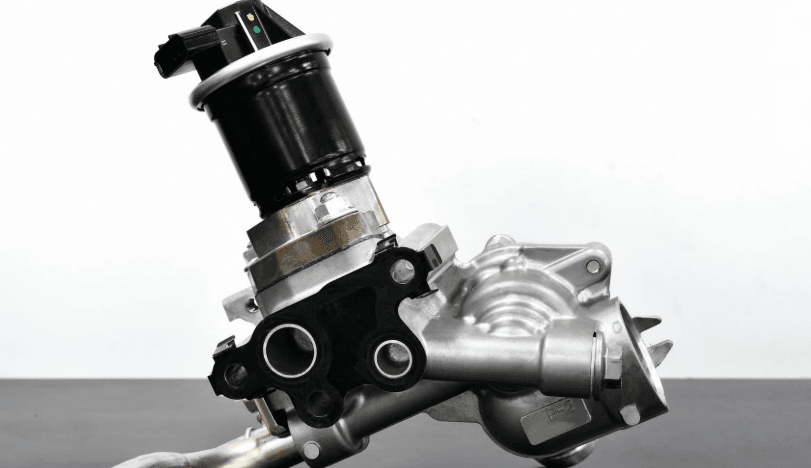
The Customer Who Swore It Was Not the EGR
A 2014 Ford F-150 rolled into my bay last winter. The owner had a P0401 code that would not stay gone. He had already replaced the EGR valve twice. Two different mechanics had cleaned the passages. The light kept coming back within a week.
I hooked up my scanner and pulled the freeze frame data. The DPFE sensor voltage was reading 0.2 volts at idle. That is way too low. I backprobed the connector with a multimeter and found the 5-volt reference circuit was dropping to 3.8 volts under load. The wiring harness had a pin drag issue inside the connector. A $12 pigtail fixed what two EGR valves and a carbon cleaning could not.
That is the thing about EGR valve diagnosis. The valve itself is usually the last suspect. The sensor, the wiring, the vacuum supply, and the passages all fail more often. This guide shows you how to test each one before you spend money on parts you do not need.
How EGR Systems Actually Work
The exhaust gas recirculation system routes a controlled portion of exhaust gases back into the intake manifold. Those inert gases displace oxygen. That lowers peak combustion temperatures. Lower temps mean less nitrogen oxide, or NOx, formation.
There are three main types of EGR valves you will encounter in 2026.
Pneumatic EGR valves use engine vacuum to open the valve diaphragm. A vacuum solenoid controlled by the engine computer decides when to apply vacuum. These are common on older vehicles, typically pre-2010.
Electronic EGR valves use an internal electric motor to position the valve pintle. A position sensor feeds back to the computer so it knows exactly how far the valve is open. These are standard on most vehicles built after 2010.
Cooled EGR systems pass exhaust gases through a heat exchanger before they reach the intake. The cooler drops gas temperature by 200 to 300 degrees Fahrenheit. This allows more exhaust gas to be recirculated without hurting combustion efficiency. Cooled EGR is common on modern diesels and direct-injection gas engines.
The engine computer monitors EGR flow using one of several methods. Ford uses a DPFE sensor that measures pressure difference across a restriction in the EGR tube. GM and many imports use the MAP sensor to detect the slight vacuum drop when EGR opens. Some systems use a dedicated EGR position sensor built into the valve itself.
Common EGR Fault Codes and What They Mean
Here are the codes I see most often in the shop. Each one points to a different part of the system.
- P0400: EGR flow malfunction. The computer detected a general problem but could not pinpoint it.
- P0401: EGR insufficient flow detected. This is the big one. Usually means a clogged valve, blocked passages, or a failed DPFE sensor.
- P0402: EGR excessive flow detected. The valve is stuck open or the sensor thinks it is open when it should be closed.
- P0403: EGR circuit malfunction. Electrical problem, not mechanical.
- P0404: EGR circuit range or performance. The valve is not moving to the position the computer commanded.
- P0405: EGR sensor A circuit low. Usually a short to ground in the position sensor wiring.
- P0406: EGR sensor A circuit high. Usually a short to power or an open circuit.
- P1403: EGR solenoid low. Vacuum solenoid circuit issue on pneumatic systems.
- P1404: EGR system closed valve pintle error. The valve is not seating fully when closed.
- P1406: EGR system pintle position error. The position sensor feedback does not match the commanded position.
If your scanner shows any of these, do not just clear the code and hope. The computer set it for a reason. The tests below will tell you exactly why.
Tools You Need for EGR Valve Diagnosis
Must-Have Tools:
- OBD-II scanner with live data ($50 to $150)
- Digital multimeter ($30 to $60)
- Hand vacuum pump with gauge ($30 to $45)
- Basic socket set (10mm, 12mm, 13mm most common)
- Flashlight or borescope ($20 to $80)
- Safety glasses and gloves
Nice to Have:
- Automotive oscilloscope for watching sensor waveforms
- Smoke machine for finding vacuum leaks
- Ultrasonic cleaner for valve cleaning
- Backprobe pins for testing connectors without piercing wires
Total investment if starting from scratch: under $200. That is less than one shop diagnostic fee.

Autel AL539 OBD2 Scanner with Built-In Multimeter
Reads all EGR-related codes including P0400 through P1406. Shows live data streams, freeze frame, and I/M readiness. The built-in multimeter saves you from carrying two tools. Perfect for backprobing sensors and checking reference voltage.
Step-by-Step EGR Valve Diagnosis
- Pull the codes and freeze frame data.
Connect your scanner. Write down the exact code. Check freeze frame to see engine temp, RPM, and vehicle speed when the code set. This tells you if the failure happens at idle, cruise, or under load. - Check for technical service bulletins.
Before you touch anything, look up TSBs for your year, make, and model. Ford had massive DPFE sensor recalls. BMW had EGR cooler recalls on N47 and N57 diesels. GM had wiring harness issues on certain trucks. A TSB can save you hours of unnecessary testing. - Visual inspection of the entire system.
Look at vacuum lines for cracks or splits. Check electrical connectors for corrosion, bent pins, or oil contamination. Inspect the EGR tube for cracks or rust holes. On cooled systems, look for coolant residue around the cooler. - Test EGR valve operation with a vacuum pump.
On pneumatic valves, disconnect the vacuum hose. Apply 10 to 15 inches of vacuum with a hand pump. The diaphragm should move smoothly. The engine should stumble or stall if you do this at idle. If nothing happens, the valve is stuck or the diaphragm is torn. - Test the EGR solenoid.
Unplug the solenoid connector. Use your multimeter on ohms. Most EGR solenoids read 20 to 50 ohms across the coil terminals. If you get an open circuit, the coil is burned out. If you get zero ohms, it is shorted internally. - Test the DPFE sensor (Ford systems).
Backprobe the connector with the key on, engine off. The 5-volt reference wire should read 4.8 to 5.2 volts. The signal wire should read 0.2 to 1.0 volt at idle with no EGR flow. Apply suction to the reference port. The signal voltage should climb smoothly toward 4.5 volts. If it does not change, the sensor is dead. - Test electronic EGR valve position sensor.
With the harness disconnected, measure resistance across the position sensor terminals. Most read 1.0 to 4.5 kilo-ohms depending on valve position. With the harness connected and key on, the signal voltage should change smoothly as you manually rotate the pintle. Any dead spots or jumps mean the sensor is worn. - Check EGR valve coil resistance.
On electronic EGR valves, the motor coil resistance is typically 4 to 12 ohms. Measure across the coil terminals with the harness unplugged. Open circuit means a broken winding. Zero ohms means a short. Both require valve replacement. - Command the valve with a scanner.
Use bi-directional controls if your scanner has them. Command the EGR valve to open 10 percent, then 50 percent, then 100 percent. Watch the position sensor feedback. It should track the commanded value within 5 percent. If it lags or overshoots, the valve motor is weak or the pintle is sticking. - Inspect the passages for carbon buildup.
Remove the valve if all electrical tests pass. Shine a flashlight into the intake ports. Carbon buildup looks like hard black rock. On Honda and Toyota 4-cylinders, the ports can clog completely solid. A borescope helps you see deep into the manifold without disassembling everything. - Test for EGR cooler leaks (cooled systems).
On BMW diesels and modern gas direct-injection engines, remove the EGR cooler inlet pipe. Look inside for damp, gooey soot. Dry soot is normal. Wet or oily soot means coolant is leaking into the exhaust stream. Pressure test the cooling system with the EGR cooler isolated. A drop in pressure confirms internal leakage.
Never apply direct battery voltage to an electronic EGR valve motor. The internal motor is designed for pulsed signals from the computer. Full battery voltage will burn out the coil in seconds. Use a scanner or a dedicated EGR tester for electronic valves.
Testing Pneumatic EGR Valves
Pneumatic EGR valves are the simplest to test. They have three main parts. The valve body with a diaphragm. A vacuum solenoid controlled by the computer. And on some systems, a temperature or position sensor.
Start with the vacuum supply. Disconnect the hose from the solenoid and check for manifold vacuum at idle. You should see 15 to 20 inches of mercury. Low vacuum means a leak upstream or a restricted vacuum source.
Next, test the solenoid. Unplug the electrical connector. Measure coil resistance. Most Ford EGR solenoids read 26 to 40 ohms. GM units are similar. An open circuit means the coil is burned. Zero ohms means it is shorted.
Apply 12 volts directly to the solenoid terminals using jumper wires. You should hear a distinct click. No click means the coil is open or the plunger is stuck. If it clicks, apply vacuum to the inlet port. The outlet port should hold vacuum when the solenoid is off and pass vacuum when energized.
Now test the valve itself. Remove it from the engine. Apply vacuum to the diaphragm port. The valve should open smoothly against spring pressure. Release vacuum. It should snap closed. Any hesitation, sticking, or vacuum leak means the diaphragm is torn or the pintle is carbon-welded in place.
Testing Electronic EGR Valves
Electronic EGR valves are more complex but also more precise. They contain a DC motor, a position sensor, and sometimes a temperature sensor. The computer sends a pulse-width modulated signal to the motor. The position sensor tells the computer exactly where the pintle sits.
The first test is resistance. Unplug the connector. Identify the motor coil terminals using a wiring diagram. Measure resistance. Most coils read 4 to 12 ohms. Some newer valves use stepper motors instead of DC motors. Those will read different resistance values, so check the spec for your exact valve.
Next, test the position sensor. With the harness disconnected, measure resistance across the sensor terminals. Slowly rotate the pintle by hand. The resistance should change smoothly from one extreme to the other. Any dead spots or open circuits mean the sensor track is worn.
With the harness connected and key on, backprobe the sensor signal wire. The voltage should read approximately 0.5 to 1.0 volt when the valve is closed. Manually rotate the pintle open. The voltage should climb toward 4.5 volts. If the voltage jumps or drops out, the sensor is failing.
If your scanner has bi-directional controls, command the valve to open in 10 percent increments. Watch the position sensor voltage. It should track within 5 percent of the commanded value. A lag of more than 2 seconds or an overshoot past the target means the motor is weak or the pintle is binding.

Mityvac MV8500 Silverline Elite Hand Vacuum Pump
Essential for testing EGR valve diaphragm operation, vacuum solenoids, and brake boosters. Includes gauge, hoses, and multiple adapters. Accurate to 1 inch of mercury. A shop staple for any emissions diagnosis.
DPFE Sensor Testing (Ford and Mazda Systems)
The DPFE sensor is the most misdiagnosed part of the Ford EGR system. It measures pressure difference across a small restriction in the EGR tube. When exhaust gas flows, pressure on the upstream side is higher than the downstream side. The sensor converts that difference to a voltage signal.
Here is the test procedure I use on every Ford with a P0401.
With the key on and engine off, backprobe the connector. The 5-volt reference should read 4.8 to 5.2 volts. The signal wire should read 0.2 to 1.0 volt. The ground wire should read less than 0.1 volt.
Start the engine. At idle with the EGR valve closed, the signal should still read near 0.2 to 0.5 volt. Now apply vacuum to the EGR valve to open it manually. The signal voltage should climb to 2.0 to 4.0 volts depending on how much the valve opens. If the voltage does not climb, either the valve is not opening or the sensor is not detecting flow.
Remove the two hoses from the DPFE sensor. Apply suction to the reference port with your mouth or a vacuum pump. The signal voltage should climb smoothly toward 4.5 volts. Release suction. It should drop back to near zero. If the voltage is stuck high or low, the sensor is dead.
Check the hoses themselves. The original Ford hoses are silicone and last about 80,000 miles before cracking. I have seen dozens of P0401 codes caused by cracked DPFE hoses that let exhaust leak out before reaching the sensor. Replacement hoses are $15 and take 10 minutes.
EGR Cooler Leak Testing
Cooled EGR systems add another failure point. The cooler can develop internal leaks that let coolant enter the exhaust stream. This is especially common on BMW N47, B47, and N57 diesel engines. BMW issued a massive recall covering roughly 1.6 million vehicles for this exact issue.
The symptoms are subtle at first. You will lose coolant slowly with no visible leak. The exhaust may smell sweet. White steam might appear on cold startup. Oil analysis may show elevated sodium levels.
Here is how I test for EGR cooler leaks.
First, remove the inlet pipe from the cooler to the intake. Shine a flashlight inside. Normal soot is dry and powdery. Coolant contamination looks like damp, greasy sludge. If you see wet soot, the cooler is leaking internally.
Next, pressure test the cooling system with the EGR cooler isolated. Disconnect the coolant lines and cap them. Pressurize the cooling system to 15 PSI. Watch the gauge for 30 minutes. A drop of more than 2 PSI means an internal leak.
On BMW diesels, check your VIN against the NHTSA recall database before doing any work. If your vehicle is affected, BMW will replace the cooler and intake manifold at no cost. Do not pay for a repair that should be free.
Interpreting EGR Live Data with Your Scanner
Live data is where the real diagnosis happens. A code only tells you the computer saw a problem. Live data tells you what the computer saw in real time.
Here are the PIDs I watch on every EGR diagnosis.
EGR commanded position: This shows what percent open the computer wants the valve. At idle, it should read 0 percent. At cruise, it might read 10 to 30 percent. Under hard acceleration, it should drop to 0 percent.
EGR actual position: This is the feedback from the position sensor. It should track the commanded position within 5 percent. A big gap means the valve is not responding.
EGR error: Some scanners show the difference between commanded and actual. Anything over 10 percent is a problem.
DPFE voltage (Ford): At idle, 0.2 to 0.5 volt. With EGR flowing, 2.0 to 4.0 volts. Stuck at 0 or 5 volts means sensor failure.
MAP sensor (GM and imports): When the EGR opens, manifold vacuum should drop slightly. If MAP does not change when EGR is commanded, the valve is not opening or the passages are blocked.
Short-term fuel trim: When EGR opens, the mixture gets slightly leaner. Fuel trim should move positive by 3 to 8 percent. No change means no EGR flow.
Common EGR Misdiagnosis Traps
I have seen good mechanics throw parts at EGR codes and get nowhere. Here are the traps that waste time and money.
Replacing the valve when the passages are clogged. A new valve on clogged ports will still throw P0401. Always inspect the intake ports before installing a new valve.
Replacing the valve when the DPFE sensor is bad. On Ford systems, a failed DPFE sensor is three times more common than a failed valve. Test the sensor first.
Ignoring the wiring harness. I have fixed more EGR codes by repairing corroded connectors than by replacing valves. Pin drag, green corrosion, and chafed wires are common on vehicles over 10 years old.
Forgetting to relearn the valve. Many electronic EGR valves require a relearn procedure after replacement. The computer needs to learn the fully open and fully closed positions. Skip this step and the valve may not operate correctly.
Assuming P0401 always means a clogged valve. On some vehicles, P0401 sets when the EGR cooler is restricted. On others, it sets when the EGR temperature sensor fails. Always check the factory diagnostic tree for your specific vehicle.
EGR Diagnostic Decision Tree
Use this flowchart to avoid guessing.
Step 1: Pull codes. Is it P0401, P0402, P0403, or P1404?
Step 2: Check TSBs and recalls. Any open campaigns for your VIN?
Step 3: Visual inspection. Vacuum lines cracked? Connectors corroded? Coolant leaking?
Step 4: Test the sensor. DPFE voltage correct? Position sensor tracking?
Step 5: Test the valve. Diaphragm moves? Motor runs? Pintle free?
Step 6: Test the passages. Carbon buildup visible? Ports clear?
Step 7: Test the cooler. Wet soot inside? Pressure drop when isolated?
Step 8: Test the wiring. Reference voltage stable? Ground clean? Signal wire intact?
If you follow this order, you will find the real problem before you spend a dime on parts.
EGR System Test Specifications
| Component | Test | Normal Reading |
|---|---|---|
| Pneumatic EGR diaphragm | Vacuum pump test | Holds 15 inHg, moves smoothly |
| EGR solenoid coil | Resistance | 20–50 ohms |
| Electronic EGR motor coil | Resistance | 4–12 ohms |
| EGR position sensor | Voltage (closed) | 0.5–1.0 volt |
| EGR position sensor | Voltage (open) | 4.0–4.5 volts |
| DPFE sensor (Ford) | Signal voltage (idle) | 0.2–0.5 volt |
| DPFE sensor (Ford) | Signal voltage (flowing) | 2.0–4.0 volts |
| 5-volt reference circuit | Voltage (KOEO) | 4.8–5.2 volts |
| Sensor ground circuit | Voltage drop | Less than 0.1 volt |
| EGR cooler | Pressure test (isolated) | Holds 15 PSI for 30 minutes |
Always verify specifications for your exact year, make, and model using the factory service manual. These are typical values. Your vehicle may differ.

Fluke 117 Digital Multimeter with True RMS
Auto-ranging, true RMS accuracy, and built-in non-contact voltage detection. Reads DC millivolts for sensor testing and ohms for coil resistance. The gold standard for automotive electrical diagnosis. Worth every penny.
Cost Analysis: DIY Diagnosis vs Shop Diagnosis in 2026
Estimated Cost Breakdown
🔧 DIY Diagnosis
- OBD2 scanner$50–$150
- Multimeter$30–$60
- Vacuum pump$30–$45
- Total one-time investment$110–$255
🏪 Professional Diagnosis
- Diagnostic fee$100–$150
- Hourly labor for testing$100–$150/hr
- Total typical bill$150–$400
A good scanner and multimeter pay for themselves on the first diagnosis. I have saved customers hundreds by finding a $15 wiring pigtail instead of a $250 EGR valve replacement.
When to Clean, When to Replace
Not every EGR code needs a new valve. Here is how I decide in the shop.
Clean the valve if: The pintle moves freely but is coated in carbon. The diaphragm holds vacuum. The position sensor tracks smoothly. The passages are clogged but the valve itself is mechanically sound.
Replace the valve if: The diaphragm is torn or leaking. The motor coil is open or shorted. The position sensor has dead spots. The pintle is physically damaged or worn. The valve has been cleaned before and the code returned.
Replace the cooler if: You find wet soot inside the intake pipe. The pressure test shows a leak. Your VIN is affected by a recall. The coolant loss is steady and no external leak is visible.
Fix the wiring if: The 5-volt reference is low. The ground has voltage drop. The signal wire is open or shorted. The connector pins are corroded or spread.
FAQ: Real Questions from the Shop
-
What is the most common cause of P0401?
On most vehicles, carbon buildup in the EGR passages is the most common cause. On Ford trucks, a failed DPFE sensor is actually more common than a bad valve. Always test the sensor before replacing the valve. -
Can I test an EGR valve without removing it?
Yes, on pneumatic valves you can apply vacuum with a hand pump while the engine runs. The engine should stumble. On electronic valves, use a scanner with bi-directional controls to command the valve open. Watch the position sensor feedback and listen for the motor. -
How do I know if my DPFE sensor is bad?
Backprobe the connector with a multimeter. The signal voltage should read 0.2 to 0.5 volt at idle. Apply suction to the reference port. The voltage should climb toward 4.5 volts. If it stays stuck at zero or five volts, or does not change smoothly, the sensor is failed. -
What voltage should an EGR position sensor read?
Most position sensors read 0.5 to 1.0 volt when the valve is fully closed. They read 4.0 to 4.5 volts when fully open. The voltage should change smoothly as the pintle moves. Any dead spots, jumps, or erratic readings mean the sensor track is worn. -
Can a bad EGR valve cause a misfire?
Yes, but indirectly. A stuck-open EGR valve dumps exhaust into the intake at idle. That dilutes the air-fuel mixture and can cause a lean misfire. A stuck-closed valve raises combustion temps and can cause pinging, which feels like a misfire under load. -
How do I test for an EGR cooler leak?
Remove the inlet pipe from the cooler to the intake. Look inside for damp, greasy soot. Dry soot is normal. Wet soot means coolant is leaking. Pressure test the cooling system with the cooler isolated. A drop in pressure confirms an internal leak. -
Do I need a scanner to diagnose EGR problems?
You need at minimum a basic OBD2 code reader to pull the fault codes. A full-featured scanner with live data and bi-directional controls makes diagnosis much faster. You can do basic tests with a multimeter and vacuum pump alone, but the scanner tells you what the computer is seeing. -
Why does my EGR code keep coming back after cleaning?
Three common reasons. One, the passages were not cleaned thoroughly enough. Two, the sensor is still failing even though the valve is clean. Three, the wiring harness has an intermittent fault that only shows up when the engine is hot or vibrating. Test all three before cleaning again.
A Mechanic’s Take
EGR valve diagnosis is one of those jobs where the code is easy to pull but the cause is often hidden. I have seen $800 estimates for EGR valve replacement when the real fix was a $15 DPFE hose. I have seen customers replace three valves when the intake ports were packed solid with carbon.
The key is testing in the right order. Codes first. Then visual inspection. Then sensor testing. Then valve testing. Then passage inspection. Then cooler testing. Then wiring. Skip a step and you will guess wrong.
The good news is that most EGR diagnosis requires only basic tools. A scanner. A multimeter. A vacuum pump. And patience. With those three things and this guide, you can find the real problem before you spend a dime on parts.
From my side of the toolbox, the rule is simple: test before replacing. The EGR valve is usually the last thing that fails. The sensor, the wiring, and the carbon are the real culprits most of the time.