
Last Tuesday afternoon, a panicked customer pulled into our bay with steam billowing from under her hood. She’d been sitting in bumper-to-bumper traffic on I-95 when her temperature gauge suddenly pinned itself in the red zone. “I just had the oil changed last week,” she said, as if that should’ve prevented this. I popped the hood and immediately knew we were dealing with something I see at least twice a week—a failing thermostat that finally gave up the ghost on the hottest day of summer.
After fifteen years turning wrenches and diagnosing thousands of overheating engines, I can tell you that engine overheating causes aren’t as mysterious as most people think. In fact, about 80% of the overheating cases that roll into our shop stem from just five common problems. The difference between a $40 DIY fix and a $2,500 head gasket replacement often comes down to catching the warning signs early and knowing exactly where to look.
In this guide, I’m going to walk you through the real-world causes of an overheating engine, the diagnostic steps I use every single day, and the quick fixes that’ll get you back on the road without emptying your wallet. Whether you’re dealing with high temperature warnings right now or just want to prevent coolant problems down the line, I’ll share the same technical knowledge and shop tricks I’ve learned from years of actually doing this work.
Understanding How Your Engine Cooling System Actually Works
Before we dive into troubleshooting, you need to understand what’s happening under that hood. Your engine generates enough heat to literally melt metal—we’re talking combustion temperatures around 2,500°F. The cooling system’s job is to maintain operating temperature between 195-220°F, and it does this through a surprisingly simple loop.
The water pump (driven by your serpentine belt) pushes coolant through passages in the engine block and cylinder head, absorbing heat as it goes. This hot coolant then flows to the radiator, where it releases that heat to the outside air through thousands of thin aluminum fins. The thermostat acts as a gatekeeper, staying closed when the engine is cold to help it warm up quickly, then opening at around 195°F to allow coolant flow.
When any part of this system fails, you get engine temperature problems. The gauge climbs, the warning light comes on, and if you ignore it long enough, you’ll be looking at warped heads, blown gaskets, or worse—a seized engine that’s nothing but scrap metal.
The Five Most Common Engine Overheating Causes (And How to Spot Them)
1. Low Coolant Level – The #1 Culprit
I check this first every single time because it accounts for nearly half of all overheating complaints. Not enough coolant means not enough heat absorption, plain and simple. Here’s what makes this tricky: the leak might be so slow you never see puddles under your car.
I had a 2015 Honda Accord in last month where the customer swore there was no leak. We pressure tested the system to 16 PSI and found coolant seeping from a pinhole in the radiator end tank—losing maybe two ounces per week. Over six months, that’s enough to drop the level below the water pump inlet, causing air pockets and overheating.
Symptoms of low coolant:
- Temperature gauge rises during highway driving or hot weather
- Heater blows cold air at idle but warm when accelerating
- Sweet smell (ethylene glycol) from vents or under hood
- White steam from tailpipe (if it’s leaking internally into cylinders)
Common leak locations:
- Radiator hoses and clamps ($15-40 per hose)
- Water pump weep hole ($150-400 with labor)
- Radiator tanks or core ($250-600 for replacement)
- Heater core (you’ll smell it inside the car, $400-1,000 to replace)
- Head gasket (the nightmare scenario, $1,500-2,500)
To diagnose this properly, you need a cooling system pressure tester. I use the Stant 12270—it’s $45 on Amazon and has paid for itself a hundred times over. Pump it up to your radiator cap’s pressure rating (usually 13-16 PSI, stamped right on the cap), and watch for drops. If you lose more than 1 PSI in 15 minutes, you’ve got a leak.
2. Failed Thermostat – The Silent Killer
Thermostats fail in one of two ways: stuck closed (causing overheating) or stuck open (engine never reaches operating temperature). The stuck-closed scenario is what we’re concerned with here, and it’s responsible for about a quarter of all overheating cases I see.
The problem with thermostats is they fail without warning. One day it’s opening and closing perfectly at 195°F, the next day it’s welded shut by corrosion or a broken spring. I’ve pulled out thermostats that looked perfect on the outside but wouldn’t open if you heated them with a torch.
Symptoms of a stuck thermostat:
- Engine reaches normal temperature, then suddenly spikes into the red
- Upper radiator hose stays cold while engine overheats (thermostat stuck closed)
- Temperature fluctuates wildly between normal and hot
- Engine overheats in traffic but cools down on the highway (sometimes indicates partially stuck thermostat)
Here’s my field test: start the engine cold and let it idle. Place your hand on the upper radiator hose (carefully—don’t touch moving belts). When the engine reaches about 200°F on the gauge, that hose should get hot quickly as the thermostat opens. If the engine’s overheating but the upper hose stays cold, your thermostat is stuck closed.
For most vehicles, thermostat replacement is a 30-45 minute job. On a 2012 Toyota Camry 4-cylinder, for example, you need a 10mm socket, a drain pan, about a gallon of 50/50 pre-mixed coolant, and a new thermostat with gasket. The OEM Aisin thermostat (part# THT-003) runs $28 and will last 100,000+ miles. Those $12 Stant or Gates aftermarket units? I’ve seen them fail in under 40,000 miles about 30% of the time.
3. Clogged or Damaged Radiator – The Heat Exchanger Problem
Your radiator is essentially a giant heat exchanger with hundreds of thin aluminum fins and tubes. When these get blocked—either internally with sediment or externally with bugs, leaves, and road debris—the radiator can’t dissipate heat efficiently. This is especially common in older vehicles (10+ years) that haven’t had regular coolant changes.
I pulled a radiator out of a 2010 Chevy Silverado last month that was so clogged internally, I could barely blow air through it. The owner had never changed the coolant in 185,000 miles. The old coolant had turned into a rust-colored sludge that coated every tube. At that point, flushing won’t help—you need a new radiator.
External blockage symptoms:
- Overheats in slow traffic or at idle, cools down at highway speeds (opposite of thermostat problems)
- Visible debris, bugs, or leaves stuck in radiator fins
- Radiator fins bent or damaged (common after front-end impacts)
- AC condenser (mounted in front of radiator) blocking airflow
Internal blockage symptoms:
- Coolant looks rusty, brown, or has floating particles
- Overheating even with new thermostat and proper coolant level
- Cold spots on radiator surface when engine is hot (indicates blocked tubes)
- Coolant hasn’t been changed in 5+ years or 60,000+ miles
For external cleaning, you can carefully straighten bent fins with a radiator fin comb (get the 8-fin and 10-fin combo for $12) and flush out debris with a garden hose from the engine side outward—never spray from the front, as this pushes debris deeper into the fins.
Internal blockages require a radiator replacement. Expect to pay $250-400 for an aftermarket aluminum radiator for most passenger cars. I prefer Mishimoto or CSF radiators over the cheap overseas units—they’re thicker, better welded, and I’ve never had one leak within the first year like some of the budget brands.
Understanding the relationship between [why engine overheats, causes of overheating, engine temperature problems](fix-overheating-engine) and proper coolant maintenance can save you from expensive radiator replacements down the road.
4. Water Pump Failure – When the Heart Stops Pumping
The water pump is literally the heart of your cooling system, and when it fails, coolant stops circulating. On most modern engines, the water pump is driven by the timing belt or serpentine belt. I see two main failure modes: the bearing fails (causing wobble and noise), or the impeller corrodes and breaks apart (causing poor coolant flow with no external symptoms).
The bearing failure is easy to spot—you’ll hear a grinding or squealing noise from the front of the engine, and if you grab the water pump pulley with the engine off, you can feel play in the bearing. The impeller failure is sneaky. Everything looks fine externally, but the plastic or stamped-metal impeller has corroded away or broken, so it’s just spinning without moving coolant.
Last week, I diagnosed a 2016 Jeep Wrangler 3.6L that was overheating intermittently. Customer said it was fine around town but overheated on the highway. Coolant level was perfect, thermostat was new, radiator wasn’t clogged. I pulled the water pump and found the impeller had lost three of its six vanes. At idle, it moved enough coolant to keep temperatures normal. At highway speeds, the engine needed more cooling capacity, and that damaged impeller couldn’t deliver.
- Grinding, squealing, or growling noise from front of engine
- Coolant leak from weep hole under water pump (a small hole designed to show when the seal fails)
- Visible play in water pump pulley
- Overheating that doesn’t follow typical patterns (might overheat at highway speed with failed impeller)
- Rust-colored streaks on front of engine below water pump
Water pump replacement difficulty varies wildly by vehicle. On a 2010 Ford Escape 3.0L V6, the pump is right on the front of the engine—45 minutes of work, $95 for a Motorcraft pump, and about $30 in fresh coolant. On a 2014 Subaru Outback 2.5L, the pump is behind the timing cover—you’re looking at 4-5 hours of labor because you have to remove the timing belt, which means you should replace that too ($400-600 in parts plus 5-6 hours labor).
5. Blown Head Gasket or Cracked Head – The Expensive Problem
This is the diagnosis every mechanic hates giving and every customer hates hearing. A blown head gasket or cracked cylinder head allows combustion gases into the cooling system, or coolant into the cylinders, or both. It’s the most expensive common cause of overheating, and it’s almost always the result of ignoring earlier overheating episodes.
Here’s what happens: you let the engine overheat severely (usually above 260°F). The aluminum cylinder head expands faster than the iron block, or the head warps slightly, or the head gasket gets crushed and loses its seal. Now you’ve got 2,000+ PSI combustion pressure pushing into your cooling system, which can only handle 16 PSI.
I had a customer bring in a 2013 Nissan Altima last year after driving it while severely overheated. She said she “only drove it five miles” after the gauge hit the red. When I pulled the head, it was warped 0.018 inches across the deck surface. Spec is 0.002 inches maximum. We had to send it to the machine shop for resurfacing ($200), replace both head gaskets ($150), new head bolts ($80), and 12 hours of labor. Total bill: $2,340.
Blown head gasket symptoms:
- White smoke from exhaust (coolant burning in cylinders)
- Bubbles in coolant reservoir or radiator when engine is running
- Rapid coolant loss with no visible external leaks
- Oil looks like a chocolate milkshake (coolant mixing with oil)
- Sweet smell from exhaust
- Rough idle or misfiring after engine cools down
- Coolant pressurizes excessively (cap pops off or hoses bulge)
To confirm a head gasket failure, I use a combustion leak tester—basically a chamber filled with blue fluid that turns yellow when exposed to combustion gases. You place it over the radiator or reservoir opening with the engine running. If the fluid turns yellow within 30 seconds, you’ve got combustion gases in your coolant. The Block Tester BT-500 kit is $35 and comes with enough fluid for 12-15 tests.
There’s no quick fix for a blown head gasket. You’re replacing gaskets, possibly resurfacing heads, definitely replacing head bolts (they’re torque-to-yield on most modern engines and can’t be reused), and often replacing the thermostat, water pump, and radiator hoses while you’re in there. Budget $1,500-2,500 for a four-cylinder, $2,000-3,500 for a V6, and $3,000-5,000+ for a V8.
Step-by-Step Diagnostic Process (How I’d Diagnose Your Car)
When an overheating engine rolls into my bay, I follow the same systematic diagnostic process every time. This approach finds the problem in under 30 minutes about 90% of the time. Here’s exactly how I do it:
1 Visual inspection with engine cold (5 minutes)
First thing I do is pop the hood and look for obvious problems. Check coolant level in the reservoir—should be between MIN and MAX marks. Look at all hoses for cracks, swelling, or soft spots. Check for coolant stains or dried crusty residue (indicates old leaks). Look at the serpentine belt condition and make sure it’s actually turning the water pump pulley when someone cranks the engine.
2 Check for external leaks (5 minutes)
Get down low with a flashlight and look under the radiator, water pump, and around all hose connections. Fresh coolant leaks will be wet and colorful (usually green, orange, or pink). Old leaks leave white or greenish crusty deposits. Check the oil dipstick—if it looks milky or has coolant droplets, you’ve got an internal leak (head gasket territory).
3 Cold start thermostat test (10 minutes)
With the engine completely cold, start it and immediately feel the upper radiator hose. It should stay cold for the first 5-10 minutes, then get hot quickly when the thermostat opens (usually around 195°F on the gauge). If the hose gets warm immediately, the thermostat is stuck open. If the engine reaches 210°F+ and the hose is still cold, the thermostat is stuck closed.
4 Pressure test the cooling system (10 minutes)
This is where the pressure tester earns its keep. Let the engine cool, remove the radiator cap, attach the tester, and pump it up to the cap’s pressure rating (stamped on the cap—usually 13-16 PSI). Watch the gauge for 15 minutes. If pressure drops more than 1 PSI, you’ve got a leak. Now look for where coolant is dripping—that’s your leak location.
5 Check for combustion gases in coolant (5 minutes)
If you’ve ruled out external leaks, thermostat, and radiator issues, test for a blown head gasket. Use the combustion leak tester (block tester) over the radiator opening with the engine running. If the blue fluid turns yellow in under a minute, you’ve got exhaust gases pushing into your cooling system—blown head gasket or cracked head.
6 Inspect radiator cooling efficiency (5 minutes)
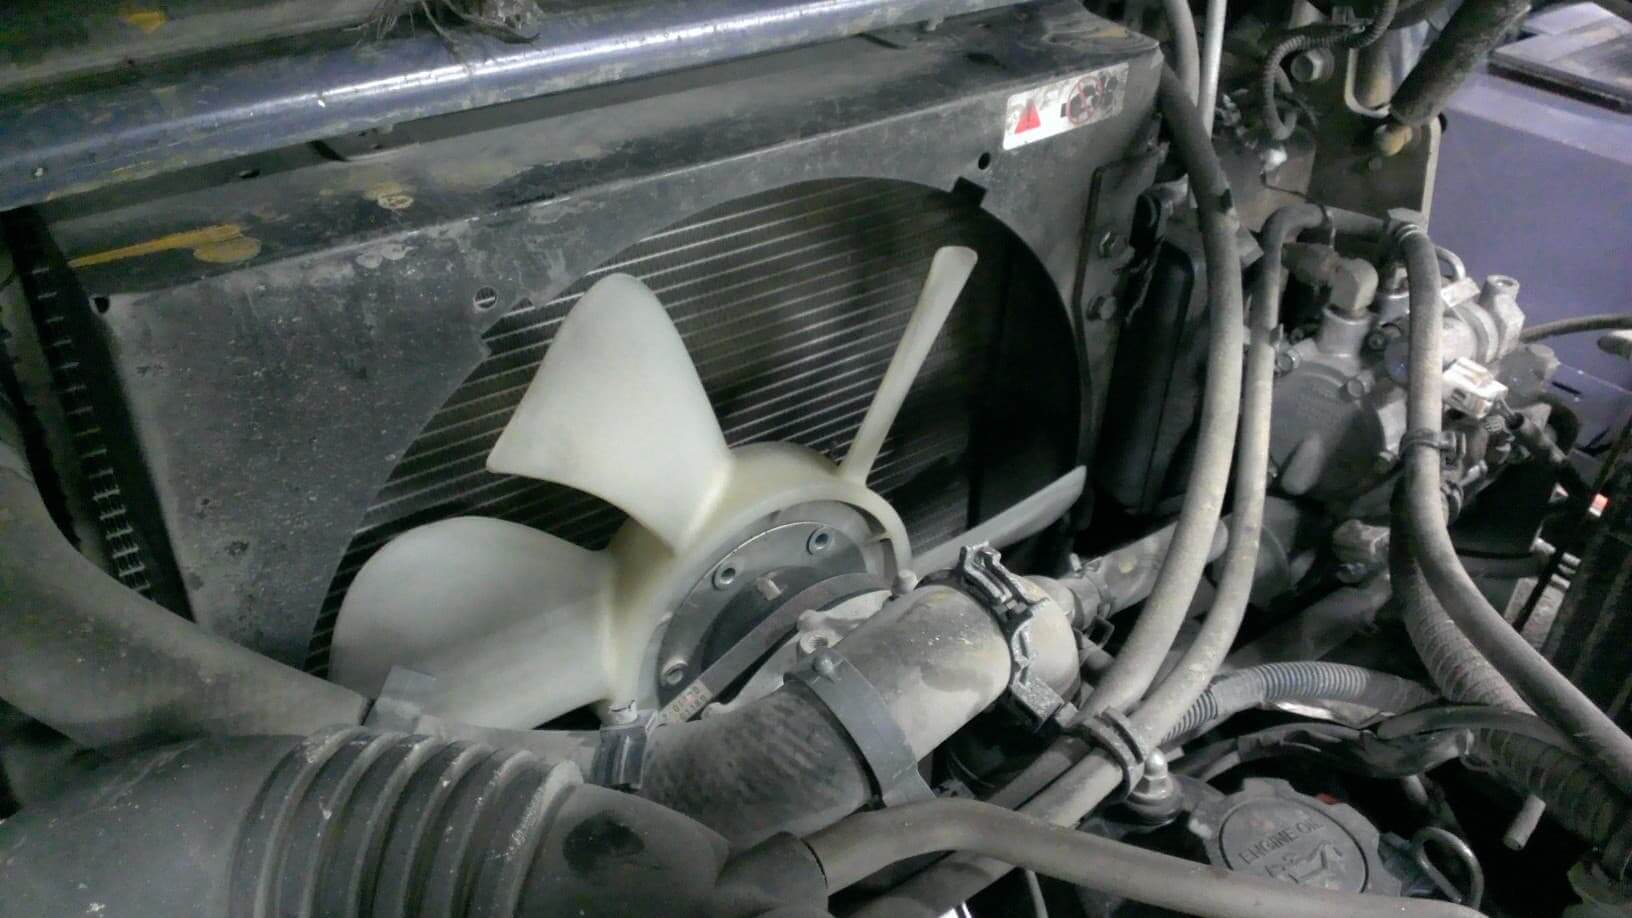
Use an infrared thermometer to scan the radiator surface with the engine at operating temperature. You want to see fairly uniform temperatures (190-210°F) across the entire radiator. Cold spots indicate internal blockage. Also check that both radiator fans are spinning when the AC is on or when the engine reaches 210°F. Many overheating problems are simply failed fan motors or relays.
Quick Fixes You Can Do in Your Driveway
Not every overheating problem requires a professional repair. Here are the fixes I’d tackle myself if I were working with basic tools in a home garage:
Fixing a Low Coolant Level (Difficulty: Easy | Time: 15 minutes | Cost: $15-30)
If you’ve identified a slow leak or just need to top off the system, here’s how to do it properly. Never use straight water or straight antifreeze—you need a 50/50 mix for proper freeze protection and boiling point elevation. I buy the pre-mixed stuff because it’s foolproof and only costs $2-3 more per gallon than concentrate.
Required Tools & Materials:
- 1-2 gallons of 50/50 pre-mixed coolant (match your vehicle’s type—DO NOT mix colors)
- Funnel
- Shop towels
- Optional: Coolant pressure tester to verify no leaks
- Let the engine cool completely (at least 30 minutes after driving). Touch the upper radiator hose—if it’s warm to the touch, wait longer.
- Locate your coolant reservoir (usually a translucent plastic tank near the radiator). Some vehicles have the cap on the radiator itself—check your owner’s manual.
- Slowly open the cap while turning your face away. Even on a “cold” engine, there might be residual pressure.
- Add coolant to the MAX line. Don’t overfill—the system needs expansion room. If you’re filling a radiator directly, fill it to about 1 inch below the cap neck.
- Run the engine with the cap off for 5 minutes to burp any air pockets. Squeeze the upper radiator hose a few times to help air escape. Top off as the level drops.
- Replace the cap tightly and check the reservoir level after the next drive. If it’s low again, you definitely have a leak.
Replacing a Thermostat (Difficulty: Moderate | Time: 45-90 minutes | Cost: $25-60)
This is one of the best DIY repairs because it’s cheap, relatively simple, and the thermostat is usually accessible. I’ll use a 2012 Toyota Camry 4-cylinder as an example since it’s a common vehicle with a straightforward setup.
Required Tools & Materials:
- 10mm socket and ratchet
- Drain pan (2+ gallon capacity)
- New thermostat with gasket (OEM Aisin THT-003, $28)
- 1 gallon 50/50 pre-mixed Toyota red coolant
- Shop towels or rags
- Small gasket scraper or plastic putty knife
- Torque wrench (if available)
- Drain about 1 gallon of coolant from the radiator petcock (at bottom of radiator) into your drain pan. You don’t need to drain the whole system for a thermostat replacement.
- Locate the thermostat housing—on the Camry 4-cylinder, it’s on the driver’s side of the engine where the upper radiator hose connects. Remove the two 10mm bolts holding the housing.
- Remove the old thermostat and gasket. Note which direction the thermostat sits—the spring side typically faces toward the engine. Clean both mating surfaces with your scraper until they’re smooth and clean.
- Install the new thermostat in the same orientation as the old one. Place the new gasket on top (some come with a rubber seal integrated into the thermostat—no separate gasket needed).
- Torque the housing bolts to 80 inch-pounds (that’s 6.6 foot-pounds—very light torque). Don’t overtighten or you’ll crack the housing. If you don’t have a torque wrench, tighten them until snug, then give each bolt another 1/8 turn.
- Refill the cooling system and burp out air pockets as described in the previous section. Run the engine and verify the new thermostat opens properly by feeling the upper radiator hose get hot at around 200°F.
Total time for this job: about 60 minutes for a first-timer. Once you’ve done it, you can knock it out in 30 minutes. And you’ve just saved yourself $150-250 in shop labor charges.
Flushing a Clogged Radiator (Difficulty: Moderate | Time: 2-3 hours | Cost: $40-70)
If your coolant looks rusty or hasn’t been changed in years, a proper flush might restore cooling efficiency without replacing the radiator. Note that this only works for mild to moderate internal contamination—if the radiator is severely clogged, you’re buying a new one.
Required Tools & Materials:
- 2-3 gallons distilled water (NOT tap water—minerals will recontaminate)
- Radiator flush chemical (I use Prestone AS105 or CLR radiator flush)
- 2 gallons of 50/50 pre-mixed coolant (correct type for your vehicle)
- Large drain pan (5+ gallon capacity)
- Garden hose with spray nozzle
- Funnel
- Gloves and safety glasses
Expect to spend about 2-3 hours on this job because you need to run the engine multiple times to circulate the flush chemicals. The radiator drain petcock (plastic drain valve at bottom corner) is fragile—turn it gently. I’ve broken dozens of these over the years by being too aggressive, and then you’re replacing the radiator anyway.
If the flush doesn’t improve your cooling and you’re still seeing issues related to [coolant system problems](coolant-system-problems), you may need professional diagnostics or a radiator replacement.
When to Call a Professional
I’m all for DIY repairs, but some problems require professional equipment and expertise. Here’s when you should bring your overheating engine to a shop:
- Suspected head gasket failure: This requires pulling the cylinder head(s), inspecting for warpage, and often machining work. It’s a 6-12 hour job depending on the engine, and mistakes can turn into catastrophic engine damage. Unless you’ve done this before and have access to a machine shop for head resurfacing, pay a professional.
- Water pump replacement on timing belt engines: If the water pump is behind the timing belt, you’re removing the timing cover and belt. Getting the timing marks wrong can cause the pistons to hit the valves, destroying the engine. This is $800-1,500 in shop labor, but it’s worth it for the peace of mind.
- Electric fan motor diagnosis: Modern vehicles have complex cooling fan systems controlled by the ECM, with multiple relays, fuses, and temperature sensors. Chasing down a no-fan condition without a scan tool and wiring diagrams is frustrating. Shops can diagnose this in 15 minutes with proper equipment.
- Internal radiator leaks on transmission cooler lines: Some radiators have integrated automatic transmission coolers. If the internal seals fail, coolant mixes with transmission fluid—a nightmare scenario that requires immediate professional attention. You’ll need both the radiator and transmission serviced, potentially $1,000-2,000 total.
Cost Breakdown: DIY vs Professional Repair
| Repair | DIY Cost | Shop Cost | Savings | Time Required |
|---|---|---|---|---|
| Coolant Top-Off | $15-25 | $45-75 | $30-50 | 15 minutes |
| Thermostat Replacement | $35-60 | $180-280 | $145-220 | 45-90 minutes |
| Radiator Hose Replacement | $20-50 | $120-200 | $100-150 | 30-60 minutes |
| Cooling System Flush | $40-70 | $130-180 | $90-110 | 2-3 hours |
| Radiator Replacement | $280-450 | $550-900 | $270-450 | 2-4 hours |
| Water Pump (external) | $120-200 | $400-650 | $280-450 | 2-3 hours |
| Water Pump (timing belt) | $300-500 | $900-1,400 | $600-900 | 4-6 hours |
| Head Gasket Replacement | $400-800 | $1,500-3,000 | $1,100-2,200 | 8-16 hours |
These estimates assume you already have basic tools. If you need to buy a socket set, torque wrench, and other tools, add $100-200 to your first DIY repair. However, those tools will last for decades and pay for themselves within a few repairs.
Preventing Future Overheating: Maintenance That Actually Matters
After fixing thousands of overheating engines, I can tell you that 70% of these problems are preventable with basic maintenance. Here’s what actually matters, based on real-world experience:
Change Your Coolant Every 5 Years or 60,000 Miles
Coolant doesn’t just sit there looking pretty—it’s a chemical solution that breaks down over time. The corrosion inhibitors that protect your aluminum engine parts deplete after 5 years, even if you’ve only driven 20,000 miles. Once those inhibitors are gone, you start getting internal corrosion, which leads to radiator clogs, water pump failures, and more.
I’ve cut apart water pumps from engines with 10-year-old coolant, and the impeller looks like it’s been attacked by acid—pitted, corroded, with chunks missing. Fresh coolant costs $30-40 for a complete change. A water pump replacement costs $400+. Do the math.
Inspect Hoses and Belts Every Oil Change
Radiator hoses fail from the inside out. They might look perfect on the outside, but the inner rubber layer deteriorates and starts to swell and soften. Squeeze every hose during your oil change inspection—they should feel firm and springy. If they feel mushy, spongy, or have hard crusty spots, replace them before they burst.
The serpentine belt drives your water pump (on most vehicles). A glazed, cracked, or worn belt can slip under load, causing the water pump to spin slower than designed. If you see cracks in the ribbed surface, or if the belt is shiny and glazed, it’s time for replacement. Belts are cheap insurance—$20-35 for the part.
Fix Small Leaks Immediately
That slow drip you’re ignoring? It will become a gusher, usually at the worst possible time. I’ve seen customers try to nurse a leaking hose along for “just another month” because they didn’t want to spend $25 on a new hose. Then it blows on the highway, they overheat the engine trying to get home, and now they need a $2,000 head gasket job.
Small leaks also introduce air into the cooling system, creating hot spots that accelerate component wear. Fix them when they’re small and cheap.
Use the Right Coolant Type
This is where people get themselves into expensive trouble. Modern engines use different coolant formulations—conventional green IAT (Inorganic Additive Technology), orange Dex-Cool OAT (Organic Acid Technology), Asian red/pink HOAT (Hybrid OAT), or European pink/purple HOAT. These chemistries are not compatible.
Mixing coolant types causes the additives to react, forming a gel or sludge that clogs your radiator, heater core, and cooling passages. I’ve pulled radiators full of brownish jelly from vehicles where someone topped off red coolant with green. Use only the coolant specified in your owner’s manual, and when in doubt, drain and refill the entire system rather than mixing types.
Advanced Troubleshooting: The Tricky Problems
Some overheating issues don’t fit the common patterns. Here are the weird ones I’ve encountered over the years:
Air Pocket in the Heater Core
This one baffled me early in my career. Customer complained of overheating in traffic but not on the highway, plus the heater blew cold at idle. Coolant level was perfect, no leaks, new thermostat. The problem? An air pocket trapped in the heater core, which sits higher than the radiator on some vehicles.
The fix is to park the car nose-uphill (on ramps or a steep driveway), remove the radiator cap, and rev the engine to 2,500 RPM for 30 seconds while squeezing the upper radiator hose. The air bubbles work their way out. Some vehicles have bleeder screws on high points of the cooling system specifically for this purpose—check your service manual.
Failed Radiator Cap
The radiator cap is a pressure regulator, maintaining 15-18 PSI in the system. This raises the boiling point of coolant from 212°F to about 265°F. If the cap’s spring weakens or the seal deteriorates, the system can’t build pressure, and the coolant boils at a lower temperature. You’ll get overheating around 220°F even though everything else is fine.
A new OEM cap costs $8-15. It’s cheap insurance and should be replaced every 5 years or anytime you’re doing cooling system work. I keep several common sizes in stock because it’s an easy win when nothing else obvious is wrong.
Cooling Fan Running Backwards
No joke—I’ve seen this twice. On aftermarket electric fan installations, if someone reverses the polarity, the fan spins backwards and pushes air the wrong direction. You can verify fan direction with a piece of tissue paper held near the radiator with the fan running. It should pull air from the front (through the radiator) toward the engine. If it’s pushing air forward (away from the engine), someone wired it backwards.
Clogged Catalytic Converter Causing Overheating
A severely clogged catalytic converter creates excessive back pressure, which makes the engine work harder and generate more heat. The exhaust system also runs hotter, radiating heat upward into the engine bay. I diagnosed this on a 2011 Honda Accord last year—the cat was so plugged that exhaust manifold temperatures were reaching 1,800°F instead of the normal 1,200°F.
You can test for this with a vacuum gauge. At idle, you should see 17-21 inches of vacuum. If it drops to 10 or below, you’ve got exhaust restriction. The cat will also glow cherry red if you look under the car in dim light.
Frequently Asked Questions About Engine Overheating
How long can I drive with an overheating engine before causing damage?
You shouldn’t drive at all once the temperature gauge enters the red zone or the warning light comes on. Severe damage begins at around 260°F, and you can warp cylinder heads or blow head gaskets in as little as 5-10 minutes of operation at that temperature. If your gauge hits the red zone while driving, pull over immediately, shut off the engine, and call for a tow. Trying to “make it home” is how a $100 problem becomes a $3,000 disaster.
I’ve seen people continue driving because they were “almost home” or “only had five more miles to go.” Every single one of them ended up with catastrophic damage—warped heads, blown gaskets, or seized engines. If you can’t fix the problem roadside (like adding coolant if you’ve got a supply), don’t drive. Get towed.
Can I use water instead of coolant in an emergency?
In a true emergency—stranded on the side of the road with no other options—you can use plain water to limp to a repair shop, but you need to replace it with proper 50/50 coolant as soon as possible. Water lacks corrosion inhibitors and freezes at 32°F, plus it boils at 212°F instead of the 265°F that pressurized coolant provides.
If you’re in a situation where you must use water temporarily, drive slowly, keep the engine RPM low, and stop frequently to let things cool down. Then drain and refill with proper coolant within 24 hours. I’ve seen people run straight water “temporarily” for months, then wonder why their water pump failed or their radiator corroded through. Coolant is cheap—engine repairs aren’t.
Why does my car overheat only in traffic but not on the highway?
This pattern almost always indicates either failed cooling fans or a clogged radiator. At highway speeds, you’ve got plenty of airflow through the radiator from the vehicle’s movement alone—you don’t need the fans. In stop-and-go traffic, there’s no airflow, so you’re completely dependent on the electric fans to pull air through the radiator.
Check that both fans are spinning when the AC is on or when the engine reaches 210°F. Many vehicles have two fans—one for the radiator and one for the AC condenser. If either one isn’t running, you’ll overheat in traffic. A clogged radiator has the same symptom because the fins can’t transfer heat efficiently without good airflow. For more details on cooling system component failures, check out our guide on [radiator problems](radiator-problems).
How much does it cost to fix an overheating engine?
The cost ranges from $15 (topping off coolant) to $3,500+ (head gasket replacement on a V8). Here’s the typical range for common problems: coolant top-off ($15-45), thermostat replacement ($180-280), radiator hose replacement ($120-200), water pump replacement ($400-1,400 depending on location), radiator replacement ($550-900), and head gasket replacement ($1,500-3,000 for a four-cylinder, up to $5,000 for complex V6/V8 engines).
The key to controlling costs is catching problems early. A $35 thermostat replaced before it causes overheating saves you from a $2,000 head gasket job later. Regular cooling system maintenance—changing coolant every 5 years, replacing hoses at the first sign of deterioration, fixing small leaks immediately—prevents expensive failures.
What’s the difference between overheating and running hot?
Normal operating temperature is 195-220°F, shown by the gauge sitting around the middle mark. “Running hot” means the gauge is higher than normal but not in the red zone—maybe around 230-240°F. This indicates a developing problem that needs attention soon but isn’t an emergency. “Overheating” means the gauge is in the red zone (260°F+) or you see steam from under the hood—this is an emergency requiring immediate shutdown.
If your gauge runs consistently above the middle mark, don’t ignore it. Something’s wrong—you might have low coolant, a failing thermostat that’s sticking partially closed, or a radiator that’s starting to clog. Address it now while it’s a minor repair, not when you’re stranded with a blown head gasket.
Can a bad thermostat cause overheating even if it’s brand new?
Absolutely. I’ve installed new thermostats that failed within the first week because they were cheap aftermarket junk. Some of those $12 thermostats from overseas arrive defective or fail almost immediately. I had a customer come back three days after a thermostat replacement with overheating—the new thermostat had stuck closed. We pulled it out, tested it in boiling water, and it never opened.
This is why I always recommend OEM thermostats. Yes, they cost $25-35 instead of $12, but I’ve tracked failure rates over the years, and OEM units fail at maybe 2-3% within 100,000 miles, while cheap aftermarket units fail at 25-30% within 60,000 miles. The extra $15 is worth the reliability. Denso, Aisin, and Motorcraft (for Ford) are the brands I trust.
Should I replace my radiator if it has a small leak?
It depends on where the leak is and how old the radiator is. If it’s leaking from a plastic end tank (very common on 10+ year old radiators), replacement is your only option—those tanks can’t be reliably repaired. If it’s leaking from a pinhole in an aluminum fin, you might be able to seal it with a proper stop-leak product like Bar’s Leaks or K-Seal, but this is a temporary fix that buys you a few months at best.
If your radiator is 12+ years old and has started leaking, I’d replace it rather than patching it. Here’s why: once one part fails, others usually follow within 6-12 months. I can’t count how many customers patched a leak, then had a different leak develop three months later, then another one after that. At some point, you’re spending more time and money on patches than a new radiator would cost. A quality aftermarket radiator runs $250-400 and will last another 10-15 years.
Why does my temperature gauge fluctuate while driving?
The temperature gauge should sit rock-steady at the middle mark once warmed up. If it’s bouncing around—maybe dropping toward cold when you’re on the highway, then shooting up at idle—you’ve got a problem. The most common cause is a thermostat that’s failing and sticking intermittently. Sometimes it opens, sometimes it doesn’t, causing the temperature to swing wildly.
Other causes include low coolant (creating air pockets that pass through the temperature sensor), a failing water pump (cavitation causes intermittent coolant flow), or a faulty temperature sensor itself. Start by checking your coolant level, then replace the thermostat since that’s the cheapest and most likely culprit. If the problem persists, have a shop diagnose the sensor and water pump.
My Final Thoughts as Your Mechanic
After fifteen years of diagnosing engine overheating causes every single week, here’s what I want you to remember: this problem doesn’t fix itself, and it gets exponentially more expensive the longer you ignore it. That temperature gauge climbing into the red zone is your engine screaming for help. Listen to it.
The customers I feel worst for are the ones who ignored early warning signs—maybe the coolant level was low, maybe the gauge ran slightly hot, maybe they heard a squealing noise from the water pump. They thought they’d “deal with it next month” when they had more money. Then next month arrived with a $2,800 head gasket bill instead of a $200 thermostat replacement.
On the flip side, I’ve had customers catch problems immediately and bring their car in as soon as something seemed off. Those people drive away with $150 repair bills and thank me for “saving them money.” I didn’t save them anything—they saved themselves by being proactive.
Most of the problems I’ve covered in this guide are fixable in your own driveway if you’re comfortable with basic hand tools. A thermostat replacement, coolant flush, or radiator hose swap are all doable weekend projects that’ll save you hundreds in shop labor. The diagnostic steps I’ve shared will help you figure out what’s wrong before you spend a dime.
But know your limits. Head gasket jobs, timing belt water pumps, and complex electrical diagnostics—those are professional territory unless you’ve got experience and proper tools. Trying to save $500 in labor on a head gasket can cost you $5,000 if you mess up the torque sequence or damage a head during removal.
The most important thing? Don’t drive an overheating engine. I’ve said it multiple times in this guide because I’ve seen too many destroyed engines from people who “just needed to get home.” Once that gauge hits the red, you’re minutes away from permanent damage. Pull over, shut it down, and call for help. Your engine will thank you, and so will your bank account.
Now get out there and fix that overheating problem. You’ve got all the knowledge you need. And if you run into something weird that doesn’t match anything in this guide, find a honest independent shop (not a dealer—they’ll charge twice as much) and have them diagnose it properly. Sometimes paying for an hour of professional diagnostic time saves you from spending days chasing the wrong problem.
Good luck, stay safe, and keep that engine cool.