Throttle Body Cleaning: DIY Guide to Improve Performance

It was a Tuesday morning in late October, the kind where you can see your breath in the shop before the heaters kick in. A customer pulled up in a 2015 Honda Civic with 87,000 miles, complaining about a rough idle and occasional stalling at stop lights. “It feels like the car wants to die,” she said, frustrated after already spending $400 at a quick-lube place for a fuel system cleaning that didn’t fix anything.

I popped the hood, pulled the intake tube, and there it was—a throttle body coated with a black, crusty layer of carbon buildup thick enough that the throttle plate barely had room to move. Twenty minutes and one can of cleaner later, that Civic was purring like it just rolled off the assembly line. The customer saved herself another $300 in diagnostic fees, and I gained another convert to preventive maintenance.

That scenario plays out in my bay at least twice a week. Throttle body cleaning is one of those maintenance tasks that gets ignored until you’re dealing with symptoms, but it’s honestly one of the easiest and most rewarding DIY jobs you can tackle. If you’ve got a rough idle, hesitation during acceleration, or your check engine light is throwing a P0505 code (Idle Air Control System Malfunction), there’s a solid chance your throttle body needs attention.

Quick Answer: Throttle body cleaning involves removing carbon deposits from the throttle plate and bore using specialized cleaner spray. This 30-minute procedure can restore smooth idle, improve throttle response, and fix minor drivability issues on most vehicles. Expected cost: $8-15 DIY vs $150-300 professional service.

What Is a Throttle Body and Why Does It Get Dirty?

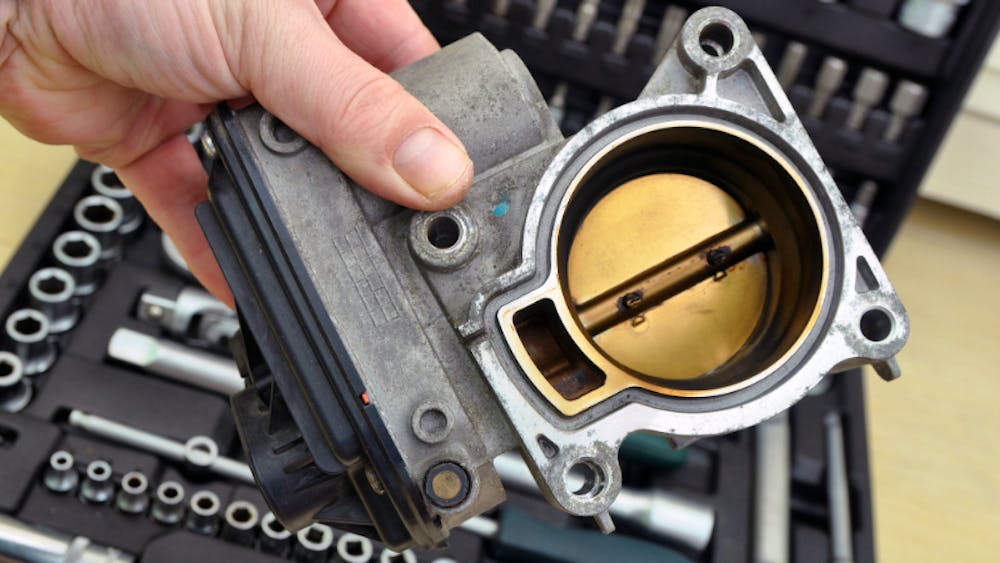
Your throttle body is essentially the gatekeeper for air entering your engine. When you press the accelerator pedal, you’re not directly controlling fuel—you’re controlling this butterfly valve that regulates airflow. More air means the ECU (Engine Control Unit) adds more fuel, and you get more power.

Here’s where things get messy. Your engine’s crankcase ventilation system recirculates oil vapors back through the intake to be burned off. These vapors, combined with dust that sneaks past your air filter and exhaust gases from the EGR system, create a sticky residue that accumulates on the throttle plate and bore. Over time—usually around 60,000 to 80,000 miles—this buildup becomes thick enough to interfere with proper airflow.

I’ve seen throttle bodies so clogged that the plate could barely move past 50% open. The driver thought his transmission was slipping because acceleration felt sluggish, but it was just the engine being strangled for air. Before you start looking into common causes of poor acceleration, check that throttle body first.

Direct Injection Engines: A Special Case

If you’re driving a newer vehicle with direct injection—think 2010+ models from Ford, GM, Volkswagen, and others—you’re looking at accelerated carbon buildup. These engines don’t spray fuel over the intake valves like port-injection engines do, which means there’s no detergent action keeping things clean. I’ve cleaned throttle bodies on direct-injection turbocharged engines with only 35,000 miles that looked worse than port-injection engines at 100,000.

Pro Tip: Direct injection vehicles benefit from throttle body cleaning every 30,000-40,000 miles instead of the typical 60,000-80,000 mile interval for port-injection engines. I’ve seen this simple change prevent expensive intake valve carbon cleaning procedures down the road.
Throttle Body Cleaning: DIY Guide to Improve Performance

Symptoms of a Dirty Throttle Body

I can usually diagnose a dirty throttle body before I even open the hood, just based on what the customer describes. Here’s what to watch for:

Rough or fluctuating idle: The RPMs bounce between 500-900 when sitting at a light, or the engine shakes more than normal. This happens because the ECU is struggling to maintain proper air-fuel mixture with restricted airflow.

Stalling at stops: You come to a complete stop and the engine just dies. Usually restarts fine, but it’s embarrassing in traffic and potentially dangerous.

Hesitation or stumble during acceleration: You hit the gas and there’s a brief moment where nothing happens, then the power kicks in suddenly. This is the ECU trying to compensate for the airflow restriction.

Poor fuel economy: A dirty throttle body forces the ECU to run rich to compensate, wasting fuel. I’ve seen fuel economy improve by 2-3 MPG after a proper cleaning.

Check engine light with specific codes: P0505, P0506, P0507 (idle control issues), P0121, P0122, P0123 (throttle position sensor codes). If you’re experiencing a persistent rough idle that won’t go away, these codes are your smoking gun.

Important: These symptoms can also indicate failing components like the idle air control valve, throttle position sensor, or even vacuum leaks. Clean the throttle body first since it’s free/cheap, but if symptoms persist, you’ll need deeper diagnostics.

Tools and Materials You’ll Need

Must-Have Tools:

  • Throttle body cleaner spray – CRC Mass Air Flow Sensor Cleaner (05110) or Berryman B-12 Chemtool (0117). Cost: $6-8 per can. You’ll need 1-2 cans depending on buildup severity.
  • Clean shop towels or lint-free rags – Microfiber works best. Cost: $5 for a pack.
  • Screwdrivers – Flathead and Phillips, various sizes. Most intake tubes use 8mm or 10mm flathead for hose clamps.
  • Socket set or wrenches – Typically 8mm, 10mm for intake tube bolts. Cost: $20-40 if you don’t have one.
  • Soft-bristle toothbrush or parts brush – For stubborn deposits. Cost: $2-3.
  • Latex or nitrile gloves – Throttle body cleaner is nasty stuff. Cost: $5 for a box.

Nice-to-Have:

  • Flashlight or work light – You’ll be working in tight spaces.
  • Mirror on a stick – Helps see behind the throttle plate. Cost: $8-12.
  • Torque wrench – If you’re reinstalling the entire throttle body. Cost: $30-60.
  • Battery terminal protection spray – If disconnecting the battery. Cost: $5.

I personally keep three cans of CRC Mass Air Flow cleaner in my box at all times. It’s safe for sensors, evaporates completely without residue, and works on throttle bodies just as well as dedicated TB cleaner. The Berryman stuff is more aggressive and works faster on heavy deposits, but it smells like you’re huffing paint thinner—use it in a well-ventilated area.

SAFETY WARNING: Throttle body cleaners are extremely flammable and contain harsh solvents. Work in a well-ventilated area, wear gloves and eye protection, keep away from sparks or flames, and never spray directly onto hot engine components. Fumes can cause dizziness—if you feel lightheaded, step outside immediately.

Pre-Cleaning Checklist: Important Considerations

Before you grab that can of cleaner, there are a few things you need to know that’ll save you headaches later.

Electronic vs. Cable-Operated Throttle Bodies

Modern vehicles (2005+) use electronic throttle control—no cable connecting your pedal to the throttle body, just sensors and motors. Older vehicles use a physical cable. This matters because:

Electronic throttle bodies need to be “relearned” after cleaning on some vehicles. The ECU has memorized the carbon buildup and compensated for it. When you clean it, the ECU gets confused and you might have a really rough idle for 10-20 minutes while it relearns. Some vehicles require a specific relearn procedure—Toyota and Honda usually self-relearn after driving, but GM and Ford sometimes need a Tech 2 scanner procedure.

Cable-operated throttle bodies don’t have this issue, but you need to be careful not to damage the cable or its adjustment.

Relearn Procedure – Quick Version: After cleaning, start the engine and let it idle for 5 minutes without touching the accelerator. Turn off the engine, wait 10 seconds, restart, and let it idle another 5 minutes. Then drive normally for 10-15 minutes, including several stop-and-go cycles. Most vehicles will adapt automatically. If the idle stays rough, check your specific make/model for the exact relearn procedure.

To Remove or Not to Remove?

You’ve got two options: clean it while installed, or remove the throttle body entirely. Here’s my take after doing this literally thousands of times:

Clean in place: Faster (15-20 minutes), less risk of creating vacuum leaks or damaging gaskets. Works fine for light to moderate buildup. This is what I do on most customer cars during routine service.

Complete removal: Better access for heavy deposits, lets you clean both sides of the throttle plate, ensures no cleaner drips into the intake manifold. Takes 45-60 minutes including gasket replacement. I only do this on severely neglected throttle bodies or when I’m already replacing intake gaskets for another reason.

For your first time, I recommend cleaning in place. It’s harder to screw up, and honestly, it works just fine 90% of the time.

Step-by-Step Throttle Body Cleaning Procedure

1Park safely and prepare the work area

Park on level ground, engage the parking brake, and let the engine cool completely—at least 30 minutes after driving. Pop the hood and disconnect the negative battery terminal if you’re cleaning an electronic throttle body. This prevents fault codes on some vehicles, though it’s not always necessary. On my personal cars, I skip this step unless I’m doing a complete removal.

SAFETY: Never work on a hot engine. Throttle body cleaner is flammable and can ignite on hot components. Wait until you can comfortably touch the intake manifold with your bare hand.

2Locate and access the throttle body

The throttle body sits between your air filter box and intake manifold. Follow the large air intake tube from the filter—it connects directly to the throttle body. On most vehicles it’s right on top of the engine, but on some (looking at you, Subaru), you’ll need to remove the intake tube to see it properly.

You’ll need to remove the intake air tube to access the throttle body. This usually involves:

  • Loosening the hose clamp at the throttle body (usually 8mm flathead or 10mm socket)
  • Loosening the clamp at the air filter box
  • Unplugging the MAF (Mass Air Flow) sensor connector if it’s mounted on the tube
  • Gently wiggling the tube free—it might be stuck from years of oil buildup

This is also a perfect time to inspect your engine air filter condition and MAF sensor for contamination. I can’t tell you how many times I’ve found a filthy air filter during a throttle body service that was causing half the problem.

Pro Tip: Take a photo with your phone before disconnecting anything. It’s your roadmap for reassembly, especially with vacuum lines and sensor connectors. I’ve been doing this professionally for 15 years and I still do this on unfamiliar models.

3Initial inspection

With the intake tube removed, you’re looking directly at the throttle plate. Shine a flashlight inside and check the buildup level. Light tan or brown discoloration is normal. Black crusty deposits that you can feel with your finger? That’s what we’re after.

Check for oil weeping around the throttle shaft—if you see fresh oil, you’ve got a worn throttle shaft seal and cleaning won’t fix an oil consumption issue, though it’ll still help with performance.

4Protect the intake manifold

Stuff a clean rag loosely into the intake manifold opening behind the throttle body. Not too tight—you need airflow—but enough to catch excess cleaner and carbon chunks. I learned this the hard way when a chunk of carbon the size of a dime broke loose and got ingested by a customer’s engine. It didn’t cause damage, but it sure scared me.

5Begin the cleaning process

Spray throttle body cleaner directly onto the throttle plate and bore. Don’t be shy—really soak it. The cleaner will dissolve carbon deposits and drip down, which is why you’ve got that rag in place.

Let the cleaner soak for 30-60 seconds. For heavy buildup, spray again and let it sit longer. I’ve had throttle bodies so bad that I’ve let cleaner soak for 5 minutes between applications.

Use a soft-bristle brush to gently scrub the throttle plate and bore. The keyword here is gently. You’re not scrubbing a bathtub. The throttle body bore has a special coating that you don’t want to damage. I use an old toothbrush with soft bristles, and I’ve never had an issue in 15+ years.

Critical: DO NOT use abrasive materials, wire brushes, or excessive force. The throttle body bore has a molybdenum coating that prevents sticking—scratch it and you’ll need a new throttle body ($200-800 depending on the vehicle). If deposits won’t come off with cleaner and a soft brush, spray more cleaner and wait longer.

6Clean both sides of the throttle plate

Here’s where it gets slightly tricky. You need to open the throttle plate to clean the back side. On cable-operated throttles, this is easy—just pull the cable or manually move the linkage. On electronic throttles, you need to be more careful.

For electronic throttle bodies: You can carefully press the throttle plate open with your finger or a plastic tool. Apply gentle pressure to the edge—these plates are designed to handle 1000+ PSI of air pressure, so reasonable finger pressure won’t hurt them. Just don’t try to force them if they’re stuck.

Spray cleaner through the opening onto the back side of the plate. Let it drip through, then wipe with a clean rag wrapped around your finger or a cotton swab.

7Final cleaning and inspection

Keep spraying and wiping until the cleaner comes away clear on your rag. This usually takes 3-5 cycles of spray-wait-wipe. The throttle plate should look like bare metal (silver or gold colored depending on the coating) with no black residue.

Check the throttle plate edges and shaft for any remaining deposits. Use cotton swabs for tight spots around the shaft.

Don’t forget to clean the idle air control passages if your throttle body has them. These are small holes or passages around the edge of the throttle bore. They get plugged with carbon and cause idle issues. Spray cleaner directly into these passages.

8Clean the gasket surface (if removing the throttle body)

If you’ve removed the throttle body completely, clean the gasket surface on both the throttle body and intake manifold. Use a plastic scraper—never metal—and gasket remover spray. Old gasket material left behind will cause vacuum leaks.

Always use a new gasket when reinstalling. These are usually $3-8 and prevent vacuum leaks. Torque the mounting bolts in a crisscross pattern to the manufacturer’s spec—usually 7-10 ft-lbs for most 4-cylinder engines. Yes, that’s really light torque. Overtightening will warp the throttle body housing.

9Reassemble everything

Remove the rag from the intake manifold. Reinstall the intake air tube, making sure hose clamps are snug but not overtightened—you’re clamping rubber, not crushing it. Reconnect the MAF sensor if you unplugged it. Double-check that all connections are secure.

If you disconnected the battery, reconnect it now. You might need to reset your radio presets and clock.

10Start and test

Start the engine. Expect a rough idle for the first 30-60 seconds—this is normal. The ECU is relearning proper idle parameters. Let it idle for 5 minutes without touching the throttle.

After the warm-up idle, take it for a test drive. You should notice smoother acceleration, steadier idle, and better throttle response immediately. If the idle is still rough after 15 minutes of driving, you may need to perform the specific relearn procedure for your vehicle.

Common Mistakes and How to Avoid Them

I’ve seen DIYers make the same errors repeatedly. Here’s what to watch out for:

Spraying too much cleaner at once: Excess cleaner pools in the intake manifold and can hydro-lock the engine or damage the catalytic converter when it finally burns off. Use controlled bursts and wipe away excess.

Not letting cleaner soak long enough: Impatience leads to scrubbing too hard and damaging the coating. Let chemistry do the work—spray, wait, wipe. Repeat as needed.

Using the wrong cleaner: Carburetor cleaner, brake cleaner, or WD-40 are NOT substitutes for throttle body cleaner. Carb cleaner leaves residue, brake cleaner can damage sensors and coatings, and WD-40 is just going to make things worse. Spend the $8 on proper TB cleaner.

Forgetting to check for vacuum leaks after reassembly: A loose clamp or cracked hose will cause the same symptoms you just tried to fix. After reassembly, start the engine and spray soapy water around all connections while it’s running. Bubbles indicate a leak.

Skipping the relearn procedure: On electronic throttles, skipping this step means you’ll drive around with a rough idle for days wondering if you broke something. Just do the relearn—it takes 15 minutes.

Pro Tip: After cleaning, I always spray a tiny bit of cleaner on a rag and wipe down the rubber intake tube and gasket surfaces. This removes oil film that can cause connections to slip loose over time. Takes 30 seconds and prevents comebacks.

Cost Analysis: DIY vs Professional Service

DIY Costs:

  • Throttle body cleaner (1-2 cans): $6-15
  • Shop towels/rags: $5 (reusable)
  • Gasket (if removing TB): $3-8
  • Gloves: $5 for a box
  • Total DIY cost: $8-20 for in-place cleaning, $20-35 for complete removal
  • Time investment: 20-30 minutes (in place), 45-75 minutes (complete removal)

Professional Service Costs:

  • Quick lube or chain shop: $80-150 (usually just spray cleaning)
  • Independent shop: $120-200 (typically includes inspection and relearn)
  • Dealership: $150-300 (complete service with diagnostic scan)
  • Included with other service: $50-75 (if done during major service)

Here’s my honest assessment: if your throttle body just needs a basic cleaning and you’re comfortable doing basic maintenance, DIY is a no-brainer. You’ll save $100-280 and learn something about your car. The job is simple enough that failure is unlikely if you follow the steps carefully.

However, if you’re experiencing persistent drivability issues, multiple check engine codes, or you’ve never worked on a car before, spending $150 at a reputable independent shop buys you proper diagnostics, guaranteed results, and someone to blame if things go wrong. I’ve had customers come in after attempting DIY cleaning who either damaged the throttle body coating or missed an underlying issue like a failing idle air control valve.

Scenario Recommendation Reason
Light buildup, no codes DIY in place Simple, quick, low risk
Heavy buildup, rough idle DIY removal or professional Needs thorough cleaning
Multiple codes, persistent issues Professional diagnostics first May have underlying problems
First-time DIYer, nervous Professional Peace of mind worth $150
Luxury/European vehicle Professional with scanner May need special relearn procedure

Maintenance Interval and Prevention

The question I get constantly: “How often should I clean my throttle body?” The answer depends on several factors, but here’s what I’ve observed over thousands of services:

Port-injection engines (older vehicles): Every 60,000-80,000 miles, or when symptoms appear. These engines clean themselves pretty well through normal operation.

Direct-injection engines: Every 30,000-40,000 miles. Carbon buildup accelerates significantly without fuel washing over intake components.

Turbocharged engines: Every 40,000-50,000 miles. The turbo pressurizes crankcase vapors, increasing oil vapor in the intake system.

Vehicles in dusty environments: Reduce intervals by 20,000 miles. Dust plus oil vapor creates an abrasive sludge.

City driving vs highway: City drivers should clean 25% more frequently. Stop-and-go driving means more idle time with low airflow, accelerating deposits.

Prevention Strategies

You can’t completely prevent throttle body carbon buildup, but you can slow it down significantly:

Use quality air filters and replace them on schedule: A clogged air filter forces the engine to pull harder, drawing more crankcase vapors through the PCV system. I recommend OEM or premium aftermarket filters (Wix, Mann, K&N) changed every 12,000-15,000 miles for normal driving, 10,000 miles for dusty conditions.

Fix oil leaks and PCV system issues immediately: Excessive crankcase pressure from worn piston rings or a faulty PCV valve pumps more oil vapor into the intake. If you’re adding a quart of oil between changes, that oil is going somewhere—usually coating your throttle body.

Use top-tier gasoline with detergents: While this primarily helps fuel injectors and combustion chambers, the detergent packages in brands like Chevron, Shell, and Mobil do reduce some deposit formation. Worth the extra 10 cents per gallon in my opinion.

Occasional Italian tune-up: Once a month, get on the highway and run the engine at 3,500-4,500 RPM for 10-15 minutes. The increased airflow helps blow out light deposits before they solidify. This is old-school wisdom that actually works.

Pro Tip: I’ve noticed that vehicles using quality synthetic oil and sticking to 5,000-mile change intervals have noticeably cleaner throttle bodies than those running conventional oil to 7,500+ miles. The oil vapor quality matters more than most people realize.

Troubleshooting: When Cleaning Doesn’t Fix the Problem

You’ve cleaned the throttle body, followed every step perfectly, and the problem persists. Here’s my diagnostic flowchart for when throttle body cleaning doesn’t solve your issues:

Persistent Rough Idle After Cleaning

If the idle is still rough after 30 minutes of driving:

  • Check for vacuum leaks using the soapy water method or listen for hissing sounds
  • Verify the idle air control valve is functioning (if separate from the throttle body)
  • Scan for codes—a P0171/P0174 (lean condition) suggests vacuum leak or MAF sensor issue
  • Test the throttle position sensor—worn sensors give false readings to the ECU

I had a Nissan Altima come back three times for rough idle after throttle body cleaning before I found a cracked intake manifold gasket that was only leaking at operating temperature. Sometimes the obvious fix isn’t the right fix.

Check Engine Light Returns

If codes come back within a few days:

  • P0505, P0506, P0507 returning = faulty idle air control valve or severe vacuum leak
  • P0121, P0122, P0123 returning = throttle position sensor failing or poor electrical connection
  • P0171, P0174 = check MAF sensor, vacuum leaks, or fuel pressure issues

Don’t just keep clearing codes hoping the problem goes away. If the same code returns twice, you’ve got a component failure that needs addressing.

Stalling Still Occurs

If the vehicle still stalls at idle after cleaning:

  • Test fuel pressure—low pressure causes stalling that mimics throttle body issues
  • Check the crankshaft position sensor (common failure on high-mileage vehicles)
  • Verify the EGR valve isn’t stuck open, allowing exhaust into the intake at idle
  • On older vehicles with separate IAC valves, remove and clean them separately
When to Call It: If you’ve cleaned the throttle body, verified no vacuum leaks, and the problem continues, it’s time for professional diagnostics. You’ve eliminated the cheap and easy fix—now you need scan tools and component testing that most DIYers don’t have access to. Expect to pay $80-120 for proper diagnostics, but it beats replacing parts blindly.

Throttle Body Replacement: When Cleaning Isn’t Enough

Occasionally you’ll encounter a throttle body that’s beyond cleaning. Here’s when replacement is the right call:

Worn throttle shaft bearings: If you can wiggle the throttle plate side-to-side and feel play in the shaft, the bearings are worn. This creates a vacuum leak that cleaning won’t fix. Common on vehicles over 150,000 miles.

Damaged coating: If someone before you used a wire brush or abrasive cleaner and scratched up the bore, the throttle plate will stick. You’ll notice this as hesitation or binding when manually moving the plate.

Failed internal motor (electronic throttles): The motor that actuates the throttle plate can fail. You’ll get codes and the throttle won’t respond properly. Cleaning won’t help—you need a new throttle body assembly.

Cracked housing: Rare but I’ve seen it on vehicles that overheated severely. Coolant passages in the throttle body housing can crack, causing coolant leaks.

Replacement costs vary wildly by vehicle. A throttle body for a Honda Civic runs $120-200 for an aftermarket unit, $300-400 for OEM. A throttle body for a BMW 335i? Try $600-1,200 depending on whether you go OEM or remanufactured. Installation adds 1-2 hours of labor.

Vehicle Type Aftermarket TB Cost OEM TB Cost Labor (hours)
Domestic 4-cylinder $100-180 $200-350 0.5-1.0
Import 4-cylinder $120-220 $250-450 0.5-1.5
Domestic V6/V8 $150-280 $300-550 1.0-2.0
Import V6 $180-350 $400-700 1.0-2.5
Luxury/European $250-500 $500-1,200 1.5-3.0

Frequently Asked Questions

Can I use carburetor cleaner instead of throttle body cleaner?

No, and I see this mistake constantly. Carburetor cleaner leaves an oily residue designed for carburetors that aren’t electronically controlled. This residue will attract more carbon deposits and can damage oxygen sensors and catalytic converters downstream. It also doesn’t evaporate cleanly like proper TB cleaner.

Throttle body cleaner is specifically formulated to evaporate completely without residue and is safe for sensors. The $6-8 cost difference isn’t worth the risk. I’ve seen $1,500 catalytic converter replacements traced back to someone using carb cleaner on a throttle body.

Will cleaning my throttle body improve gas mileage?

Maybe, but don’t expect miracles. I typically see 1-3 MPG improvement after cleaning a heavily carboned throttle body, though the improvement is more noticeable in city driving than highway. The main benefit is smoother operation, better throttle response, and eliminating rough idle—fuel economy is a nice bonus, not the primary goal.

If you’re looking specifically for fuel economy improvements, addressing your air filter condition, tire pressure, and driving habits will give you much better returns. A clean throttle body just helps the engine operate as designed.

How do I know if my throttle body is electronic or cable-operated?

Easy check: look at your accelerator pedal under the dash. If there’s a metal cable attached to the top of the pedal that runs into the firewall, you have a cable-operated throttle. If the pedal has only electrical connectors and no cable, it’s electronic (drive-by-wire).

As a general rule, most vehicles 2005 and newer use electronic throttle control, though some manufacturers adopted it earlier. When in doubt, trace the throttle body—if there’s no cable attached to it, it’s electronic.

Can a dirty throttle body cause the check engine light to come on?

Absolutely. The most common codes I see from dirty throttle bodies are P0505 (Idle Air Control System), P0506 (Idle RPM Lower Than Expected), and P0507 (Idle RPM Higher Than Expected). You might also get throttle position sensor codes like P0121, P0122, or P0123 if carbon buildup prevents the plate from moving through its full range.

Less commonly, a severely restricted throttle body can cause lean mixture codes (P0171, P0174) because the ECU can’t get enough air for the fuel it’s trying to inject. Clean the throttle body first, clear the codes, and see if they return before spending money on other parts.

Should I disconnect the battery before cleaning the throttle body?

It depends on the vehicle. For electronic throttle bodies, disconnecting the battery can help clear the ECU’s adaptive memory and force it to relearn idle parameters with the clean throttle body. However, you’ll lose radio presets, clock settings, and on some newer vehicles, power window auto-up/down calibration.

My approach: on Honda, Toyota, and Nissan, I don’t bother disconnecting—they relearn fine on their own. On GM vehicles, especially 2005-2015 models, I disconnect for 10 minutes before cleaning to ensure a proper relearn. Ford is hit or miss—newer Fords handle it fine, older ones benefit from a battery disconnect. When in doubt, check your specific vehicle’s relearn procedure.

What causes throttle body carbon buildup?

It’s a combination of three main sources. First, crankcase vapors from your PCV (Positive Crankcase Ventilation) system contain oil mist that gets recirculated through the intake. Second, exhaust gases from the EGR (Exhaust Gas Recirculation) system deposit soot and carbon. Third, dust and particles that make it past your air filter add to the mix.

These three components combine into a sticky tar-like substance that accumulates over thousands of miles. Direct-injection engines suffer more because they don’t have fuel spraying over the intake valves to wash things clean like port-injection engines do. It’s normal wear and tear, not a sign of a problem—every car will eventually need throttle body service.

Can I prevent throttle body carbon buildup?

You can slow it down but not prevent it entirely. The best prevention strategies I’ve seen work are: using quality air filters and changing them every 12,000-15,000 miles, maintaining your PCV system and fixing any oil consumption issues immediately, using top-tier gasoline with better detergent packages, and occasionally running the engine at higher RPMs (3,500-4,500 for 10-15 minutes) to blow out light deposits.

Vehicles that get regular oil changes with quality synthetic oil tend to have cleaner intake systems overall. Beyond that, it’s just scheduled maintenance—plan on cleaning the throttle body every 60,000-80,000 miles on port-injection engines, or every 30,000-40,000 on direct-injection engines.

How much does professional throttle body cleaning cost?

Expect to pay $80-150 at a quick-lube chain (though they usually just spray cleaner without removing anything), $120-200 at an independent shop for a thorough job including inspection and relearn procedures, or $150-300 at a dealership for complete service with diagnostic scanning. Some shops include it as part of a major service for $50-75 added cost.

Whether professional service is worth it depends on your comfort level and the severity of the problem. For basic preventive cleaning on a straightforward vehicle, DIY saves you $100-280. For troubleshooting persistent drivability issues or working on European luxury vehicles with complex relearn procedures, professional service is money well spent for the diagnostics and proper equipment.

Real-World Results: What to Expect

I want to give you realistic expectations because I’ve seen too many DIYers disappointed when their vehicle doesn’t feel brand new after a throttle body cleaning. Here’s what you should actually expect:

Best-case scenario (heavily carboned throttle body): Immediate improvement in idle quality, smoother acceleration, elimination of hesitation, possible 1-3 MPG fuel economy gain, check engine light stays off. This is what happens about 60% of the time when the throttle body was the primary issue.

Moderate improvement (light to moderate carbon): Slightly smoother idle, better throttle response, but no dramatic change. The cleaning prevented future problems and maintained performance, which is still valuable preventive maintenance. This is about 30% of cleanings.

No improvement (underlying issues): Symptoms persist because the problem isn’t the throttle body—it’s a vacuum leak, failing sensor, or other component. The cleaning wasn’t wasted—you eliminated one possibility—but you need further diagnostics. This is about 10% of cases.

I cleaned the throttle body on my personal 2008 Toyota Tacoma at 95,000 miles. The buildup was moderate, and honestly, I didn’t notice a huge difference in how it drove. But I know from experience that carbon was going to cause problems by 120,000 miles, so the $8 and 20 minutes I spent prevented future headaches. That’s the real value of preventive maintenance.

Conclusion

Throttle body cleaning is one of those rare maintenance tasks that’s genuinely easy enough for anyone with basic mechanical aptitude, costs almost nothing, and can solve some frustrating drivability problems. In my 15+ years turning wrenches, I’ve seen it fix everything from cars that stalled at every stop light to vehicles with check engine lights that stumped other shops.

The job requires minimal tools, takes 20-30 minutes for an in-place cleaning, and costs $8-15 in supplies. Compare that to $150-300 at a shop, and the DIY savings are obvious. Even if you’ve never worked on a car before, this is a great starter project—it’s hard to screw up if you follow the steps and use the right products.

Just remember: use proper throttle body cleaner, not carb cleaner or brake cleaner. Don’t scrub aggressively with abrasive materials. Let the chemicals do the work. Perform the relearn procedure on electronic throttle bodies. And if symptoms persist after cleaning, you’ve got underlying issues that need professional diagnostics.

From a mechanic’s perspective, I’d rather see someone attempt this job themselves and learn something about their vehicle than ignore the symptoms until they’re stranded at a traffic light with a stalled engine. The worst-case scenario for a botched DIY throttle body cleaning is you spend $150 at a shop to have it done properly—which is what you would’ve paid anyway. The best-case scenario is you save $150, gain confidence, and have a smoother-running vehicle.

Clean throttle bodies, smooth idle, and may your check engine light stay off.

Leave a Comment