
Your car shakes when you brake. The steering wheel pulses at 60 mph. You’re sitting in your driveway wondering — do I need new rotors, or can these be saved?
I’ve answered this exact question hundreds of times in my shop. And honestly? Most people overthink it. The decision comes down to three simple measurements — and I’ll show you exactly how to make the call yourself.
What’s the Difference Between Resurfacing and Replacing Rotors?
Resurfacing (also called “turning” or “machining”) means a shop puts your existing rotor on a brake lathe and shaves off a thin layer — usually 0.005 to 0.015 inches per side — to restore a smooth, flat surface.
Replacement means you throw the old rotor out and bolt on a new one.
Both fix the same problem. The question is which one makes sense for your specific rotor right now.
The single most important number: minimum thickness. Every rotor has it stamped right on the hat (the center part). On most midsize sedans, the front rotor minimum is around 22.4 mm. This number decides everything.
When Should You Resurface Instead of Replace?
Resurfacing makes sense when all three of these are true:
Your rotor thickness is at least 0.5 mm above minimum after the cut. If your rotor is at 23.2 mm and minimum is 22.4 mm, a 0.25 mm cut per side leaves you at 22.7 mm — that’s fine. If you’re already at 23.0 mm, that same cut puts you at 22.5 mm — dangerously close to the edge.
Your lateral runout is 0.002 inches or less. Runout is how much the rotor wobbles as it spins. Anything above 0.004 inches and you’ll feel pulsation in the pedal no matter how well it’s machined.
The surface damage is mild — light scoring or uneven pad deposits, not deep grooves or heat cracks.
One thing most people miss: before measuring, clean the hub face with a 3M Roloc disc. I’ve seen 0.001 inches of rust scale create 0.003 inches of false runout. Clean hub = accurate reading.
When Do You Need Full Replacement?
Skip resurfacing and go straight to new rotors when:
- Thickness is at or below minimum — there’s nothing safe to cut
- You see heat cracks longer than 1 mm on the friction surface
- Runout stays above 0.004 inches even after cleaning the hub
- The rotor has hard spots — dark bluish circles on the surface that a lathe can’t fix
That last one catches a lot of people off guard. Many newer SUVs with large 350 mm rotors develop hard spots from overheating. No amount of machining fixes them. I’ve seen customers come back twice complaining of steering shake after resurfacing — new rotors solved it immediately.
How Much Does Each Option Cost?
| Service | Parts Cost | Labor | Total (Front Axle) |
|---|---|---|---|
| Resurface | $30–$50 | $80–$150 | $110–$200 |
| Replace (Aftermarket) | $90–$240 | $80–$150 | $170–$390 |
| Replace (Dealer OEM) | $200–$400 | $150–$250 | $350–$650 |
DIY replacement costs $180–$300 for both front rotors if you do the labor yourself. Resurfacing yourself isn’t practical — a brake lathe costs around $900.
My honest take: aftermarket rotors from brands like Bosch or Raybestos are perfectly fine for daily driving. Save the OEM pricing for high-performance vehicles or if you’re particular about exact specs.
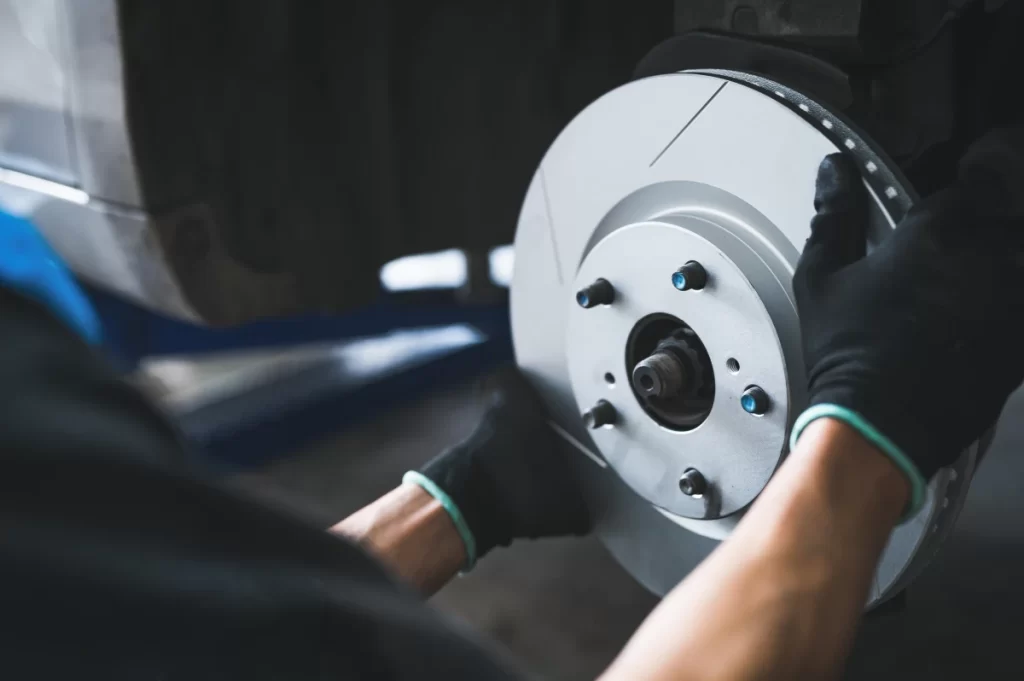
How to Replace Brake Rotors — Step by Step
If you’re doing it yourself, here’s exactly how I do it:
- Loosen lug nuts with a 19mm socket before jacking the car up
- Raise and support the vehicle on jack stands — minimum 3-ton rated
- Remove caliper bolts with a 14mm wrench, hang the caliper with wire — never let it hang by the brake hose
- Remove bracket bolts with a 17mm socket
- Slide off the old rotor — tap with a 2 lb hammer if rust has it stuck, and wear eye protection
- Clean the hub face with a Roloc disc before installing the new rotor
- Install new rotor, reinstall bracket and caliper, then torque lug nuts to 89 ft-lbs in a star pattern with a calibrated torque wrench
One thing I always tell people: apply a thin film of anti-seize on the hub face only — not on the wheel studs. Excess anti-seize on studs changes the effective torque and can cause runout.
Why Does Torque Matter So Much?
This is where most DIY brake jobs go wrong. Uneven or excessive torque — especially from an impact gun cranked up too high — distorts the rotor slightly as the wheel heats and cools. Within a few thousand miles, that turns into pedal pulsation.
Always use a calibrated torque wrench, tighten in a star pattern, and target 85–100 ft-lbs depending on your vehicle spec. If you use an impact gun, set it to the correct torque — don’t just blast away.
My Final Take
Resurfacing saves $60–$120 per axle and makes perfect sense when the numbers support it. But if your rotors are near minimum thickness, high-mileage, or showing hard spots — just replace them. The extra $80–$100 buys you full thermal mass, full thickness, and peace of mind.
Measure first. Cut once. Torque correctly. Your brakes are the one system on your car that can’t afford a comeback.
FAQ
Can I just resurface one rotor and replace the other? No — always do both rotors on the same axle together. Mismatched thickness or friction surfaces cause uneven braking and pull.
How long do resurfaced rotors last? Done correctly, resurfaced rotors can last another 30,000–50,000 miles. But if they were already near minimum, expect a shorter life.
Can I drive with pulsating brakes while I wait for parts? You can drive carefully at low speeds for a short time, but pulsation means your braking performance is already compromised. Don’t delay.
Does resurfacing void any warranty? On newer vehicles under manufacturer warranty, check your manual first. Some brands require OEM replacement parts to maintain brake system warranty coverage.