
Last July, it was one of those sticky 95-degree days in the shop, and a regular customer rolled in with his 2017 Mustang GT. The car had 65,000 miles, and he was complaining it felt sluggish off the line—like the thrill was gone. He’d been watching YouTube videos about mods and kept asking about cold air intakes. I popped the hood, showed him that restrictive stock air box sucking in hot engine bay air, and told him straight: a good cold air intake installation could wake the car up without breaking the bank.
Quick Answer: Is a cold air intake worth it? For most naturally aspirated or lightly modified vehicles, expect 5-15 horsepower, sharper throttle response, and that addictive intake sound. Gains are real but modest—biggest bang comes when paired with other mods like a tune or exhaust.
What Is a Cold Air Intake and Why Do People Install One?
What You’ll Need
As an Amazon Associate, VehicleBar earns from qualifying purchases at no extra cost to you.


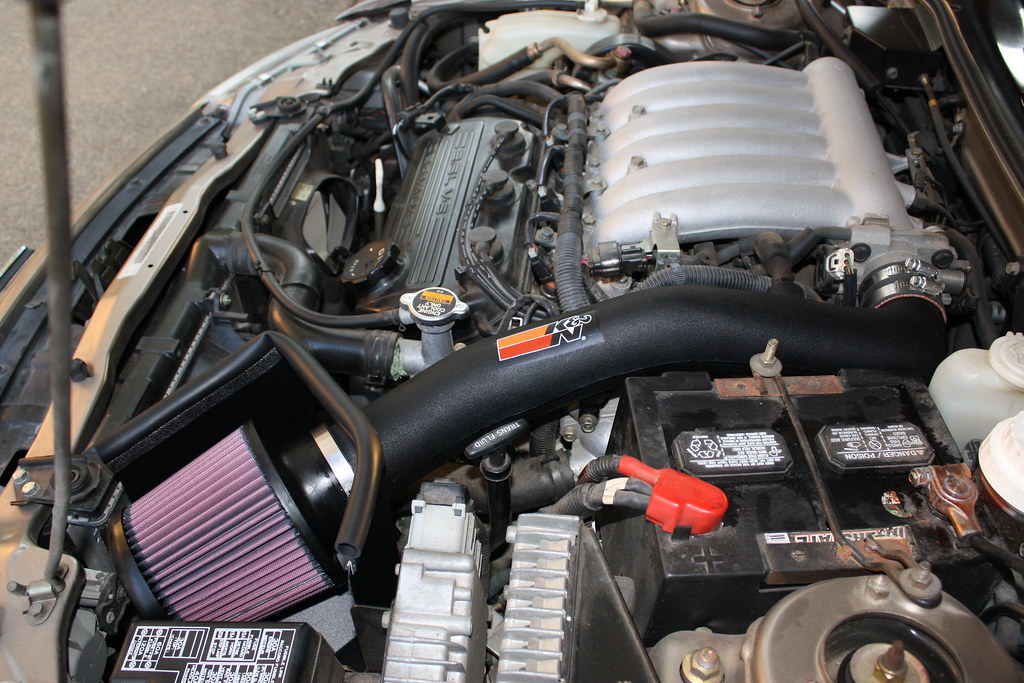
Your factory air intake system is designed for quiet operation, filtration, and keeping costs down for the manufacturer. It usually pulls air from inside the hot engine bay and runs it through a restrictive paper filter and plastic tubing. A cold air intake (CAI) relocates the filter to pull cooler, denser air from outside the engine bay—often down near the fender or bumper.
Cooler air means more oxygen molecules per volume, which means better combustion and more power. That’s the core of cold air intake benefits. I’ve dyno-tested plenty: a quality CAI on a stock V8 Mustang or Civic Si typically adds 8-12 wheel horsepower and similar torque. On turbo cars, gains can hit 15-20 with a good tune.
Beyond numbers, the improved intake sound is what hooks most owners—that whoosh on throttle tip-in and growl under load. It’s addictive. Some guys also report 1-2 mpg better highway economy when driving normally, since the engine works more efficiently.
Before you dive into your cold air intake installation, brush up on the basics with our [intake system overview](air-intake-system-explained) and [air filter basics](how-to-replace-engine-air-filter).
Choosing the Best Cold Air Intake for Your Vehicle
Not all CAIs are created equal. Cheap $100 eBay specials often use poor materials and fit like garbage. I’ve seen them cause check engine lights from air leaks or even MAF sensor contamination.
Stick with proven brands: K&N (great oiled filters, lifetime warranty), AEM (dry filters, excellent fitment), Injen (polished tubes, good sound), aFe (high-flow options), and S&B (sealed boxes for dusty areas). These consistently deliver the best cold air intake performance in my experience.
Consider your driving: If you live where it rains a lot, go with a sealed box design or add a bypass valve to reduce hydrolock risk. For track use, prioritize heat shielding. Always confirm CARB approval if you’re in California.
Tools & Materials List
Must-Have Tools:
- Flathead and Phillips screwdrivers
- 10mm, 12mm sockets and ratchet (most common sizes)
- Needle-nose pliers (for spring clamps)
- Trim removal tools (plastic pry tools to avoid scratches)
- Torque wrench (for any bracket bolts—usually 8-12 ft-lbs)
- Shop rags and cleaner (brake cleaner works great)
Nice-to-Have:
- Extension set for ratchet
- Flashlight or shop light
- Zip ties (for clean routing)
- MAF sensor cleaner
Most kits cost $250-450 on Amazon or AutoZone. Tools you likely already own if you’re a DIYer.
Safety Warnings
Critical: Disconnect the negative battery terminal before starting any work near sensors or the throttle body. Reconnect only after everything is installed.
Hydrolock Risk: Low-mounted filters can suck water in heavy rain, bending rods and destroying your engine. I’ve seen it twice—both times totaled the motor. If you drive in wet conditions, choose a higher-mounted short-ram or add a bypass valve.
MAF Sensor Damage: These sensors are fragile and expensive ($100-300 to replace). Never touch the wires—handle only by the plastic housing.
Wear safety glasses and gloves. Work in a well-ventilated area. If you’re unsure at any step, stop and consult a professional.
Step-by-Step Cold Air Intake Installation
Time estimate: 60-90 minutes for most vehicles. Steps vary by make/model—always follow your kit’s instructions first. These are general steps I’ve used on everything from Civics to Silverados.
Park on a level surface, engine off and cool. Disconnect negative battery terminal (10mm wrench usually).
Locate and remove the stock air box. Loosen clamps on intake tube (screwdriver or 8mm socket). Unplug MAF sensor by pressing the tab gently. Remove any push pins or bolts holding the air box (often 10mm).
[Image: Stock air box with MAF sensor highlighted and clamps circled]
Clean the throttle body opening and MAF sensor if dirty (use dedicated cleaner—never compressed air).
Assemble the new intake per kit instructions. Install heat shield or box first if included. Route tubing carefully to avoid kinks.
Install couplers and clamps. Hand-tighten first, then snug with screwdriver or socket—don’t overtighten silicone (about 1/4 turn past snug).
Transfer or install MAF sensor into new housing. Plug connector in firmly until it clicks.
[Image: Proper MAF orientation in new intake tube]
Mount filter and secure all brackets. Reconnect battery.
Start engine and listen for abnormal noises or vacuum leaks (hissing). Check for codes with a scanner.
Pro Tip: After install, reset the ECU by disconnecting battery for 10 minutes or driving gently for 20-30 miles so it relearns air flow.
Troubleshooting Common Problems
- Check Engine Light (lean codes P0171/P0174): Usually air leak at couplers. Spray carb cleaner around joints—RPM change means leak. Tighten or replace coupler.
- Rough idle or stalling: Dirty MAF from oiled filter. Clean with MAF cleaner or switch to dry filter.
- No noticeable gains: Often needs a tune on modern cars. Stock ECU may pull timing.
- Water ingestion: Filter soaked after rain—dry thoroughly and consider relocating or bypass valve.
If problems persist, scan for codes. DIY fix usually free; shop diagnosis $100-150.
Cost Analysis
| Item | DIY Cost | Professional |
|---|---|---|
| Quality CAI Kit | $250-450 | $250-450 |
| Tools (if needed) | $0-100 | Included |
| Labor | $0 | $150-300 |
| Total | $250-550 | $400-750 |
Long-term: Filter cleaning/replacement every 30-50k miles ($0-80). Potential slight fuel savings offset cost over years.
Money-saving trick: Buy during Black Friday sales—I’ve seen K&N and AEM drop 30%.
For more ideas, check our guide to [engine performance upgrades](engine-performance-upgrades) and the [best air filters](best-engine-air-filters-2025).
FAQ
How much horsepower does a cold air intake add?
Realistically 5-15 hp on most vehicles, sometimes 20+ on turbo applications with a tune. I’ve seen the biggest seat-of-pants difference in throttle response and mid-range pull.
Will a cold air intake hurt my gas mileage?
Not if you drive normally—many owners see slight improvement. But if you can’t resist that new intake sound and stay in boost more, mileage drops.
Is cold air intake installation difficult?
Moderate difficulty—basic hand tools and 1-2 hours. Biggest rookie mistake is damaging the MAF sensor or leaving vacuum leaks.
Do I need a tune after installing a CAI?
On older cars, no. On 2015+ vehicles with strict emissions, yes for maximum gains and to avoid lean conditions. Untuned is still safe on reputable kits.
What’s the best cold air intake brand?
K&N, AEM, and Injen top my list for fit, quality, and warranty. Avoid no-name brands—I’ve removed plenty that caused problems.
Can a cold air intake cause engine damage?
Only if poorly designed/installed or you drive through deep water (hydrolock). Quality units from reputable brands are safe when installed correctly.
How often should I clean the filter?
Every 15-30k miles depending on dust. K&N oiled filters need cleaning and re-oiling; dry filters just tap out dust.
Final Thoughts from the Shop
A cold air intake installation is one of the easiest, most satisfying mods you can do yourself. For $300-500 and an afternoon, you get noticeable performance gains, that killer intake sound, and the pride of doing it yourself. It’s moderate difficulty—perfect for weekend warriors with basic tools.
I’ve installed hundreds, and the customers who follow instructions and choose quality parts are always happy. Pair it with a good exhaust and tune if you want real power, but even standalone it’s worth it for the driving enjoyment.
If you’re on the fence, start with this upgrade. Your engine will thank you with every throttle stab.