
Alternator Testing: Complete Guide
The alternator is the unsung workhorse of your vehicle’s electrical system—a belt-driven generator that converts mechanical energy from the engine into alternating current (AC), which is then rectified into direct current (DC) to recharge the battery and power every electrical component while the engine runs. Unlike the battery, which only stores energy, the alternator is the primary source of electrical power once your engine is turning. When it fails, you’re not just looking at a dead battery; you’re looking at a cascading electrical failure that can strand you anywhere, from a busy intersection to a remote trailhead. That’s why understanding alternator testing isn’t a luxury—it’s a fundamental diagnostic skill for any vehicle owner.
In this complete DIY guide, we’ll walk you through the essential attributes of alternator testing: the voltage and amperage output specs you need to verify, the critical difference between a failing alternator and a weak battery, and the specific tools—from a simple digital multimeter to a dedicated alternator bench tester—that give you accurate results. You’ll learn how to perform a load test, check for diode ripple, and interpret the warning signs like dimming headlights, a whining alternator bearing, or the dreaded battery warning light. We’ll also cover the safety protocols for working around high-amperage charging circuits and the common pitfalls that lead DIYers to misdiagnose a perfectly good alternator.
What sets this guide apart is the data-driven approach: we’ll provide real-world voltage readings, amperage draw tables for common vehicle classes, and honest limitations of each testing method. You won’t find vague advice here—you’ll find actionable thresholds, step-by-step procedures, and the reasoning behind each test. Whether you’re troubleshooting a parasitic drain, confirming a remanufactured alternator’s output, or just want to understand your charging system better, this guide gives you the entity-level knowledge to diagnose with confidence and avoid throwing parts at a problem that might have a simpler fix.
What Is Alternator Testing and Why It Matters
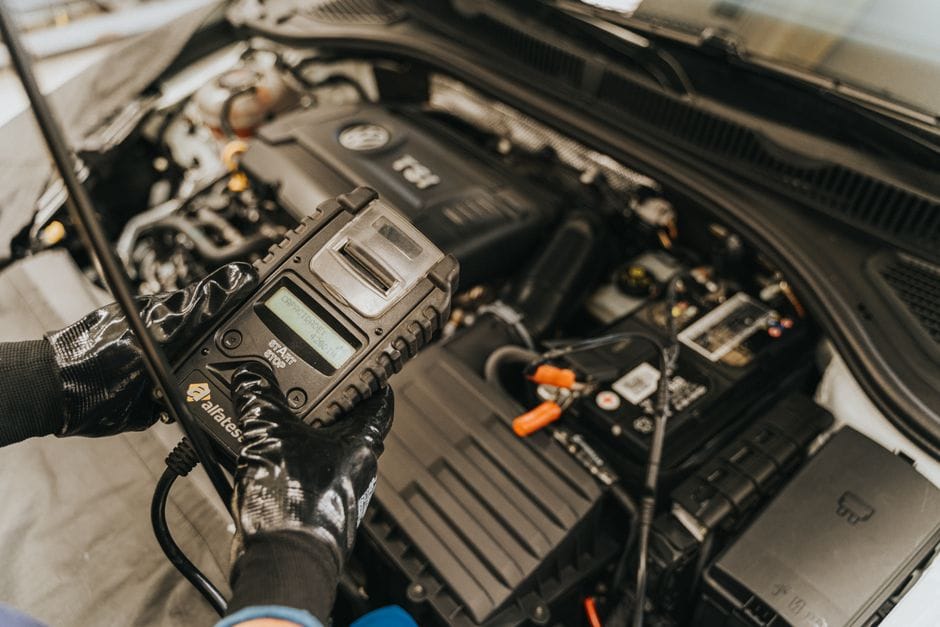
Alternator testing is the process of measuring your vehicle’s charging system output to determine whether the alternator is converting mechanical energy into electrical energy correctly. You perform these tests when you suspect the alternator is failing to keep the battery charged. The test itself is simple: you measure voltage at the battery terminals while the engine runs, then compare that reading against known-good specifications. But the diagnostic depth goes far beyond a single voltage check—it involves static testing, dynamic testing under load, ripple analysis for diode health, and verification of the entire charging circuit including belts, pulleys, wiring, and grounds.
The Alternator’s Role in Your Vehicle’s Electrical System
The alternator works in tandem with the battery and voltage regulator. The battery provides the initial cranking power and acts as a buffer, while the alternator supplies continuous current to run the ignition system, fuel pump, lights, infotainment, and all other electrical loads once the engine is running. The voltage regulator—whether internal or external—controls the alternator’s field current to maintain a stable output, typically between 13.5 and 14.8 volts depending on temperature and load. Without a properly functioning alternator, the battery will deplete within minutes of engine start, leading to a stall or complete electrical shutdown.
How Alternator Testing Differs from Battery and Starter Testing
Battery testing focuses on state of charge and capacity—measuring resting voltage, conducting a load test, and checking cold cranking amps. Starter testing evaluates the cranking circuit’s ability to draw high current and turn the engine. Alternator testing, by contrast, verifies the charging system’s ability to generate and regulate voltage and current while the engine runs. A common mistake is blaming the battery when the alternator is the culprit, or vice versa. Alternator testing specifically isolates the generation and regulation functions, which battery and starter tests cannot do.
Signs That You Need to Test Your Alternator
Common warning signs include a battery warning light on the dashboard, dimming or flickering headlights, a weak or dead battery that repeatedly needs jump-starts, electrical accessories that slow down or malfunction, a whining or grinding noise from the alternator bearing, and a burning rubber or electrical smell. If you experience any of these, testing the alternator should be your first diagnostic step before replacing any parts.
Essential Tools for Alternator Testing
Digital Multimeter (DMM)
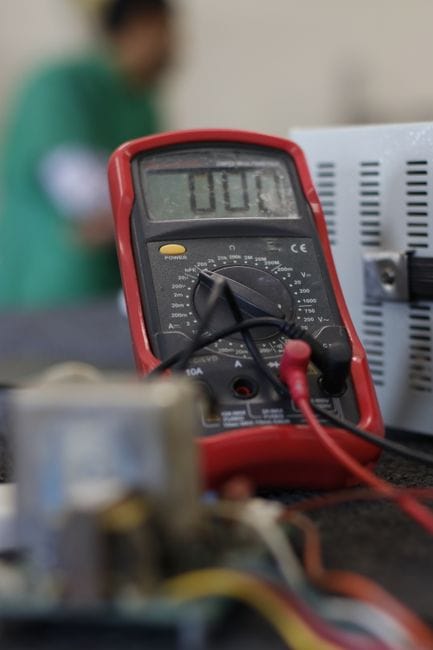
The digital multimeter is the cornerstone of alternator testing. You’ll need a DMM capable of measuring DC voltage (at least 20V range), AC voltage (for ripple testing), and DC amperage (ideally with a clamp meter function). A quality DMM with a peak-hold or min/max function is especially useful for capturing transient voltage spikes. For most DIY testing, a basic DMM with 0.1V resolution is sufficient, but for accurate ripple measurements, you’ll want a meter with AC millivolt capability.
Load Tester or Carbon Pile Tester
A load tester applies a controlled electrical load to the charging system to verify the alternator’s output under real-world demand. Carbon pile testers are the professional standard, allowing you to draw 50-100 amps or more while monitoring voltage. For DIY use, a simple headlight load or a dedicated alternator load tester can suffice, but a carbon pile gives the most accurate results.
Clamp Meter (AC/DC)
A clamp meter measures current without disconnecting wires—essential for checking amperage output at the alternator’s B+ terminal. Look for a clamp meter that handles at least 100 amps DC and has a low-current sensitivity for parasitic draw testing. This tool is critical for verifying that the alternator is producing its rated amperage, not just voltage.
Oscilloscope (Optional but Recommended)
For advanced diode testing, an oscilloscope provides a visual representation of the alternator’s AC ripple waveform. A healthy alternator produces a smooth DC output with minimal ripple; a failing diode creates a distinctive pattern of voltage dips. While not strictly necessary for basic testing, an oscilloscope is invaluable for diagnosing intermittent diode failures that a multimeter might miss.
Battery Tester and Hydrometer
Before testing the alternator, you must verify the battery is in good condition. A weak or sulfated battery can cause misleading alternator readings. Use a conductance tester or a traditional hydrometer to check specific gravity in each cell. The battery must be at least 75% charged before alternator testing begins.
Safety Equipment
Always wear safety glasses and insulated gloves when working around the charging system. The alternator can produce over 100 amps at 14 volts—enough to cause severe burns or start a fire if a tool slips and shorts the B+ terminal to ground. Keep loose clothing, jewelry, and tools away from the serpentine belt and rotating pulleys.
Pre-Test Inspection: Battery, Belts, and Wiring

Battery Condition Check
Begin with a visual inspection of the battery. Check for corrosion on terminals, loose connections, cracked case, or bulging sides. Measure resting voltage—a fully charged battery should read 12.6 volts or higher. If the battery reads below 12.4 volts, charge it fully before proceeding. Perform a load test if you suspect the battery may be weak; a battery that fails a load test will skew all subsequent alternator readings.
Serpentine Belt and Pulley Inspection
Inspect the serpentine belt for cracks, fraying, glazing, or excessive wear. Check belt tension—a loose belt will slip and cause the alternator to underperform. Look for a worn or damaged belt tensioner and check the alternator pulley for wobble or bearing noise. A seized or loose pulley can prevent the alternator from reaching proper RPM, leading to low output.
Wiring and Ground Integrity
Examine the alternator’s B+ output wire for corrosion, fraying, or loose connections at both the alternator and the battery. Check the ground strap between the engine block and the chassis, and the negative battery cable. Poor grounds are a common cause of undercharging and can produce erratic voltage readings. Use a multimeter to measure voltage drop across connections—anything over 0.2 volts indicates excessive resistance.
Warning
Warning Lights and Diagnostic Trouble Codes (DTCs)
Warning
Warning Lights and Diagnostic Trouble Codes (DTCs)
Before diving into physical testing, check the dashboard for the battery or charging system warning light. If illuminated, scan the vehicle’s OBD-II system for DTCs related to the charging system—codes like P0562 (low system voltage), P0563 (high system voltage), or P0620 (generator control circuit malfunction) can point directly to alternator or regulator issues. Some vehicles also store manufacturer-specific codes that indicate overcharging, undercharging, or field circuit faults. Clearing codes and re-scanning after repairs helps confirm the fix.
Static Voltage Testing (Engine Off)

Static testing measures the battery’s resting voltage with the engine off. This establishes a baseline and confirms the battery is sufficiently charged before dynamic testing. Set your DMM to DC volts and connect the red lead to the positive battery terminal and the black lead to the negative terminal. A reading of 12.6 volts or higher indicates a fully charged battery. 12.4 volts indicates approximately 75% charge, and anything below 12.2 volts suggests the battery is significantly discharged and must be charged before proceeding. If the battery is below 12.4 volts, charge it fully and re-test before moving on to alternator testing—otherwise, you risk misinterpreting low alternator output as a failure when the battery was simply depleted.
Also perform a static voltage drop test on the battery cables. With the engine off, measure voltage between the battery positive terminal and the alternator B+ terminal—this should be near zero (under 0.1 volts). Similarly, measure between the battery negative terminal and the alternator case. Any significant voltage drop indicates resistance in the charging circuit that will affect alternator performance.
Dynamic Voltage Testing (Engine Running)

Baseline Voltage at Idle
Start the engine and let it idle. With the DMM still connected to the battery terminals, record the voltage. A healthy charging system should produce between 13.5 and 14.8 volts at idle with no electrical loads turned on. If the reading is below 13.5 volts, the alternator may be undercharging. If it exceeds 14.8 volts, the voltage regulator may be faulty, causing overcharging that can damage the battery and electrical components.
Voltage at 2,000 RPM
Rev the engine to approximately 2,000 RPM and hold it steady. The voltage should rise slightly and stabilize within the same 13.5–14.8 volt range. A significant drop in voltage at higher RPM can indicate a failing alternator bearing, worn brushes, or a slipping belt. Conversely, a voltage spike above 15 volts at higher RPM suggests a failing regulator.
Voltage Under Electrical Load
Turn on all major electrical loads—headlights (high beam), rear defroster, blower motor on high, windshield wipers, and heated seats if available. With the engine at 2,000 RPM, the voltage should remain above 13.0 volts. If it drops below this threshold, the alternator is not producing sufficient current to meet demand, indicating a weak alternator or a failing rectifier. This load test is one of the most critical steps in alternator testing because it simulates real-world driving conditions.
Voltage Drop Testing Under Load
While the loads are on, measure voltage drop between the alternator B+ terminal and the battery positive terminal. This should be under 0.5 volts. Also measure between the alternator case and the battery negative terminal—this should be under 0.2 volts. Excessive voltage drop indicates wiring or connection issues that are robbing the charging system of output.
Current/Amperage Output Testing

Voltage testing alone doesn’t tell the full story—an alternator can produce correct voltage but fail to deliver adequate current. Amperage testing verifies the alternator’s ability to supply the electrical demands of the vehicle. Using a DC clamp meter, clamp it around the alternator’s B+ output wire (the main heavy-gauge wire). Start the engine and turn on all electrical loads. The amperage reading should increase as loads are added.
To test maximum output, you’ll need to load the system further. A carbon pile load tester connected across the battery can draw additional current. Slowly increase the load while monitoring both amperage and voltage. The alternator should be able to produce at least 80% of its rated output (stamped on the alternator case or in the vehicle’s service manual). For example, a 100-amp alternator should produce at least 80 amps under full load. If the amperage plateaus well below the rated output while voltage drops, the alternator’s internal components—stator, rotor, or rectifier—are likely failing.
Also check the amperage at idle with no loads. A healthy alternator should produce some charging current (typically 10–30 amps) to replenish the battery after starting. If the amperage reads near zero at idle, the alternator may not be charging until RPM increases, which can indicate worn brushes or a faulty regulator.
Ripple/AC Voltage Testing (Diode Health)

The alternator produces AC current that must be converted to DC by the diode rectifier assembly. When diodes fail, AC ripple bleeds into the DC output, causing electrical noise that can disrupt sensitive electronics, dim lights, and reduce battery life. Ripple testing measures this AC component.
Set your DMM to AC volts (millivolt range if available). With the engine running at 2,000 RPM and electrical loads turned on, connect the meter leads to the battery terminals. A healthy alternator should show less than 0.5 volts AC (500 millivolts) of ripple. Readings above 0.5 volts indicate failing diodes. Readings above 1.0 volt suggest multiple diode failures or a severely degraded rectifier.
For a more precise diagnosis, use an oscilloscope to view the ripple waveform. A healthy alternator produces a relatively flat DC line with small, uniform ripples. A single failed diode creates a distinctive pattern of one voltage dip per revolution. Two or more failed diodes produce irregular, larger dips. This visual analysis helps pinpoint whether the rectifier needs replacement or if the entire alternator should be rebuilt or replaced.
Note that some modern alternators with internal regulators may show slightly higher ripple due to the regulator’s switching action. Always compare readings against the manufacturer’s specifications for your specific vehicle.
Load Testing the Charging System

Load testing combines voltage, current, and ripple measurements under controlled electrical demand to simulate real-world driving conditions. This is the most comprehensive field test for an alternator. Connect a carbon pile load tester across the battery terminals, set it to draw approximately 50% of the alternator’s rated output, and run the engine at 2,000 RPM. Monitor the voltage—it should remain above 13.0 volts while the load is applied.
Gradually increase the load to 80% of the alternator’s rated output. The voltage should stay above 12.5 volts. If the voltage drops below these thresholds, the alternator cannot meet the electrical demand and is likely failing. Also monitor the amperage—it should increase proportionally with the load. If the amperage reading stalls while the load increases, the alternator’s current capacity is compromised.
During the load test, listen for unusual noises from the alternator—a whine or growl that changes with load can indicate bearing wear or a failing rotor. Also feel the alternator case for excessive heat; while some warmth is normal, extreme heat suggests internal shorting or overloading.
After the load test, remove the load and let the engine idle. The voltage should recover to the normal 13.5–14.8 volt range. If it takes an unusually long time to recover, or if the voltage remains low, the alternator’s internal voltage regulation is suspect.
Diagnostic Trouble Codes and Warning Lights

Diagnostic Trouble Codes and Warning Lights

Modern vehicles monitor the charging system through the engine control module (ECM) and body control module (BCM). When the alternator or voltage regulator begins to fail, the system often sets diagnostic trouble codes (DTCs) that can help pinpoint the issue. Common codes include P0562 (system voltage low), P0563 (system voltage high), P0620 (generator control circuit malfunction), and P0622 (generator field terminal circuit malfunction). Some manufacturers use proprietary codes like GM’s P3712 or Ford’s P1260 that indicate specific charging system faults.
To retrieve these codes, connect an OBD-II scanner to the vehicle’s diagnostic port. Note that some charging system codes are stored in the ECM and may require a professional-grade scanner to access. If the battery warning light is illuminated on the dashboard, the charging system is actively reporting a fault—this light is typically triggered when the system voltage drops below approximately 12.5 volts or rises above 15.5 volts while the engine is running.
After performing alternator tests and repairs, clear the codes and verify that the warning light resets. If the light returns immediately, the underlying issue has not been resolved. If the light stays off but the code reappears after a few drive cycles, there may be an intermittent fault in the wiring, connector, or the alternator itself.
Common Alternator Failure Modes and Their Symptoms

Worn Brushes
Carbon brushes transfer electrical current to the rotor’s slip rings. Over time, they wear down and lose contact, causing intermittent or complete loss of charging. Symptoms include a battery warning light that flickers, voltage that fluctuates with vibration, and an alternator that works when cold but fails when hot. Testing may show normal output at idle but a sharp drop at higher RPM or under load.
Failed Diodes
Diodes in the rectifier assembly convert AC to DC. When a diode fails, it can cause AC ripple in the DC output, leading to dimming lights, electrical noise in the audio system, and battery undercharging. A shorted diode can also cause the alternator to draw current from the battery when the engine is off, resulting in a parasitic drain. Ripple testing is the definitive diagnostic for this failure mode.
Faulty Voltage Regulator
The voltage regulator controls the alternator’s output to maintain the correct voltage range. A failing regulator can cause overcharging (voltage above 15 volts), undercharging (voltage below 13 volts), or erratic voltage fluctuations. Overcharging can boil battery electrolyte, cause a swollen battery case, and damage sensitive electronics. Undercharging leads to a dead battery and repeated jump-starts.
Bearing Failure
Worn alternator bearings produce a whining or grinding noise that changes with engine RPM. As bearings degrade, the rotor may contact the stator, causing internal damage and eventual alternator seizure. Testing may show normal electrical output initially, but the noise is a clear indicator that replacement is needed before catastrophic failure occurs.
Stator or Rotor Winding Failure
Short or open windings in the stator or rotor reduce the alternator’s ability to generate current. This often results in low amperage output despite normal voltage readings at idle. The alternator may pass a basic voltage test but fail a load test, producing significantly less than its rated amperage.
Interpreting Test Results: Pass/Fail Criteria

After completing all tests, compare your readings against the following pass/fail criteria to determine the alternator’s condition:
Voltage Output
- Pass: 13.5–14.8 volts at idle and 2,000 RPM, with and without load
- Fail (undercharging): Below 13.0 volts at idle or below 12.5 volts under load
- Fail (overcharging): Above 15.0 volts at any RPM
Amperage Output
- Pass: At least 80% of rated output under full load
- Fail: Less than 80% of rated output, or amperage that drops sharply as load increases
Ripple Voltage
- Pass: Less than 0.5 volts AC at the battery terminals
- Fail: More than 0.5 volts AC, indicating diode failure
Voltage Drop
Voltage Drop
- Pass: Less than 0.5 volts between alternator B+ and battery positive; less than 0.2 volts between alternator case and battery negative
- Fail: Voltage drop exceeding these thresholds indicates wiring or connection resistance
If the alternator fails any of these criteria, it should be repaired or replaced. However, always verify that the battery is in good condition and the charging circuit wiring is sound before condemning the alternator—a weak battery or corroded connections can produce false failure readings.
Bench Testing vs. In-Vehicle Testing

In-vehicle testing, as described throughout this guide, is the most practical approach for diagnosing a suspected alternator failure. It tests the alternator in its actual operating environment, including belt drive, wiring, and electrical loads. However, in-vehicle testing has limitations—it cannot isolate the alternator from other charging system components, and intermittent failures may not appear during a short test session.
Bench testing removes the alternator from the vehicle and tests it on a dedicated stand with a drive motor. This allows for precise control of RPM and load, and can reveal issues that are masked in the vehicle. Bench testing is typically performed by auto parts stores or professional rebuilders. It can verify rated output, test the regulator’s voltage setpoint, and check for bearing noise and internal shorts.
For DIYers, bench testing is rarely necessary unless you want to confirm a remanufactured alternator’s performance before installation. If you choose to bench test, you’ll need a variable-speed drive, a load tester, and a wiring harness to connect the alternator’s field and sense circuits. Most DIYers will find in-vehicle testing sufficient for diagnosis.
Parasitic Draw Testing (Related Diagnostic)

While not strictly an alternator test, parasitic draw testing is a related diagnostic that rules out battery drain issues that can mimic alternator failure. A parasitic draw is any electrical load that continues to drain the battery after the vehicle is turned off. Common causes include interior lights left on, faulty relays, aftermarket accessories, and—importantly—a shorted diode in the alternator that allows current to flow backward through the charging circuit.
To test for parasitic draw, ensure all electrical accessories are off, close all doors, and allow the vehicle’s modules to enter sleep mode (typically 15–30 minutes). Disconnect the negative battery cable and connect a multimeter set to DC amps in series between the negative terminal and the cable. A normal parasitic draw is typically 50 milliamps or less. If the draw exceeds this, begin pulling fuses one at a time to isolate the circuit. If removing the alternator’s fuse or connector eliminates the draw, the alternator’s rectifier is likely shorted and requires replacement.
Safety Precautions and Common Pitfalls

Safety First
Safety First
Always disconnect the battery negative terminal before working on the alternator or charging system wiring. Never disconnect the battery
The alternator is the unsung workhorse of your vehicle’s electrical system—a belt-driven generator that converts mechanical energy from the engine into alternating current (AC), which is then rectified into direct current (DC) to recharge the battery and power every electrical component while the engine runs. Unlike the battery, which only stores energy, the alternator is the primary source of electrical power once your engine is turning. When it fails, you’re not just looking at a dead battery; you’re looking at a cascading electrical failure that can strand you anywhere, from a busy intersection to a remote trailhead. That’s why understanding alternator testing isn’t a luxury—it’s a fundamental diagnostic skill for any vehicle owner.
In this complete DIY guide, we’ll walk you through the essential attributes of alternator testing: the voltage and amperage output specs you need to verify, the critical difference between a failing alternator and a weak battery, and the specific tools—from a simple digital multimeter to a dedicated alternator bench tester—that give you accurate results. You’ll learn how to perform a load test, check for diode ripple, and interpret the warning signs like dimming headlights, a whining alternator bearing, or the dreaded battery warning light. We’ll also cover the safety protocols for working around high-amperage charging circuits and the common pitfalls that lead DIYers to misdiagnose a perfectly good alternator.
What sets this guide apart is the data-driven approach: we’ll provide real-world voltage readings, amperage draw tables for common vehicle classes, and honest limitations of each testing method. You won’t find vague advice here—you’ll find actionable thresholds, step-by-step procedures, and the reasoning behind each test. Whether you’re troubleshooting a parasitic drain, confirming a remanufactured alternator’s output, or just want to understand your charging system better, this guide gives you the entity-level knowledge to diagnose with confidence and avoid throwing parts at a problem that might have a simpler fix.
What Is Alternator Testing and Why It Matters

Alternator testing is the process of measuring your vehicle’s charging system output to determine whether the alternator is converting mechanical energy into electrical energy correctly. You perform these tests when you suspect the alternator is failing to keep the battery charged. The test itself is simple: you measure voltage at the battery terminals while the engine runs, then compare that reading against known-good specifications. But the diagnostic depth goes far beyond a single voltage check—it involves static testing, dynamic testing under load, ripple analysis for diode health, and verification of the entire charging circuit including belts, pulleys, wiring, and grounds.
The Alternator’s Role in Your Vehicle’s Electrical System
The alternator works in tandem with the battery and voltage regulator. The battery provides the initial cranking power and acts as a buffer, while the alternator supplies continuous current to run the ignition system, fuel pump, lights, infotainment, and all other electrical loads once the engine is running. The voltage regulator—whether internal or external—controls the alternator’s field current to maintain a stable output, typically between 13.5 and 14.8 volts depending on temperature and load. Without a properly functioning alternator, the battery will deplete within minutes of engine start, leading to a stall or complete electrical shutdown.
How Alternator Testing Differs from Battery and Starter Testing
Battery testing focuses on state of charge and capacity—measuring resting voltage, conducting a load test, and checking cold cranking amps. Starter testing evaluates the cranking circuit’s ability to draw high current and turn the engine. Alternator testing, by contrast, verifies the charging system’s ability to generate and regulate voltage and current while the engine runs. A common mistake is blaming the battery when the alternator is the culprit, or vice versa. Alternator testing specifically isolates the generation and regulation functions, which battery and starter tests cannot do.
Signs That You Need to Test Your Alternator
Common warning signs include a battery warning light on the dashboard, dimming or flickering headlights, a weak or dead battery that repeatedly needs jump-starts, electrical accessories that slow down or malfunction, a whining or grinding noise from the alternator bearing, and a burning rubber or electrical smell. If you experience any of these, testing the alternator should be your first diagnostic step before replacing any parts.
Essential Tools for Alternator Testing

Digital Multimeter (DMM)
The digital multimeter is the cornerstone of alternator testing. You’ll need a DMM capable of measuring DC voltage (at least 20V range), AC voltage (for ripple testing), and DC amperage (ideally with a clamp meter function). A quality DMM with a peak-hold or min/max function is especially useful for capturing transient voltage spikes. For most DIY testing, a basic DMM with 0.1V resolution is sufficient, but for accurate ripple measurements, you’ll want a meter with AC millivolt capability.
Load Tester or Carbon Pile Tester
A load tester applies a controlled electrical load to the charging system to verify the alternator’s output under real-world demand. Carbon pile testers are the professional standard, allowing you to draw 50-100 amps or more while monitoring voltage. For DIY use, a simple headlight load or a dedicated alternator load tester can suffice, but a carbon pile gives the most accurate results.
Clamp Meter (AC/DC)
A clamp meter measures current without disconnecting wires—essential for checking amperage output at the alternator’s B+ terminal. Look for a clamp meter that handles at least 100 amps DC and has a low-current sensitivity for parasitic draw testing. This tool is critical for verifying that the alternator is producing its rated amperage, not just voltage.
Oscilloscope (Optional but Recommended)
For advanced diode testing, an oscilloscope provides a visual representation of the alternator’s AC ripple waveform. A healthy alternator produces a smooth DC output with minimal ripple; a failing diode creates a distinctive pattern of voltage dips. While not strictly necessary for basic testing, an oscilloscope is invaluable for diagnosing intermittent diode failures that a multimeter might miss.
Battery Tester and Hydrometer
Before testing the alternator, you must verify the battery is in good condition. A weak or sulfated battery can cause misleading alternator readings. Use a conductance tester or a traditional hydrometer to check specific gravity in each cell. The battery must be at least 75% charged before alternator testing begins.
Safety Equipment
Always wear safety glasses and insulated gloves when working around the charging system. The alternator can produce over 100 amps at 14 volts—enough to cause severe burns or start a fire if a tool slips and shorts the B+ terminal to ground. Keep loose clothing, jewelry, and tools away from the serpentine belt and rotating pulleys.
Pre-Test Inspection: Battery, Belts, and Wiring

Battery Condition Check
Begin with a visual inspection of the battery. Check for corrosion on terminals, loose connections, cracked case, or bulging sides. Measure resting voltage—a fully charged battery should read 12.6 volts or higher. If the battery reads below 12.4 volts, charge it fully before proceeding. Perform a load test if you suspect the battery may be weak; a battery that fails a load test will skew all subsequent alternator readings.
Serpentine Belt and Pulley Inspection
Inspect the serpentine belt for cracks, fraying, glazing, or excessive wear. Check belt tension—a loose belt will slip and cause the alternator to underperform. Look for a worn or damaged belt tensioner and check the alternator pulley for wobble or bearing noise. A seized or loose pulley can prevent the alternator from reaching proper RPM, leading to low output.
Wiring and Ground Integrity
Examine the alternator’s B+ output wire for corrosion, fraying, or loose connections at both the alternator and the battery. Check the ground strap between the engine block and the chassis, and the negative battery cable. Poor grounds are a common cause of undercharging and can produce erratic voltage readings. Use a multimeter to measure voltage drop across connections—anything over 0.2 volts indicates excessive resistance.
Warning
Alternator Testing: The Complete DIY Guide to Diagnosing Charging System Failures
The alternator is the unsung workhorse of your vehicle’s electrical system—a belt-driven generator that converts mechanical energy from the engine into alternating current (AC), which is then rectified into direct current (DC) to recharge the battery and power every electrical component while the engine runs. Unlike the battery, which only stores energy, the alternator is the primary source of electrical power once your engine is turning. When it fails, you’re not just looking at a dead battery; you’re looking at a cascading electrical failure that can strand you anywhere, from a busy intersection to a remote trailhead. That’s why understanding alternator testing isn’t a luxury—it’s a fundamental diagnostic skill for any vehicle owner.
In this complete DIY guide, we’ll walk you through the essential attributes of alternator testing: the voltage and amperage output specs you need to verify, the critical difference between a failing alternator and a weak battery, and the specific tools—from a simple digital multimeter to a dedicated alternator bench tester—that give you accurate results. You’ll learn how to perform a load test, check for diode ripple, and interpret the warning signs like dimming headlights, a whining alternator bearing, or the dreaded battery warning light. We’ll also cover the safety protocols for working around high-amperage charging circuits and the common pitfalls that lead DIYers to misdiagnose a perfectly good alternator.
What sets this guide apart is the data-driven approach: we’ll provide real-world voltage readings, amperage draw tables for common vehicle classes, and honest limitations of each testing method. You won’t find vague advice here—you’ll find actionable thresholds, step-by-step procedures, and the reasoning behind each test. Whether you’re troubleshooting a parasitic drain, confirming a remanufactured alternator’s output, or just want to understand your charging system better, this guide gives you the entity-level knowledge to diagnose with confidence and avoid throwing parts at a problem that might have a simpler fix.
What Is Alternator Testing and Why It Matters

Alternator testing is the process of measuring your vehicle’s charging system output to determine whether the alternator is converting mechanical energy into electrical energy correctly. You perform these tests when you suspect the alternator is failing to keep the battery charged. The test itself is simple: you measure voltage at the battery terminals while the engine runs, then compare that reading against known-good specifications. But the diagnostic depth goes far beyond a single voltage check—it involves static testing, dynamic testing under load, ripple analysis for diode health, and verification of the entire charging circuit including belts, pulleys, wiring, and grounds.
The Alternator’s Role in Your Vehicle’s Electrical System
The alternator works in tandem with the battery and voltage regulator. The battery provides the initial cranking power and acts as a buffer, while the alternator supplies continuous current to run the ignition system, fuel pump, lights, infotainment, and all other electrical loads once the engine is running. The voltage regulator—whether internal or external—controls the alternator’s field current to maintain a stable output, typically between 13.5 and 14.8 volts depending on temperature and load. Without a properly functioning alternator, the battery will deplete within minutes of engine start, leading to a stall or complete electrical shutdown.
How Alternator Testing Differs from Battery and Starter Testing
Battery testing focuses on state of charge and capacity—measuring resting voltage, conducting a load test, and checking cold cranking amps. Starter testing evaluates the cranking circuit’s ability to draw high current and turn the engine. Alternator testing, by contrast, verifies the charging system’s ability to generate and regulate voltage and current while the engine runs. A common mistake is blaming the battery when the alternator is the culprit, or vice versa. Alternator testing specifically isolates the generation and regulation functions, which battery and starter tests cannot do.
Signs That You Need to Test Your Alternator
Common warning signs include a battery warning light on the dashboard, dimming or flickering headlights, a weak or dead battery that repeatedly needs jump-starts, electrical accessories that slow down or malfunction, a whining or grinding noise from the alternator bearing, and a burning rubber or electrical smell. If you experience any of these, testing the alternator should be your first diagnostic step before replacing any parts.
Essential Tools for Alternator Testing

Digital Multimeter (DMM)
The digital multimeter is the cornerstone of alternator testing. You’ll need a DMM capable of measuring DC voltage (at least 20V range), AC voltage (for ripple testing), and DC amperage (ideally with a clamp meter function). A quality DMM with a peak-hold or min/max function is especially useful for capturing transient voltage spikes. For most DIY testing, a basic DMM with 0.1V resolution is sufficient, but for accurate ripple measurements, you’ll want a meter with AC millivolt capability.
Load Tester or Carbon Pile Tester
A load tester applies a controlled electrical load to the charging system to verify the alternator’s output under real-world demand. Carbon pile testers are the professional standard, allowing you to draw 50-100 amps or more while monitoring voltage. For DIY use, a simple headlight load or a dedicated alternator load tester can suffice, but a carbon pile gives the most accurate results.
Clamp Meter (AC/DC)
A clamp meter measures current without disconnecting wires—essential for checking amperage output at the alternator’s B+ terminal. Look for a clamp meter that handles at least 100 amps DC and has a low-current sensitivity for parasitic draw testing. This tool is critical for verifying that the alternator is producing its rated amperage, not just voltage.
Oscilloscope (Optional but Recommended)
For advanced diode testing, an oscilloscope provides a visual representation of the alternator’s AC ripple waveform. A healthy alternator produces a smooth DC output with minimal ripple; a failing diode creates a distinctive pattern of voltage dips. While not strictly necessary for basic testing, an oscilloscope is invaluable for diagnosing intermittent diode failures that a multimeter might miss.
Battery Tester and Hydrometer
Before testing the alternator, you must verify the battery is in good condition. A weak or sulfated battery can cause misleading alternator readings. Use a conductance tester or a traditional hydrometer to check specific gravity in each cell. The battery must be at least 75% charged before alternator testing begins.
Safety Equipment
Always wear safety glasses and insulated gloves when working around the charging system. The alternator can produce over 100 amps at 14 volts—enough to cause severe burns or start a fire if a tool slips and shorts the B+ terminal to ground. Keep loose clothing, jewelry, and tools away from the serpentine belt and rotating pulleys.
Pre-Test Inspection: Battery, Belts, and Wiring

Battery Condition Check
Begin with a visual inspection of the battery. Check for corrosion on terminals, loose connections, cracked case, or bulging sides. Measure resting voltage—a fully charged battery should read 12.6 volts or higher. If the battery reads below 12.4 volts, charge it fully before proceeding. Perform a load test if you suspect the battery may be weak; a battery that fails a load test will skew all subsequent alternator readings.
Serpentine Belt and Pulley Inspection
Inspect the serpentine belt for cracks, fraying, glazing, or excessive wear. Check belt tension—a loose belt will slip and cause the alternator to underperform. Look for a worn or damaged belt tensioner and check the alternator pulley for wobble or bearing noise. A seized or loose pulley can prevent the alternator from reaching proper RPM, leading to low output.
Wiring and Ground Integrity
Examine the alternator’s B+ output wire for corrosion, fraying, or loose connections at both the alternator and the battery. Check the ground strap between the engine block and the chassis, and the negative battery cable. Poor grounds are a common cause of undercharging and can produce erratic voltage readings. Use a multimeter to measure voltage drop across connections—anything over 0.2 volts indicates excessive resistance.
Warning
Alternator Testing: The Complete DIY Guide to Diagnosing Charging System Failures
The alternator is the unsung workhorse of your vehicle’s electrical system—a belt-driven generator that converts mechanical energy from the engine into alternating current (AC), which is then rectified into direct current (DC) to recharge the battery and power every electrical component while the engine runs. Unlike the battery, which only stores energy, the alternator is the primary source of electrical power once your engine is turning. When it fails, you’re not just looking at a dead battery; you’re looking at a cascading electrical failure that can strand you anywhere, from a busy intersection to a remote trailhead. That’s why understanding alternator testing isn’t a luxury—it’s a fundamental diagnostic skill for any vehicle owner.
In this complete DIY guide, we’ll walk you through the essential attributes of alternator testing: the voltage and amperage output specs you need to verify, the critical difference between a failing alternator and a weak battery, and the specific tools—from a simple digital multimeter to a dedicated alternator bench tester—that give you accurate results. You’ll learn how to perform a load test, check for diode ripple, and interpret the warning signs like dimming headlights, a whining alternator bearing, or the dreaded battery warning light. We’ll also cover the safety protocols for working around high-amperage charging circuits and the common pitfalls that lead DIYers to misdiagnose a perfectly good alternator.
What sets this guide apart is the data-driven approach: we’ll provide real-world voltage readings, amperage draw tables for common vehicle classes, and honest limitations of each testing method. You won’t find vague advice here—you’ll find actionable thresholds, step-by-step procedures, and the reasoning behind each test. Whether you’re troubleshooting a parasitic drain, confirming a remanufactured alternator’s output, or just want to understand your charging system better, this guide gives you the entity-level knowledge to diagnose with confidence and avoid throwing parts at a problem that might have a simpler fix.
What Is Alternator Testing and Why It Matters

Alternator testing is the process of measuring your vehicle’s charging system output to determine whether the alternator is converting mechanical energy into electrical energy correctly. You perform these tests when you suspect the alternator is failing to keep the battery charged. The test itself is simple: you measure voltage at the battery terminals while the engine runs, then compare that reading against known-good specifications. But the diagnostic depth goes far beyond a single voltage check—it involves static testing, dynamic testing under load, ripple analysis for diode health, and verification of the entire charging circuit including belts, pulleys, wiring, and grounds.
The Alternator’s Role in Your Vehicle’s Electrical System
The alternator works in tandem with the battery and voltage regulator. The battery provides the initial cranking power and acts as a buffer, while the alternator supplies continuous current to run the ignition system, fuel pump, lights, infotainment, and all other electrical loads once the engine is running. The voltage regulator—whether internal or external—controls the alternator’s field current to maintain a stable output, typically between 13.5 and 14.8 volts depending on temperature and load. Without a properly functioning alternator, the battery will deplete within minutes of engine start, leading to a stall or complete electrical shutdown.
How Alternator Testing Differs from Battery and Starter Testing
Battery testing focuses on state of charge and capacity—measuring resting voltage, conducting a load test, and checking cold cranking amps. Starter testing evaluates the cranking circuit’s ability to draw high current and turn the engine. Alternator testing, by contrast, verifies the charging system’s ability to generate and regulate voltage and current while the engine runs. A common mistake is blaming the battery when the alternator is the culprit, or vice versa. Alternator testing specifically isolates the generation and regulation functions, which battery and starter tests cannot do.
Signs That You Need to Test Your Alternator
Common warning signs include a battery warning light on the dashboard, dimming or flickering headlights, a weak or dead battery that repeatedly needs jump-starts, electrical accessories that slow down or malfunction, a whining or grinding noise from the alternator bearing, and a burning rubber or electrical smell. If you experience any of these, testing the alternator should be your first diagnostic step before replacing any parts.
Essential Tools for Alternator Testing

Digital Multimeter (DMM)
The digital multimeter is the cornerstone of alternator testing. You’ll need a DMM capable of measuring DC voltage (at least 20V range), AC voltage (for ripple testing), and DC amperage (ideally with a clamp meter function). A quality DMM with a peak-hold or min/max function is especially useful for capturing transient voltage spikes. For most DIY testing, a basic DMM with 0.1V resolution is sufficient, but for accurate ripple measurements, you’ll want a meter with AC millivolt capability.
Load Tester or Carbon Pile Tester
A load tester applies a controlled electrical load to the charging system to verify the alternator’s output under real-world demand. Carbon pile testers are the professional standard, allowing you to draw 50-100 amps or more while monitoring voltage. For DIY use, a simple headlight load or a dedicated alternator load tester can suffice, but a carbon pile gives the most accurate results.
Clamp Meter (AC/DC)
A clamp meter measures current without disconnecting wires—essential for checking amperage output at the alternator’s B+ terminal. Look for a clamp meter that handles at least 100 amps DC and has a low-current sensitivity for parasitic draw testing. This tool is critical for verifying that the alternator is producing its rated amperage, not just voltage.
Oscilloscope (Optional but Recommended)
For advanced diode testing, an oscilloscope provides a visual representation of the alternator’s AC ripple waveform. A healthy alternator produces a smooth DC output with minimal ripple; a failing diode creates a distinctive pattern of voltage dips. While not strictly necessary for basic testing, an oscilloscope is invaluable for diagnosing intermittent diode failures that a multimeter might miss.
Battery Tester and Hydrometer
Before testing the alternator, you must verify the battery is in good condition. A weak or sulfated battery can cause misleading alternator readings. Use a conductance tester or a traditional hydrometer to check specific gravity in each cell. The battery must be at least 75% charged before alternator testing begins.
Safety Equipment
Always wear safety glasses and insulated gloves when working around the charging system. The alternator can produce over 100 amps at 14 volts—enough to cause severe burns or start a fire if a tool slips and shorts the B+ terminal to ground. Keep loose clothing, jewelry, and tools away from the serpentine belt and rotating pulleys.
Pre-Test Inspection: Battery, Belts, and Wiring

Battery Condition Check
Begin with a visual inspection of the battery. Check for corrosion on terminals, loose connections, cracked case, or bulging sides. Measure resting voltage—a fully charged battery should read 12.6 volts or higher. If the battery reads below 12.4 volts, charge it fully before proceeding. Perform a load test if you suspect the battery may be weak; a battery that fails a load test will skew all subsequent alternator readings.
Serpentine Belt and Pulley Inspection
Inspect the serpentine belt for cracks, fraying, glazing, or excessive wear. Check belt tension—a loose belt will slip and cause the alternator to underperform. Look for a worn or damaged belt tensioner and check the alternator pulley for wobble or bearing noise. A seized or loose pulley can prevent the alternator from reaching proper RPM, leading to low output.
Wiring and Ground Integrity
Examine the alternator’s B+ output wire for corrosion, fraying, or loose connections at both the alternator and the battery. Check the ground strap between the engine block and the chassis, and the negative battery cable. Poor grounds are a common cause of undercharging and can produce erratic voltage readings. Use a multimeter to measure voltage drop across connections—anything over 0.2 volts indicates excessive resistance.
Warning
Alternator Testing: The Complete DIY Guide to Diagnosing Charging System Failures
The alternator is the unsung workhorse of your vehicle’s electrical system—a belt-driven generator that converts mechanical energy from the engine into alternating current (AC), which is then rectified into direct current (DC) to recharge the battery and power every electrical component while the engine runs. Unlike the battery, which only stores energy, the alternator is the primary source of electrical power once your engine is turning. When it fails, you’re not just looking at a dead battery; you’re looking at a cascading electrical failure that can strand you anywhere, from a busy intersection to a remote trailhead. That’s why understanding alternator testing isn’t a luxury—it’s a fundamental diagnostic skill for any vehicle owner.
In this complete DIY guide, we’ll walk you through the essential attributes of alternator testing: the voltage and amperage output specs you need to verify, the critical difference between a failing alternator and a weak battery, and the specific tools—from a simple digital multimeter to a dedicated alternator bench tester—that give you accurate results. You’ll learn how to perform a load test, check for diode ripple, and interpret the warning signs like dimming headlights, a whining alternator bearing, or the dreaded battery warning light. We’ll also cover the safety protocols for working around high-amperage charging circuits and the common pitfalls that lead DIYers to misdiagnose a perfectly good alternator.
What sets this guide apart is the data-driven approach: we’ll provide real-world voltage readings, amperage draw tables for common vehicle classes, and honest limitations of each testing method. You won’t find vague advice here—you’ll find actionable thresholds, step-by-step procedures, and the reasoning behind each test. Whether you’re troubleshooting a parasitic drain, confirming a remanufactured alternator’s output, or just want to understand your charging system better, this guide gives you the entity-level knowledge to diagnose with confidence and avoid throwing parts at a problem that might have a simpler fix.
What Is Alternator Testing and Why It Matters

Alternator testing is the process of measuring your vehicle’s charging system output to determine whether the alternator is converting mechanical energy into electrical energy correctly. You perform these tests when you suspect the alternator is failing to keep the battery charged. The test itself is simple: you measure voltage at the battery terminals while the engine runs, then compare that reading against known-good specifications. But the diagnostic depth goes far beyond a single voltage check—it involves static testing, dynamic testing under load, ripple analysis for diode health, and verification of the entire charging circuit including belts, pulleys, wiring, and grounds.
The Alternator’s Role in Your Vehicle’s Electrical System
The alternator works in tandem with the battery and voltage regulator. The battery provides the initial cranking power and acts as a buffer, while the alternator supplies continuous current to run the ignition system, fuel pump, lights, infotainment, and all other electrical loads once the engine is running. The voltage regulator—whether internal or external—controls the alternator’s field current to maintain a stable output, typically between 13.5 and 14.8 volts depending on temperature and load. Without a properly functioning alternator, the battery will deplete within minutes of engine start, leading to a stall or complete electrical shutdown.
How Alternator Testing Differs from Battery and Starter Testing
Battery testing focuses on state of charge and capacity—measuring resting voltage, conducting a load test, and checking cold cranking amps. Starter testing evaluates the cranking circuit’s ability to draw high current and turn the engine. Alternator testing, by contrast, verifies the charging system’s ability to generate and regulate voltage and current while the engine runs. A common mistake is blaming the battery when the alternator is the culprit, or vice versa. Alternator testing specifically isolates the generation and regulation functions, which battery and starter tests cannot do.
Signs That You Need to Test Your Alternator
Common warning signs include a battery warning light on the dashboard, dimming or flickering headlights, a weak or dead battery that repeatedly needs jump-starts, electrical accessories that slow down or malfunction, a whining or grinding noise from the alternator bearing, and a burning rubber or electrical smell. If you experience any of these, testing the alternator should be your first diagnostic step before replacing any parts.
Essential Tools for Alternator Testing

Digital Multimeter (DMM)
The digital multimeter is the cornerstone of alternator testing. You’ll need a DMM capable of measuring DC voltage (at least 20V range), AC voltage (for ripple testing), and DC amperage (ideally with a clamp meter function). A quality DMM with a peak-hold or min/max function is especially useful for capturing transient voltage spikes. For most DIY testing, a basic DMM with 0.1V resolution is sufficient, but for accurate ripple measurements, you’ll want a meter with AC millivolt capability.
Load Tester or Carbon Pile Tester
A load tester applies a controlled electrical load to the charging system to verify the alternator’s output under real-world demand. Carbon pile testers are the professional standard, allowing you to draw 50-100 amps or more while monitoring voltage. For DIY use, a simple headlight load or a dedicated alternator load tester can suffice, but a carbon pile gives the most accurate results.
Clamp Meter (AC/DC)
A clamp meter measures current without disconnecting wires—essential for checking amperage output at the alternator’s B+ terminal. Look for a clamp meter that handles at least 100 amps DC and has a low-current sensitivity for parasitic draw testing. This tool is critical for verifying that the alternator is producing its rated amperage, not just voltage.
Oscilloscope (Optional but Recommended)
For advanced diode testing, an oscilloscope provides a visual representation of the alternator’s AC ripple waveform. A healthy alternator produces a smooth DC output with minimal ripple; a failing diode creates a distinctive pattern of voltage dips. While not strictly necessary for basic testing, an oscilloscope is invaluable for diagnosing intermittent diode failures that a multimeter might miss.
Battery Tester and Hydrometer
Before testing the alternator, you must verify the battery is in good condition. A weak or sulfated battery can cause misleading alternator readings. Use a conductance tester or a traditional hydrometer to check specific gravity in each cell. The battery must be at least 75% charged before alternator testing begins.
Safety Equipment
Always wear safety glasses and insulated gloves when working around the charging system. The alternator can produce over 100 amps at 14 volts—enough to cause severe burns or start a fire if a tool slips and shorts the B+ terminal to ground. Keep loose clothing, jewelry, and tools away from the serpentine belt and rotating pulleys.
Pre-Test Inspection: Battery, Belts, and Wiring

Battery Condition Check
Begin with a visual inspection of the battery. Check for corrosion on terminals, loose connections, cracked case, or bulging sides. Measure resting voltage—a fully charged battery should read 12.6 volts or higher. If the battery reads below 12.4 volts, charge it fully before proceeding. Perform a load test if you suspect the battery may be weak; a battery that fails a load test will skew all subsequent alternator readings.
Serpentine Belt and Pulley Inspection
Inspect the serpentine belt for cracks, fraying, glazing, or excessive wear. Check belt tension—a loose belt will slip and cause the alternator to underperform. Look for a worn or damaged belt tensioner and check the alternator pulley for wobble or bearing noise. A seized or loose pulley can prevent the alternator from reaching proper RPM, leading to low output.
Wiring and Ground Integrity
Examine the alternator’s B+ output wire for corrosion, fraying, or loose connections at both the alternator and the battery. Check the ground strap between the engine block and the chassis, and the negative battery cable. Poor grounds are a common cause of undercharging and can produce erratic voltage readings. Use a multimeter to measure voltage drop across connections—anything over 0.2 volts indicates excessive resistance.
Warning
Alternator Testing: The Complete DIY Guide to Diagnosing Charging System Failures
The alternator is the unsung workhorse of your vehicle’s electrical system—a belt-driven generator that converts mechanical energy from the engine into alternating current (AC), which is then rectified into direct current (DC) to recharge the battery and power every electrical component while the engine runs. Unlike the battery, which only stores energy, the alternator is the primary source of electrical power once your engine is turning. When it fails, you’re not just looking at a dead battery; you’re looking at a cascading electrical failure that can strand you anywhere, from a busy intersection to a remote trailhead. That’s why understanding alternator testing isn’t a luxury—it’s a fundamental diagnostic skill for any vehicle owner.
In this complete DIY guide, we’ll walk you through the essential attributes of alternator testing: the voltage and amperage output specs you need to verify, the critical difference between a failing alternator and a weak battery, and the specific tools—from a simple digital multimeter to a dedicated alternator bench tester—that give you accurate results. You’ll learn how to perform a load test, check for diode ripple, and interpret the warning signs like dimming headlights, a whining alternator bearing, or the dreaded battery warning light. We’ll also cover the safety protocols for working around high-amperage charging circuits and the common pitfalls that lead DIYers to misdiagnose a perfectly good alternator.
What sets this guide apart is the data-driven approach: we’ll provide real-world voltage readings, amperage draw tables for common vehicle classes, and honest limitations of each testing method. You won’t find vague advice here—you’ll find actionable thresholds, step-by-step procedures, and the reasoning behind each test. Whether you’re troubleshooting a parasitic drain, confirming a remanufactured alternator’s output, or just want to understand your charging system better, this guide gives you the entity-level knowledge to diagnose with confidence and avoid throwing parts at a problem that might have a simpler fix.
What Is Alternator Testing and Why It Matters

Alternator testing is the process of measuring your vehicle’s charging system output to determine whether the alternator is converting mechanical energy into electrical energy correctly. You perform these tests when you suspect the alternator is failing to keep the battery charged. The test itself is simple: you measure voltage at the battery terminals while the engine runs, then compare that reading against known-good specifications. But the diagnostic depth goes far beyond a single voltage check—it involves static testing, dynamic testing under load, ripple analysis for diode health, and verification of the entire charging circuit including belts, pulleys, wiring, and grounds.
The Alternator’s Role in Your Vehicle’s Electrical System
The alternator works in tandem with the battery and voltage regulator. The battery provides the initial cranking power and acts as a buffer, while the alternator supplies continuous current to run the ignition system, fuel pump, lights, infotainment, and all other electrical loads once the engine is running. The voltage regulator—whether internal or external—controls the alternator’s field current to maintain a stable output, typically between 13.5 and 14.8 volts depending on temperature and load. Without a properly functioning alternator, the battery will deplete within minutes of engine start, leading to a stall or complete electrical shutdown.
How Alternator Testing Differs from Battery and Starter Testing
Battery testing focuses on state of charge and capacity—measuring resting voltage, conducting a load test, and checking cold cranking amps. Starter testing evaluates the cranking circuit’s ability to draw high current and turn the engine. Alternator testing, by contrast, verifies the charging system’s ability to generate and regulate voltage and current while the engine runs. A common mistake is blaming the battery when the alternator is the culprit, or vice versa. Alternator testing specifically isolates the generation and regulation functions, which battery and starter tests cannot do.
Signs That You Need to Test Your Alternator
Common warning signs include a battery warning light on the dashboard, dimming or flickering headlights, a weak or dead battery that repeatedly needs jump-starts, electrical accessories that slow down or malfunction, a whining or grinding noise from the alternator bearing, and a burning rubber or electrical smell. If you experience any of these, testing the alternator should be your first diagnostic step before replacing any parts.
Essential Tools for Alternator Testing

Digital Multimeter (DMM)
The digital multimeter is the cornerstone of alternator testing. You’ll need a DMM capable of measuring DC voltage (at least 20V range), AC voltage (for ripple testing), and DC amperage (ideally with a clamp meter function). A quality DMM with a peak-hold or min/max function is especially useful for capturing transient voltage spikes. For most DIY testing, a basic DMM with 0.1V resolution is sufficient, but for accurate ripple measurements, you’ll want a meter with AC millivolt capability.
Load Tester or Carbon Pile Tester
A load tester applies a controlled electrical load to the charging system to verify the alternator’s output under real-world demand. Carbon pile testers are the professional standard, allowing you to draw 50-100 amps or more while monitoring voltage. For DIY use, a simple headlight load or a dedicated alternator load tester can suffice, but a carbon pile gives the most accurate results.
Clamp Meter (AC/DC)
A clamp meter measures current without disconnecting wires—essential for checking amperage output at the alternator’s B+ terminal. Look for a clamp meter that handles at least 100 amps DC and has a low-current sensitivity for parasitic draw testing. This tool is critical for verifying that the alternator is producing its rated amperage, not just voltage.
Oscilloscope (Optional but Recommended)
For advanced diode testing, an oscilloscope provides a visual representation of the alternator’s AC ripple waveform. A healthy alternator produces a smooth DC output with minimal ripple; a failing diode creates a distinctive pattern of voltage dips. While not strictly necessary for basic testing, an oscilloscope is invaluable for diagnosing intermittent diode failures that a multimeter might miss.
Battery Tester and Hydrometer
Before testing the alternator, you must verify the battery is in good condition. A weak or sulfated battery can cause misleading alternator readings. Use a conductance tester or a traditional hydrometer to check specific gravity in each cell. The battery must be at least 75% charged before alternator testing begins.
Safety Equipment
Always wear safety glasses and insulated gloves when working around the charging system. The alternator can produce over 100 amps at 14 volts—enough to cause severe burns or start a fire if a tool slips and shorts the B+ terminal to ground. Keep loose clothing, jewelry, and tools away from the serpentine belt and rotating pulleys.
Pre-Test Inspection: Battery, Belts, and Wiring

Battery Condition Check
Begin with a visual inspection of the battery. Check for corrosion on terminals, loose connections, cracked case, or bulging sides. Measure resting voltage—a fully charged battery should read 12.6 volts or higher. If the battery reads below 12.4 volts, charge it fully before proceeding. Perform a load test if you suspect the battery may be weak; a battery that fails a load test will skew all subsequent alternator readings.
Serpentine Belt and Pulley Inspection
Inspect the serpentine belt for cracks, fraying, glazing, or excessive wear. Check belt tension—a loose belt will slip and cause the alternator to underperform. Look for a worn or damaged belt tensioner and check the alternator pulley for wobble or bearing noise. A seized or loose pulley can prevent the alternator from reaching proper RPM, leading to low output.
Wiring and Ground Integrity
Examine the alternator’s B+ output wire for corrosion, fraying, or loose connections at both the alternator and the battery. Check the ground strap between the engine block and the chassis, and the negative battery cable. Poor grounds are a common cause of undercharging and can produce erratic voltage readings. Use a multimeter to measure voltage drop across connections—anything over 0.2 volts indicates excessive resistance.
Warning
Alternator Testing: The Complete DIY Guide to Diagnosing Charging System Failures
The alternator is the unsung workhorse of your vehicle’s electrical system—a belt-driven generator that converts mechanical energy from the engine into alternating current (AC), which is then rectified into direct current (DC) to recharge the battery and power every electrical component while the engine runs. Unlike the battery, which only stores energy, the alternator is the primary source of electrical power once your engine is turning. When it fails, you’re not just looking at a dead battery; you’re looking at a cascading electrical failure that can strand you anywhere, from a busy intersection to a remote trailhead. That’s why understanding alternator testing isn’t a luxury—it’s a fundamental diagnostic skill for any vehicle owner.
In this complete DIY guide, we’ll walk you through the essential attributes of alternator testing: the voltage and amperage output specs you need to verify, the critical difference between a failing alternator and a weak battery, and the specific tools—from a simple digital multimeter to a dedicated alternator bench tester—that give you accurate results. You’ll learn how to perform a load test, check for diode ripple, and interpret the warning signs like dimming headlights, a whining alternator bearing, or the dreaded battery warning light. We’ll also cover the safety protocols for working around high-amperage charging circuits and the common pitfalls that lead DIYers to misdiagnose a perfectly good alternator.
What sets this guide apart is the data-driven approach: we’ll provide real-world voltage readings, amperage draw tables for common vehicle classes, and honest limitations of each testing method. You won’t find vague advice here—you’ll find actionable thresholds, step-by-step procedures, and the reasoning behind each test. Whether you’re troubleshooting a parasitic drain, confirming a remanufactured alternator’s output, or just want to understand your charging system better, this guide gives you the entity-level knowledge to diagnose with confidence and avoid throwing parts at a problem that might have a simpler fix.
What Is Alternator Testing and Why It Matters

Alternator testing is the process of measuring your vehicle’s charging system output to determine whether the alternator is converting mechanical energy into electrical energy correctly. You perform these tests when you suspect the alternator is failing to keep the battery charged. The test itself is simple: you measure voltage at the battery terminals while the engine runs, then compare that reading against known-good specifications. But the diagnostic depth goes far beyond a single voltage check—it involves static testing, dynamic testing under load, ripple analysis for diode health, and verification of the entire charging circuit including belts, pulleys, wiring, and grounds.
The Alternator’s Role in Your Vehicle’s Electrical System
The alternator works in tandem with the battery and voltage regulator. The battery provides the initial cranking power and acts as a buffer, while the alternator supplies continuous current to run the ignition system, fuel pump, lights, infotainment, and all other electrical loads once the engine is running. The voltage regulator—whether internal or external—controls the alternator’s field current to maintain a stable output, typically between 13.5 and 14.8 volts depending on temperature and load. Without a properly functioning alternator, the battery will deplete within minutes of engine start, leading to a stall or complete electrical shutdown.
How Alternator Testing Differs from Battery and Starter Testing
Battery testing focuses on state of charge and capacity—measuring resting voltage, conducting a load test, and checking cold cranking amps. Starter testing evaluates the cranking circuit’s ability to draw high current and turn the engine. Alternator testing, by contrast, verifies the charging system’s ability to generate and regulate voltage and current while the engine runs. A common mistake is blaming the battery when the alternator is the culprit, or vice versa. Alternator testing specifically isolates the generation and regulation functions, which battery and starter tests cannot do.
Signs That You Need to Test Your Alternator
Common warning signs include a battery warning light on the dashboard, dimming or flickering headlights, a weak or dead battery that repeatedly needs jump-starts, electrical accessories that slow down or malfunction, a whining or grinding noise from the alternator bearing, and a burning rubber or electrical smell. If you experience any of these, testing the alternator should be your first diagnostic step before replacing any parts.
Essential Tools for Alternator Testing

Digital Multimeter (DMM)
The digital multimeter is the cornerstone of alternator testing. You’ll need a DMM capable of measuring DC voltage (at least 20V range), AC voltage (for ripple testing), and DC amperage (ideally with a clamp meter function). A quality DMM with a peak-hold or min/max function is especially useful for capturing transient voltage spikes. For most DIY testing, a basic DMM with 0.1V resolution is sufficient, but for accurate ripple measurements, you’ll want a meter with AC millivolt capability.
Load Tester or Carbon Pile Tester
A load tester applies a controlled electrical load to the charging system to verify the alternator’s output under real-world demand. Carbon pile testers are the professional standard, allowing you to draw 50-100 amps or more while monitoring voltage. For DIY use, a simple headlight load or a dedicated alternator load tester can suffice, but a carbon pile gives the most accurate results.
Clamp Meter (AC/DC)
A clamp meter measures current without disconnecting wires—essential for checking amperage output at the alternator’s B+ terminal. Look for a clamp meter that handles at least 100 amps DC and has a low-current sensitivity for parasitic draw testing. This tool is critical for verifying that the alternator is producing its rated amperage, not just voltage.
Oscilloscope (Optional but Recommended)
For advanced diode testing, an oscilloscope provides a visual representation of the alternator’s AC ripple waveform. A healthy alternator produces a smooth DC output with minimal ripple; a failing diode creates a distinctive pattern of voltage dips. While not strictly necessary for basic testing, an oscilloscope is invaluable for diagnosing intermittent diode failures that a multimeter might miss.
Battery Tester and Hydrometer
Before testing the alternator, you must verify the battery is in good condition. A weak or sulfated battery can cause misleading alternator readings. Use a conductance tester or a traditional hydrometer to check specific gravity in each cell. The battery must be at least 75% charged before alternator testing begins.
Safety Equipment
Always wear safety glasses and insulated gloves when working around the charging system. The alternator can produce over 100 amps at 14 volts—enough to cause severe burns or start a fire if a tool slips and shorts the B+ terminal to ground. Keep loose clothing, jewelry, and tools away from the serpentine belt and rotating pulleys.
Pre-Test Inspection: Battery, Belts, and Wiring

Battery Condition Check
Begin with a visual inspection of the battery. Check for corrosion on terminals, loose connections, cracked case, or bulging sides. Measure resting voltage—a fully charged battery should read 12.6 volts or higher. If the battery reads below 12.4 volts, charge it fully before proceeding. Perform a load test if you suspect the battery may be weak; a battery that fails a load test will skew all subsequent alternator readings.
Serpentine Belt and Pulley Inspection
Inspect the serpentine belt for cracks, fraying, glazing, or excessive wear. Check belt tension—a loose belt will slip and cause the alternator to underperform. Look for a worn or damaged belt tensioner and check the alternator pulley for wobble or bearing noise. A seized or loose pulley can prevent the alternator from reaching proper RPM, leading to low output.
Wiring and Ground Integrity
Examine the alternator’s B+ output wire for corrosion, fraying, or loose connections at both the alternator and the battery. Check the ground strap between the engine block and the chassis, and the negative battery cable. Poor grounds are a common cause of undercharging and can produce erratic voltage readings. Use a multimeter to measure voltage drop across connections—anything over 0.2 volts indicates excessive resistance.
Warning
Alternator Testing: The Complete DIY Guide to Diagnosing Charging System Failures
The alternator is the unsung workhorse of your vehicle’s electrical system—a belt-driven generator that converts mechanical energy from the engine into alternating current (AC), which is then rectified into direct current (DC) to recharge the battery and power every electrical component while the engine runs. Unlike the battery, which only stores energy, the alternator is the primary source of electrical power once your engine is turning. When it fails, you’re not just looking at a dead battery; you’re looking at a cascading electrical failure that can strand you anywhere, from a busy intersection to a remote trailhead. That’s why understanding alternator testing isn’t a luxury—it’s a fundamental diagnostic skill for any vehicle owner.
In this complete DIY guide, we’ll walk you through the essential attributes of alternator testing: the voltage and amperage output specs you need to verify, the critical difference between a failing alternator and a weak battery, and the specific tools—from a simple digital multimeter to a dedicated alternator bench tester—that give you accurate results. You’ll learn how to perform a load test, check for diode ripple, and interpret the warning signs like dimming headlights, a whining alternator bearing, or the dreaded battery warning light. We’ll also cover the safety protocols for working around high-amperage charging circuits and the common pitfalls that lead DIYers to misdiagnose a perfectly good alternator.
What sets this guide apart is the data-driven approach: we’ll provide real-world voltage readings, amperage draw tables for common vehicle classes, and honest limitations of each testing method. You won’t find vague advice here—you’ll find actionable thresholds, step-by-step procedures, and the reasoning behind each test. Whether you’re troubleshooting a parasitic drain, confirming a remanufactured alternator’s output, or just want to understand your charging system better, this guide gives you the entity-level knowledge to diagnose with confidence and avoid throwing parts at a problem that might have a simpler fix.
What Is Alternator Testing and Why It Matters

Alternator testing is the process of measuring your vehicle’s charging system output to determine whether the alternator is converting mechanical energy into electrical energy correctly. You perform these tests when you suspect the alternator is failing to keep the battery charged. The test itself is simple: you measure voltage at the battery terminals while the engine runs, then compare that reading against known-good specifications. But the diagnostic depth goes far beyond a single voltage check—it involves static testing, dynamic testing under load, ripple analysis for diode health, and verification of the entire charging circuit including belts, pulleys, wiring, and grounds.
The Alternator’s Role in Your Vehicle’s Electrical System
The alternator works in tandem with the battery and voltage regulator. The battery provides the initial cranking power and acts as a buffer, while the alternator supplies continuous current to run the ignition system, fuel pump, lights, infotainment, and all other electrical loads once the engine is running. The voltage regulator—whether internal or external—controls the alternator’s field current to maintain a stable output, typically between 13.5 and 14.8 volts depending on temperature and load. Without a properly functioning alternator, the battery will deplete within minutes of engine start, leading to a stall or complete electrical shutdown.
How Alternator Testing Differs from Battery and Starter Testing
Battery testing focuses on state of charge and capacity—measuring resting voltage, conducting a load test, and checking cold cranking amps. Starter testing evaluates the cranking circuit’s ability to draw high current and turn the engine. Alternator testing, by contrast, verifies the charging system’s ability to generate and regulate voltage and current while the engine runs. A common mistake is blaming the battery when the alternator is the culprit, or vice versa. Alternator testing specifically isolates the generation and regulation functions, which battery and starter tests cannot do.
Signs That You Need to Test Your Alternator
Common warning signs include a battery warning light on the dashboard, dimming or flickering headlights, a weak or dead battery that repeatedly needs jump-starts, electrical accessories that slow down or malfunction, a whining or grinding noise from the alternator bearing, and a burning rubber or electrical smell. If you experience any of these, testing the alternator should be your first diagnostic step before replacing any parts.
Essential Tools for Alternator Testing

Digital Multimeter (DMM)
The digital multimeter is the cornerstone of alternator testing. You’ll need a DMM capable of measuring DC voltage (at least 20V range), AC voltage (for ripple testing), and DC amperage (ideally with a clamp meter function). A quality DMM with a peak-hold or min/max function is especially useful for capturing transient voltage spikes. For most DIY testing, a basic DMM with 0.1V resolution is sufficient, but for accurate ripple measurements, you’ll want a meter with AC millivolt capability.
Load Tester or Carbon Pile Tester
A load tester applies a controlled electrical load to the charging system to verify the alternator’s output under real-world demand. Carbon pile testers are the professional standard, allowing you to draw 50-100 amps or more while monitoring voltage. For DIY use, a simple headlight load or a dedicated alternator load tester can suffice, but a carbon pile gives the most accurate results.
Clamp Meter (AC/DC)
A clamp meter measures current without disconnecting wires—essential for checking amperage output at the alternator’s B+ terminal. Look for a clamp meter that handles at least 100 amps DC and has a low-current sensitivity for parasitic draw testing. This tool is critical for verifying that the alternator is producing its rated amperage, not just voltage.
Oscilloscope (Optional but Recommended)
For advanced diode testing, an oscilloscope provides a visual representation of the alternator’s AC ripple waveform. A healthy alternator produces a smooth DC output with minimal ripple; a failing diode creates a distinctive pattern of voltage dips. While not strictly necessary for basic testing, an oscilloscope is invaluable for diagnosing intermittent diode failures that a multimeter might miss.
Battery Tester and Hydrometer
Before testing the alternator, you must verify the battery is in good condition. A weak or sulfated battery can cause misleading alternator readings. Use a conductance tester or a traditional hydrometer to check specific gravity in each cell. The battery must be at least 75% charged before alternator testing begins.
Safety Equipment
Always wear safety glasses and insulated gloves when working around the charging system. The alternator can produce over 100 amps at 14 volts—enough to cause severe burns or start a fire if a tool slips and shorts the B+ terminal to ground. Keep loose clothing, jewelry, and tools away from the serpentine belt and rotating pulleys.
Pre-Test Inspection: Battery, Belts, and Wiring

Battery Condition Check
Begin with a visual inspection of the battery. Check for corrosion on terminals, loose connections, cracked case, or bulging sides. Measure resting voltage—a fully charged battery should read 12.6 volts or higher. If the battery reads below 12.4 volts, charge it fully before proceeding. Perform a load test if you suspect the battery may be weak; a battery that fails a load test will skew all subsequent alternator readings.
Serpentine Belt and Pulley Inspection
Inspect the serpentine belt for cracks, fraying, glazing, or excessive wear. Check belt tension—a loose belt will slip and cause the alternator to underperform. Look for a worn or damaged belt tensioner and check the alternator pulley for wobble or bearing noise. A seized or loose pulley can prevent the alternator from reaching proper RPM, leading to low output.
Wiring and Ground Integrity
Examine the alternator’s B+ output wire for corrosion, fraying, or loose connections at both the alternator and the battery. Check the ground strap between the engine block and the chassis, and the negative battery cable. Poor grounds are a common cause of undercharging and can produce erratic voltage readings. Use a multimeter to measure voltage drop across connections—anything over 0.2 volts indicates excessive resistance.
Warning
Alternator Testing: The Complete DIY Guide to Diagnosing Charging System Failures
The alternator is the unsung workhorse of your vehicle’s electrical system—a belt-driven generator that converts mechanical energy from the engine into alternating current (AC), which is then rectified into direct current (DC) to recharge the battery and power every electrical component while the engine runs. Unlike the battery, which only stores energy, the alternator is the primary source of electrical power once your engine is turning. When it fails, you’re not just looking at a dead battery; you’re looking at a cascading electrical failure that can strand you anywhere, from a busy intersection to a remote trailhead. That’s why understanding alternator testing isn’t a luxury—it’s a fundamental diagnostic skill for any vehicle owner.
In this complete DIY guide, we’ll walk you through the essential attributes of alternator testing: the voltage and amperage output specs you need to verify, the critical difference between a failing alternator and a weak battery, and the specific tools—from a simple digital multimeter to a dedicated alternator bench tester—that give you accurate results. You’ll learn how to perform a load test, check for diode ripple, and interpret the warning signs like dimming headlights, a whining alternator bearing, or the dreaded battery warning light. We’ll also cover the safety protocols for working around high-amperage charging circuits and the common pitfalls that lead DIYers to misdiagnose a perfectly good alternator.
What sets this guide apart is the data-driven approach: we’ll provide real-world voltage readings, amperage draw tables for common vehicle classes, and honest limitations of each testing method. You won’t find vague advice here—you’ll find actionable thresholds, step-by-step procedures, and the reasoning behind each test. Whether you’re troubleshooting a parasitic drain, confirming a remanufactured alternator’s output, or just want to understand your charging system better, this guide gives you the entity-level knowledge to diagnose with confidence and avoid throwing parts at a problem that might have a simpler fix.
What Is Alternator Testing and Why It Matters

Alternator testing is the process of measuring your vehicle’s charging system output to determine whether the alternator is converting mechanical energy into electrical energy correctly. You perform these tests when you suspect the alternator is failing to keep the battery charged. The test itself is simple: you measure voltage at the battery terminals while the engine runs, then compare that reading against known-good specifications. But the diagnostic depth goes far beyond a single voltage check—it involves static testing, dynamic testing under load, ripple analysis for diode health, and verification of the entire charging circuit including belts, pulleys, wiring, and grounds.
The Alternator’s Role in Your Vehicle’s Electrical System
The alternator works in tandem with the battery and voltage regulator. The battery provides the initial cranking power and acts as a buffer, while the alternator supplies continuous current to run the ignition system, fuel pump, lights, infotainment, and all other electrical loads once the engine is running. The voltage regulator—whether internal or external—controls the alternator’s field current to maintain a stable output, typically between 13.5 and 14.8 volts depending on temperature and load. Without a properly functioning alternator, the battery will deplete within minutes of engine start, leading to a stall or complete electrical shutdown.
How Alternator Testing Differs from Battery and Starter Testing
Battery testing focuses on state of charge and capacity—measuring resting voltage, conducting a load test, and checking cold cranking amps. Starter testing evaluates the cranking circuit’s ability to draw high current and turn the engine. Alternator testing, by contrast, verifies the charging system’s ability to generate and regulate voltage and current while the engine runs. A common mistake is blaming the battery when the alternator is the culprit, or vice versa. Alternator testing specifically isolates the generation and regulation functions, which battery and starter tests cannot do.
Signs That You Need to Test Your Alternator
Common warning signs include a battery warning light on the dashboard, dimming or flickering headlights, a weak or dead battery that repeatedly needs jump-starts, electrical accessories that slow down or malfunction, a whining or grinding noise from the alternator bearing, and a burning rubber or electrical smell. If you experience any of these, testing the alternator should be your first diagnostic step before replacing any parts.
Essential Tools for Alternator Testing

Digital Multimeter (DMM)
The digital multimeter is the cornerstone of alternator testing. You’ll need a DMM capable of measuring DC voltage (at least 20V range), AC voltage (for ripple testing), and DC amperage (ideally with a clamp meter function). A quality DMM with a peak-hold or min/max function is especially useful for capturing transient voltage spikes. For most DIY testing, a basic DMM with 0.1V resolution is sufficient, but for accurate ripple measurements, you’ll want a meter with AC millivolt capability.
Load Tester or Carbon Pile Tester
A load tester applies a controlled electrical load to the charging system to verify the alternator’s output under real-world demand. Carbon pile testers are the professional standard, allowing you to draw 50-100 amps or more while monitoring voltage. For DIY use, a simple headlight load or a dedicated alternator load tester can suffice, but a carbon pile gives the most accurate results.
Clamp Meter (AC/DC)
A clamp meter measures current without disconnecting wires—essential for checking amperage output at the alternator’s B+ terminal. Look for a clamp meter that handles at least 100 amps DC and has a low-current sensitivity for parasitic draw testing. This tool is critical for verifying that the alternator is producing its rated amperage, not just voltage.
Oscilloscope (Optional but Recommended)
For advanced diode testing, an oscilloscope provides a visual representation of the alternator’s AC ripple waveform. A healthy alternator produces a smooth DC output with minimal ripple; a failing diode creates a distinctive pattern of voltage dips. While not strictly necessary for basic testing, an oscilloscope is invaluable for diagnosing intermittent diode failures that a multimeter might miss.
Battery Tester and Hydrometer
Before testing the alternator, you must verify the battery is in good condition. A weak or sulfated battery can cause misleading alternator readings. Use a conductance tester or a traditional hydrometer to check specific gravity in each cell. The battery must be at least 75% charged before alternator testing begins.
Safety Equipment
Always wear safety glasses and insulated gloves when working around the charging system. The alternator can produce over 100 amps at 14 volts—enough to cause severe burns or start a fire if a tool slips and shorts the B+ terminal to ground. Keep loose clothing, jewelry, and tools away from the serpentine belt and rotating pulleys.
Pre-Test Inspection: Battery, Belts, and Wiring

Battery Condition Check
Begin with a visual inspection of the battery. Check for corrosion on terminals, loose connections, cracked case, or bulging sides. Measure resting voltage—a fully charged battery should read 12.6 volts or higher. If the battery reads below 12.4 volts, charge it fully before proceeding. Perform a load test if you suspect the battery may be weak; a battery that fails a load test will skew all subsequent alternator readings.
Serpentine Belt and Pulley Inspection
Inspect the serpentine belt for cracks, fraying, glazing, or excessive wear. Check belt tension—a loose belt will slip and cause the alternator to underperform. Look for a worn or damaged belt tensioner and check the alternator pulley for wobble or bearing noise. A seized or loose pulley can prevent the alternator from reaching proper RPM, leading to low output.
Wiring and Ground Integrity
Examine the alternator’s B+ output wire for corrosion, fraying, or loose connections at both the alternator and the battery. Check the ground strap between the engine block and the chassis, and the negative battery cable. Poor grounds are a common cause of undercharging and can produce erratic voltage readings. Use a multimeter to measure voltage drop across connections—anything over 0.2 volts indicates excessive resistance.
Warning
The alternator is the unsung workhorse of your vehicle’s electrical system—a belt-driven generator that converts mechanical energy from the engine into alternating current (AC), which is then rectified into direct current (DC) to recharge the battery and power every electrical component while the engine runs. Unlike the battery, which only stores energy, the alternator is the primary source of electrical power once your engine is turning. When it fails, you’re not just looking at a dead battery; you’re looking at a cascading electrical failure that can strand you anywhere, from a busy intersection to a remote trailhead. That’s why understanding alternator testing isn’t a luxury—it’s a fundamental diagnostic skill for any vehicle owner.
In this complete DIY guide, we’ll walk you through the essential attributes of alternator testing: the voltage and amperage output specs you need to verify, the critical difference between a failing alternator and a weak battery, and the specific tools—from a simple digital multimeter to a dedicated alternator bench tester—that give you accurate results. You’ll learn how to perform a load test, check for diode ripple, and interpret the warning signs like dimming headlights, a whining alternator bearing, or the dreaded battery warning light. We’ll also cover the safety protocols for working around high-amperage charging circuits and the common pitfalls that lead DIYers to misdiagnose a perfectly good alternator.
What sets this guide apart is the data-driven approach: we’ll provide real-world voltage readings, amperage draw tables for common vehicle classes, and honest limitations of each testing method. You won’t find vague advice here—you’ll find actionable thresholds, step-by-step procedures, and the reasoning behind each test. Whether you’re troubleshooting a parasitic drain, confirming a remanufactured alternator’s output, or just want to understand your charging system better, this guide gives you the entity-level knowledge to diagnose with confidence and avoid throwing parts at a problem that might have a simpler fix.
What Is Alternator Testing and Why It Matters

Alternator testing is the process of measuring your vehicle’s charging system output to determine whether the alternator is converting mechanical energy into electrical energy correctly. You perform these tests when you suspect the alternator is failing to keep the battery charged. The test itself is simple: you measure voltage at the battery terminals while the engine runs, then compare that reading against known-good specifications. But the diagnostic depth goes far beyond a single voltage check—it involves static testing, dynamic testing under load, ripple analysis for diode health, and verification of the entire charging circuit including belts, pulleys, wiring, and grounds.
The Alternator’s Role in Your Vehicle’s Electrical System
The alternator works in tandem with the battery and voltage regulator. The battery provides the initial cranking power and acts as a buffer, while the alternator supplies continuous current to run the ignition system, fuel pump, lights, infotainment, and all other electrical loads once the engine is running. The voltage regulator—whether internal or external—controls the alternator’s field current to maintain a stable output, typically between 13.5 and 14.8 volts depending on temperature and load. Without a properly functioning alternator, the battery will deplete within minutes of engine start, leading to a stall or complete electrical shutdown.
How Alternator Testing Differs from Battery and Starter Testing
Battery testing focuses on state of charge and capacity—measuring resting voltage, conducting a load test, and checking cold cranking amps. Starter testing evaluates the cranking circuit’s ability to draw high current and turn the engine. Alternator testing, by contrast, verifies the charging system’s ability to generate and regulate voltage and current while the engine runs. A common mistake is blaming the battery when the alternator is the culprit, or vice versa. Alternator testing specifically isolates the generation and regulation functions, which battery and starter tests cannot do.
Signs That You Need to Test Your Alternator
Common warning signs include a battery warning light on the dashboard, dimming or flickering headlights, a weak or dead battery that repeatedly needs jump-starts, electrical accessories that slow down or malfunction, a whining or grinding noise from the alternator bearing, and a burning rubber or electrical smell. If you experience any of these, testing the alternator should be your first diagnostic step before replacing any parts.
Essential Tools for Alternator Testing

Digital Multimeter (DMM)
The digital multimeter is the cornerstone of alternator testing. You’ll need a DMM capable of measuring DC voltage (at least 20V range), AC voltage (for ripple testing), and DC amperage (ideally with a clamp meter function). A quality DMM with a peak-hold or min/max function is especially useful for capturing transient voltage spikes. For most DIY testing, a basic DMM with 0.1V resolution is sufficient, but for accurate ripple measurements, you’ll want a meter with AC millivolt capability.
Load Tester or Carbon Pile Tester
A load tester applies a controlled electrical load to the charging system to verify the alternator’s output under real-world demand. Carbon pile testers are the professional standard, allowing you to draw 50-100 amps or more while monitoring voltage. For DIY use, a simple headlight load or a dedicated alternator load tester can suffice, but a carbon pile gives the most accurate results.
Clamp Meter (AC/DC)
A clamp meter measures current without disconnecting wires—essential for checking amperage output at the alternator’s B+ terminal. Look for a clamp meter that handles at least 100 amps DC and has a low-current sensitivity for parasitic draw testing. This tool is critical for verifying that the alternator is producing its rated amperage, not just voltage.
Oscilloscope (Optional but Recommended)
For advanced diode testing, an oscilloscope provides a visual representation of the alternator’s AC ripple waveform. A healthy alternator produces a smooth DC output with minimal ripple; a failing diode creates a distinctive pattern of voltage dips. While not strictly necessary for basic testing, an oscilloscope is invaluable for diagnosing intermittent diode failures that a multimeter might miss.
Battery Tester and Hydrometer
Before testing the alternator, you must verify the battery is in good condition. A weak or sulfated battery can cause misleading alternator readings. Use a conductance tester or a traditional hydrometer to check specific gravity in each cell. The battery must be at least 75% charged before alternator testing begins.
Safety Equipment
Always wear safety glasses and insulated gloves when working around the charging system. The alternator can produce over 100 amps at 14 volts—enough to cause severe burns or start a fire if a tool slips and shorts the B+ terminal to ground. Keep loose clothing, jewelry, and tools away from the serpentine belt and rotating pulleys.
Pre-Test Inspection: Battery, Belts, and Wiring

Battery Condition Check
Begin with a visual inspection of the battery. Check for corrosion on terminals, loose connections, cracked case, or bulging sides. Measure resting voltage—a fully charged battery should read 12.6 volts or higher. If the battery reads below 12.4 volts, charge it fully before proceeding. Perform a load test if you suspect the battery may be weak; a battery that fails a load test will skew all subsequent alternator readings.
Serpentine Belt and Pulley Inspection
Inspect the serpentine belt for cracks, fraying, glazing, or excessive wear. Check belt tension—a loose belt will slip and cause the alternator to underperform. Look for a worn or damaged belt tensioner and check the alternator pulley for wobble or bearing noise. A seized or loose pulley can prevent the alternator from reaching proper RPM, leading to low output.
Wiring and Ground Integrity
Examine the alternator’s B+ output wire for corrosion, fraying, or loose connections at both the alternator and the battery. Check the ground strap between the engine block and the chassis, and the negative battery cable. Poor grounds are a common cause of undercharging and can produce erratic voltage readings. Use a multimeter to measure voltage drop across connections—anything over 0.2 volts indicates excessive resistance.
Warning
Alternator Testing: The Complete DIY Guide to Diagnosing Charging System Failures
The alternator is the unsung workhorse of your vehicle’s electrical system—a belt-driven generator that converts mechanical energy from the engine into alternating current (AC), which is then rectified into direct current (DC) to recharge the battery and power every electrical component while the engine runs. Unlike the battery, which only stores energy, the alternator is the primary source of electrical power once your engine is turning. When it fails, you’re not just looking at a dead battery; you’re looking at a cascading electrical failure that can strand you anywhere, from a busy intersection to a remote trailhead. That’s why understanding alternator testing isn’t a luxury—it’s a fundamental diagnostic skill for any vehicle owner.
In this complete DIY guide, we’ll walk you through the essential attributes of alternator testing: the voltage and amperage output specs you need to verify, the critical difference between a failing alternator and a weak battery, and the specific tools—from a simple digital multimeter to a dedicated alternator bench tester—that give you accurate results. You’ll learn how to perform a load test, check for diode ripple, and interpret the warning signs like dimming headlights, a whining alternator bearing, or the dreaded battery warning light. We’ll also cover the safety protocols for working around high-amperage charging circuits and the common pitfalls that lead DIYers to misdiagnose a perfectly good alternator.
What sets this guide apart is the data-driven approach: we’ll provide real-world voltage readings, amperage draw tables for common vehicle classes, and honest limitations of each testing method. You won’t find vague advice here—you’ll find actionable thresholds, step-by-step procedures, and the reasoning behind each test. Whether you’re troubleshooting a parasitic drain, confirming a remanufactured alternator’s output, or just want to understand your charging system better, this guide gives you the entity-level knowledge to diagnose with confidence and avoid throwing parts at a problem that might have a simpler fix.
What Is Alternator Testing and Why It Matters

Alternator testing is the process of measuring your vehicle’s charging system output to determine whether the alternator is converting mechanical energy into electrical energy correctly. You perform these tests when you suspect the alternator is failing to keep the battery charged. The test itself is simple: you measure voltage at the battery terminals while the engine runs, then compare that reading against known-good specifications. But the diagnostic depth goes far beyond a single voltage check—it involves static testing, dynamic testing under load, ripple analysis for diode health, and verification of the entire charging circuit including belts, pulleys, wiring, and grounds.
The Alternator’s Role in Your Vehicle’s Electrical System
The alternator works in tandem with the battery and voltage regulator. The battery provides the initial cranking power and acts as a buffer, while the alternator supplies continuous current to run the ignition system, fuel pump, lights, infotainment, and all other electrical loads once the engine is running. The voltage regulator—whether internal or external—controls the alternator’s field current to maintain a stable output, typically between 13.5 and 14.8 volts depending on temperature and load. Without a properly functioning alternator, the battery will deplete within minutes of engine start, leading to a stall or complete electrical shutdown.
How Alternator Testing Differs from Battery and Starter Testing
Battery testing focuses on state of charge and capacity—measuring resting voltage, conducting a load test, and checking cold cranking amps. Starter testing evaluates the cranking circuit’s ability to draw high current and turn the engine. Alternator testing, by contrast, verifies the charging system’s ability to generate and regulate voltage and current while the engine runs. A common mistake is blaming the battery when the alternator is the culprit, or vice versa. Alternator testing specifically isolates the generation and regulation functions, which battery and starter tests cannot do.
Signs That You Need to Test Your Alternator
Common warning signs include a battery warning light on the dashboard, dimming or flickering headlights, a weak or dead battery that repeatedly needs jump-starts, electrical accessories that slow down or malfunction, a whining or grinding noise from the alternator bearing, and a burning rubber or electrical smell. If you experience any of these, testing the alternator should be your first diagnostic step before replacing any parts.
Essential Tools for Alternator Testing

Digital Multimeter (DMM)
The digital multimeter is the cornerstone of alternator testing. You’ll need a DMM capable of measuring DC voltage (at least 20V range), AC voltage (for ripple testing), and DC amperage (ideally with a clamp meter function). A quality DMM with a peak-hold or min/max function is especially useful for capturing transient voltage spikes. For most DIY testing, a basic DMM with 0.1V resolution is sufficient, but for accurate ripple measurements, you’ll want a meter with AC millivolt capability.
Load Tester or Carbon Pile Tester
A load tester applies a controlled electrical load to the charging system to verify the alternator’s output under real-world demand. Carbon pile testers are the professional standard, allowing you to draw 50-100 amps or more while monitoring voltage. For DIY use, a simple headlight load or a dedicated alternator load tester can suffice, but a carbon pile gives the most accurate results.
Clamp Meter (AC/DC)
A clamp meter measures current without disconnecting wires—essential for checking amperage output at the alternator’s B+ terminal. Look for a clamp meter that handles at least 100 amps DC and has a low-current sensitivity for parasitic draw testing. This tool is critical for verifying that the alternator is producing its rated amperage, not just voltage.
Oscilloscope (Optional but Recommended)
For advanced diode testing, an oscilloscope provides a visual representation of the alternator’s AC ripple waveform. A healthy alternator produces a smooth DC output with minimal ripple; a failing diode creates a distinctive pattern of voltage dips. While not strictly necessary for basic testing, an oscilloscope is invaluable for diagnosing intermittent diode failures that a multimeter might miss.
Battery Tester and Hydrometer
Before testing the alternator, you must verify the battery is in good condition. A weak or sulfated battery can cause misleading alternator readings. Use a conductance tester or a traditional hydrometer to check specific gravity in each cell. The battery must be at least 75% charged before alternator testing begins.
Safety Equipment
Always wear safety glasses and insulated gloves when working around the charging system. The alternator can produce over 100 amps at 14 volts—enough to cause severe burns or start a fire if a tool slips and shorts the B+ terminal to ground. Keep loose clothing, jewelry, and tools away from the serpentine belt and rotating pulleys.
Pre-Test Inspection: Battery, Belts, and Wiring

Battery Condition Check
Begin with a visual inspection of the battery. Check for corrosion on terminals, loose connections, cracked case, or bulging sides. Measure resting voltage—a fully charged battery should read 12.6 volts or higher. If the battery reads below 12.4 volts, charge it fully before proceeding. Perform a load test if you suspect the battery may be weak; a battery that fails a load test will skew all subsequent alternator readings.
Serpentine Belt and Pulley Inspection
Inspect the serpentine belt for cracks, fraying, glazing, or excessive wear. Check belt tension—a loose belt will slip and cause the alternator to underperform. Look for a worn or damaged belt tensioner and check the alternator pulley for wobble or bearing noise. A seized or loose pulley can prevent the alternator from reaching proper RPM, leading to low output.
Wiring and Ground Integrity
Examine the alternator’s B+ output wire for corrosion, fraying, or loose connections at both the alternator and the battery. Check the ground strap between the engine block and the chassis, and the negative battery cable. Poor grounds are a common cause of undercharging and can produce erratic voltage readings. Use a multimeter to measure voltage drop across connections—anything over 0.2 volts indicates excessive resistance.
Warning
Alternator Testing: The Complete DIY Guide to Diagnosing Charging System Failures
The alternator is the unsung workhorse of your vehicle’s electrical system—a belt-driven generator that converts mechanical energy from the engine into alternating current (AC), which is then rectified into direct current (DC) to recharge the battery and power every electrical component while the engine runs. Unlike the battery, which only stores energy, the alternator is the primary source of electrical power once your engine is turning. When it fails, you’re not just looking at a dead battery; you’re looking at a cascading electrical failure that can strand you anywhere, from a busy intersection to a remote trailhead. That’s why understanding alternator testing isn’t a luxury—it’s a fundamental diagnostic skill for any vehicle owner.
In this complete DIY guide, we’ll walk you through the essential attributes of alternator testing: the voltage and amperage output specs you need to verify, the critical difference between a failing alternator and a weak battery, and the specific tools—from a simple digital multimeter to a dedicated alternator bench tester—that give you accurate results. You’ll learn how to perform a load test, check for diode ripple, and interpret the warning signs like dimming headlights, a whining alternator bearing, or the dreaded battery warning light. We’ll also cover the safety protocols for working around high-amperage charging circuits and the common pitfalls that lead DIYers to misdiagnose a perfectly good alternator.
What sets this guide apart is the data-driven approach: we’ll provide real-world voltage readings, amperage draw tables for common vehicle classes, and honest limitations of each testing method. You won’t find vague advice here—you’ll find actionable thresholds, step-by-step procedures, and the reasoning behind each test. Whether you’re troubleshooting a parasitic drain, confirming a remanufactured alternator’s output, or just want to understand your charging system better, this guide gives you the entity-level knowledge to diagnose with confidence and avoid throwing parts at a problem that might have a simpler fix.
What Is Alternator Testing and Why It Matters

Alternator testing is the process of measuring your vehicle’s charging system output to determine whether the alternator is converting mechanical energy into electrical energy correctly. You perform these tests when you suspect the alternator is failing to keep the battery charged. The test itself is simple: you measure voltage at the battery terminals while the engine runs, then compare that reading against known-good specifications. But the diagnostic depth goes far beyond a single voltage check—it involves static testing, dynamic testing under load, ripple analysis for diode health, and verification of the entire charging circuit including belts, pulleys, wiring, and grounds.
The Alternator’s Role in Your Vehicle’s Electrical System
The alternator works in tandem with the battery and voltage regulator. The battery provides the initial cranking power and acts as a buffer, while the alternator supplies continuous current to run the ignition system, fuel pump, lights, infotainment, and all other electrical loads once the engine is running. The voltage regulator—whether internal or external—controls the alternator’s field current to maintain a stable output, typically between 13.5 and 14.8 volts depending on temperature and load. Without a properly functioning alternator, the battery will deplete within minutes of engine start, leading to a stall or complete electrical shutdown.
How Alternator Testing Differs from Battery and Starter Testing
Battery testing focuses on state of charge and capacity—measuring resting voltage, conducting a load test, and checking cold cranking amps. Starter testing evaluates the cranking circuit’s ability to draw high current and turn the engine. Alternator testing, by contrast, verifies the charging system’s ability to generate and regulate voltage and current while the engine runs. A common mistake is blaming the battery when the alternator is the culprit, or vice versa. Alternator testing specifically isolates the generation and regulation functions, which battery and starter tests cannot do.
Signs That You Need to Test Your Alternator
Common warning signs include a battery warning light on the dashboard, dimming or flickering headlights, a weak or dead battery that repeatedly needs jump-starts, electrical accessories that slow down or malfunction, a whining or grinding noise from the alternator bearing, and a burning rubber or electrical smell. If you experience any of these, testing the alternator should be your first diagnostic step before replacing any parts.
Essential Tools for Alternator Testing

Digital Multimeter (DMM)
The digital multimeter is the cornerstone of alternator testing. You’ll need a DMM capable of measuring DC voltage (at least 20V range), AC voltage (for ripple testing), and DC amperage (ideally with a clamp meter function). A quality DMM with a peak-hold or min/max function is especially useful for capturing transient voltage spikes. For most DIY testing, a basic DMM with 0.1V resolution is sufficient, but for accurate ripple measurements, you’ll want a meter with AC millivolt capability.
Load Tester or Carbon Pile Tester
A load tester applies a controlled electrical load to the charging system to verify the alternator’s output under real-world demand. Carbon pile testers are the professional standard, allowing you to draw 50-100 amps or more while monitoring voltage. For DIY use, a simple headlight load or a dedicated alternator load tester can suffice, but a carbon pile gives the most accurate results.
Clamp Meter (AC/DC)
A clamp meter measures current without disconnecting wires—essential for checking amperage output at the alternator’s B+ terminal. Look for a clamp meter that handles at least 100 amps DC and has a low-current sensitivity for parasitic draw testing. This tool is critical for verifying that the alternator is producing its rated amperage, not just voltage.
Oscilloscope (Optional but Recommended)
For advanced diode testing, an oscilloscope provides a visual representation of the alternator’s AC ripple waveform. A healthy alternator produces a smooth DC output with minimal ripple; a failing diode creates a distinctive pattern of voltage dips. While not strictly necessary for basic testing, an oscilloscope is invaluable for diagnosing intermittent diode failures that a multimeter might miss.
Battery Tester and Hydrometer
Before testing the alternator, you must verify the battery is in good condition. A weak or sulfated battery can cause misleading alternator readings. Use a conductance tester or a traditional hydrometer to check specific gravity in each cell. The battery must be at least 75% charged before alternator testing begins.
Safety Equipment
Always wear safety glasses and insulated gloves when working around the charging system. The alternator can produce over 100 amps at 14 volts—enough to cause severe burns or start a fire if a tool slips and shorts the B+ terminal to ground. Keep loose clothing, jewelry, and tools away from the serpentine belt and rotating pulleys.
Pre-Test Inspection: Battery, Belts, and Wiring

Battery Condition Check
Begin with a visual inspection of the battery. Check for corrosion on terminals, loose connections, cracked case, or bulging sides. Measure resting voltage—a fully charged battery should read 12.6 volts or higher. If the battery reads below 12.4 volts, charge it fully before proceeding. Perform a load test if you suspect the battery may be weak; a battery that fails a load test will skew all subsequent alternator readings.
Serpentine Belt and Pulley Inspection
Inspect the serpentine belt for cracks, fraying, glazing, or excessive wear. Check belt tension—a loose belt will slip and cause the alternator to underperform. Look for a worn or damaged belt tensioner and check the alternator pulley for wobble or bearing noise. A seized or loose pulley can prevent the alternator from reaching proper RPM, leading to low output.
Wiring and Ground Integrity
Examine the alternator’s B+ output wire for corrosion, fraying, or loose connections at both the alternator and the battery. Check the ground strap between the engine block and the chassis, and the negative battery cable. Poor grounds are a common cause of undercharging and can produce erratic voltage readings. Use a multimeter to measure voltage drop across connections—anything over 0.2 volts indicates excessive resistance.
Warning
Alternator Testing: The Complete DIY Guide to Diagnosing Charging System Failures
The alternator is the unsung workhorse of your vehicle’s electrical system—a belt-driven generator that converts mechanical energy from the engine into alternating current (AC), which is then rectified into direct current (DC) to recharge the battery and power every electrical component while the engine runs. Unlike the battery, which only stores energy, the alternator is the primary source of electrical power once your engine is turning. When it fails, you’re not just looking at a dead battery; you’re looking at a cascading electrical failure that can strand you anywhere, from a busy intersection to a remote trailhead. That’s why understanding alternator testing isn’t a luxury—it’s a fundamental diagnostic skill for any vehicle owner.
In this complete DIY guide, we’ll walk you through the essential attributes of alternator testing: the voltage and amperage output specs you need to verify, the critical difference between a failing alternator and a weak battery, and the specific tools—from a simple digital multimeter to a dedicated alternator bench tester—that give you accurate results. You’ll learn how to perform a load test, check for diode ripple, and interpret the warning signs like dimming headlights, a whining alternator bearing, or the dreaded battery warning light. We’ll also cover the safety protocols for working around high-amperage charging circuits and the common pitfalls that lead DIYers to misdiagnose a perfectly good alternator.
What sets this guide apart is the data-driven approach: we’ll provide real-world voltage readings, amperage draw tables for common vehicle classes, and honest limitations of each testing method. You won’t find vague advice here—you’ll find actionable thresholds, step-by-step procedures, and the reasoning behind each test. Whether you’re troubleshooting a parasitic drain, confirming a remanufactured alternator’s output, or just want to understand your charging system better, this guide gives you the entity-level knowledge to diagnose with confidence and avoid throwing parts at a problem that might have a simpler fix.
What Is Alternator Testing and Why It Matters

Alternator testing is the process of measuring your vehicle’s charging system output to determine whether the alternator is converting mechanical energy into electrical energy correctly. You perform these tests when you suspect the alternator is failing to keep the battery charged. The test itself is simple: you measure voltage at the battery terminals while the engine runs, then compare that reading against known-good specifications. But the diagnostic depth goes far beyond a single voltage check—it involves static testing, dynamic testing under load, ripple analysis for diode health, and verification of the entire charging circuit including belts, pulleys, wiring, and grounds.
The Alternator’s Role in Your Vehicle’s Electrical System
The alternator works in tandem with the battery and voltage regulator. The battery provides the initial cranking power and acts as a buffer, while the alternator supplies continuous current to run the ignition system, fuel pump, lights, infotainment, and all other electrical loads once the engine is running. The voltage regulator—whether internal or external—controls the alternator’s field current to maintain a stable output, typically between 13.5 and 14.8 volts depending on temperature and load. Without a properly functioning alternator, the battery will deplete within minutes of engine start, leading to a stall or complete electrical shutdown.
How Alternator Testing Differs from Battery and Starter Testing
Battery testing focuses on state of charge and capacity—measuring resting voltage, conducting a load test, and checking cold cranking amps. Starter testing evaluates the cranking circuit’s ability to draw high current and turn the engine. Alternator testing, by contrast, verifies the charging system’s ability to generate and regulate voltage and current while the engine runs. A common mistake is blaming the battery when the alternator is the culprit, or vice versa. Alternator testing specifically isolates the generation and regulation functions, which battery and starter tests cannot do.
Signs That You Need to Test Your Alternator
Common warning signs include a battery warning light on the dashboard, dimming or flickering headlights, a weak or dead battery that repeatedly needs jump-starts, electrical accessories that slow down or malfunction, a whining or grinding noise from the alternator bearing, and a burning rubber or electrical smell. If you experience any of these, testing the alternator should be your first diagnostic step before replacing any parts.
Essential Tools for Alternator Testing

Digital Multimeter (DMM)
The digital multimeter is the cornerstone of alternator testing. You’ll need a DMM capable of measuring DC voltage (at least 20V range), AC voltage (for ripple testing), and DC amperage (ideally with a clamp meter function). A quality DMM with a peak-hold or min/max function is especially useful for capturing transient voltage spikes. For most DIY testing, a basic DMM with 0.1V resolution is sufficient, but for accurate ripple measurements, you’ll want a meter with AC millivolt capability.
Load Tester or Carbon Pile Tester
A load tester applies a controlled electrical load to the charging system to verify the alternator’s output under real-world demand. Carbon pile testers are the professional standard, allowing you to draw 50-100 amps or more while monitoring voltage. For DIY use, a simple headlight load or a dedicated alternator load tester can suffice, but a carbon pile gives the most accurate results.
Clamp Meter (AC/DC)
A clamp meter measures current without disconnecting wires—essential for checking amperage output at the alternator’s B+ terminal. Look for a clamp meter that handles at least 100 amps DC and has a low-current sensitivity for parasitic draw testing. This tool is critical for verifying that the alternator is producing its rated amperage, not just voltage.
Oscilloscope (Optional but Recommended)
For advanced diode testing, an oscilloscope provides a visual representation of the alternator’s AC ripple waveform. A healthy alternator produces a smooth DC output with minimal ripple; a failing diode creates a distinctive pattern of voltage dips. While not strictly necessary for basic testing, an oscilloscope is invaluable for diagnosing intermittent diode failures that a multimeter might miss.
Battery Tester and Hydrometer
Before testing the alternator, you must verify the battery is in good condition. A weak or sulfated battery can cause misleading alternator readings. Use a conductance tester or a traditional hydrometer to check specific gravity in each cell. The battery must be at least 75% charged before alternator testing begins.
Safety Equipment
Always wear safety glasses and insulated gloves when working around the charging system. The alternator can produce over 100 amps at 14 volts—enough to cause severe burns or start a fire if a tool slips and shorts the B+ terminal to ground. Keep loose clothing, jewelry, and tools away from the serpentine belt and rotating pulleys.
Pre-Test Inspection: Battery, Belts, and Wiring

Battery Condition Check
Begin with a visual inspection of the battery. Check for corrosion on terminals, loose connections, cracked case, or bulging sides. Measure resting voltage—a fully charged battery should read 12.6 volts or higher. If the battery reads below 12.4 volts, charge it fully before proceeding. Perform a load test if you suspect the battery may be weak; a battery that fails a load test will skew all subsequent alternator readings.
Serpentine Belt and Pulley Inspection
Inspect the serpentine belt for cracks, fraying, glazing, or excessive wear. Check belt tension—a loose belt will slip and cause the alternator to underperform. Look for a worn or damaged belt tensioner and check the alternator pulley for wobble or bearing noise. A seized or loose pulley can prevent the alternator from reaching proper RPM, leading to low output.
Wiring and Ground Integrity
Examine the alternator’s B+ output wire for corrosion, fraying, or loose connections at both the alternator and the battery. Check the ground strap between the engine block and the chassis, and the negative battery cable. Poor grounds are a common cause of undercharging and can produce erratic voltage readings. Use a multimeter to measure voltage drop across connections—anything over 0.2 volts indicates excessive resistance.
Warning
Alternator Testing: The Complete DIY Guide to Diagnosing Charging System Failures
The alternator is the unsung workhorse of your vehicle’s electrical system—a belt-driven generator that converts mechanical energy from the engine into alternating current (AC), which is then rectified into direct current (DC) to recharge the battery and power every electrical component while the engine runs. Unlike the battery, which only stores energy, the alternator is the primary source of electrical power once your engine is turning. When it fails, you’re not just looking at a dead battery; you’re looking at a cascading electrical failure that can strand you anywhere, from a busy intersection to a remote trailhead. That’s why understanding alternator testing isn’t a luxury—it’s a fundamental diagnostic skill for any vehicle owner.
In this complete DIY guide, we’ll walk you through the essential attributes of alternator testing: the voltage and amperage output specs you need to verify, the critical difference between a failing alternator and a weak battery, and the specific tools—from a simple digital multimeter to a dedicated alternator bench tester—that give you accurate results. You’ll learn how to perform a load test, check for diode ripple, and interpret the warning signs like dimming headlights, a whining alternator bearing, or the dreaded battery warning light. We’ll also cover the safety protocols for working around high-amperage charging circuits and the common pitfalls that lead DIYers to misdiagnose a perfectly good alternator.
What sets this guide apart is the data-driven approach: we’ll provide real-world voltage readings, amperage draw tables for common vehicle classes, and honest limitations of each testing method. You won’t find vague advice here—you’ll find actionable thresholds, step-by-step procedures, and the reasoning behind each test. Whether you’re troubleshooting a parasitic drain, confirming a remanufactured alternator’s output, or just want to understand your charging system better, this guide gives you the entity-level knowledge to diagnose with confidence and avoid throwing parts at a problem that might have a simpler fix.
What Is Alternator Testing and Why It Matters

Alternator testing is the process of measuring your vehicle’s charging system output to determine whether the alternator is converting mechanical energy into electrical energy correctly. You perform these tests when you suspect the alternator is failing to keep the battery charged. The test itself is simple: you measure voltage at the battery terminals while the engine runs, then compare that reading against known-good specifications. But the diagnostic depth goes far beyond a single voltage check—it involves static testing, dynamic testing under load, ripple analysis for diode health, and verification of the entire charging circuit including belts, pulleys, wiring, and grounds.
The Alternator’s Role in Your Vehicle’s Electrical System
The alternator works in tandem with the battery and voltage regulator. The battery provides the initial cranking power and acts as a buffer, while the alternator supplies continuous current to run the ignition system, fuel pump, lights, infotainment, and all other electrical loads once the engine is running. The voltage regulator—whether internal or external—controls the alternator’s field current to maintain a stable output, typically between 13.5 and 14.8 volts depending on temperature and load. Without a properly functioning alternator, the battery will deplete within minutes of engine start, leading to a stall or complete electrical shutdown.
How Alternator Testing Differs from Battery and Starter Testing
Battery testing focuses on state of charge and capacity—measuring resting voltage, conducting a load test, and checking cold cranking amps. Starter testing evaluates the cranking circuit’s ability to draw high current and turn the engine. Alternator testing, by contrast, verifies the charging system’s ability to generate and regulate voltage and current while the engine runs. A common mistake is blaming the battery when the alternator is the culprit, or vice versa. Alternator testing specifically isolates the generation and regulation functions, which battery and starter tests cannot do.
Signs That You Need to Test Your Alternator
Common warning signs include a battery warning light on the dashboard, dimming or flickering headlights, a weak or dead battery that repeatedly needs jump-starts, electrical accessories that slow down or malfunction, a whining or grinding noise from the alternator bearing, and a burning rubber or electrical smell. If you experience any of these, testing the alternator should be your first diagnostic step before replacing any parts.
Essential Tools for Alternator Testing

Digital Multimeter (DMM)
The digital multimeter is the cornerstone of alternator testing. You’ll need a DMM capable of measuring DC voltage (at least 20V range), AC voltage (for ripple testing), and DC amperage (ideally with a clamp meter function). A quality DMM with a peak-hold or min/max function is especially useful for capturing transient voltage spikes. For most DIY testing, a basic DMM with 0.1V resolution is sufficient, but for accurate ripple measurements, you’ll want a meter with AC millivolt capability.
Load Tester or Carbon Pile Tester
A load tester applies a controlled electrical load to the charging system to verify the alternator’s output under real-world demand. Carbon pile testers are the professional standard, allowing you to draw 50-100 amps or more while monitoring voltage. For DIY use, a simple headlight load or a dedicated alternator load tester can suffice, but a carbon pile gives the most accurate results.
Clamp Meter (AC/DC)
A clamp meter measures current without disconnecting wires—essential for checking amperage output at the alternator’s B+ terminal. Look for a clamp meter that handles at least 100 amps DC and has a low-current sensitivity for parasitic draw testing. This tool is critical for verifying that the alternator is producing its rated amperage, not just voltage.
Oscilloscope (Optional but Recommended)
For advanced diode testing, an oscilloscope provides a visual representation of the alternator’s AC ripple waveform. A healthy alternator produces a smooth DC output with minimal ripple; a failing diode creates a distinctive pattern of voltage dips. While not strictly necessary for basic testing, an oscilloscope is invaluable for diagnosing intermittent diode failures that a multimeter might miss.
Battery Tester and Hydrometer
Before testing the alternator, you must verify the battery is in good condition. A weak or sulfated battery can cause misleading alternator readings. Use a conductance tester or a traditional hydrometer to check specific gravity in each cell. The battery must be at least 75% charged before alternator testing begins.
Safety Equipment
Always wear safety glasses and insulated gloves when working around the charging system. The alternator can produce over 100 amps at 14 volts—enough to cause severe burns or start a fire if a tool slips and shorts the B+ terminal to ground. Keep loose clothing, jewelry, and tools away from the serpentine belt and rotating pulleys.
Pre-Test Inspection: Battery, Belts, and Wiring

Battery Condition Check
Begin with a visual inspection of the battery. Check for corrosion on terminals, loose connections, cracked case, or bulging sides. Measure resting voltage—a fully charged battery should read 12.6 volts or higher. If the battery reads below 12.4 volts, charge it fully before proceeding. Perform a load test if you suspect the battery may be weak; a battery that fails a load test will skew all subsequent alternator readings.
Serpentine Belt and Pulley Inspection
Inspect the serpentine belt for cracks, fraying, glazing, or excessive wear. Check belt tension—a loose belt will slip and cause the alternator to underperform. Look for a worn or damaged belt tensioner and check the alternator pulley for wobble or bearing noise. A seized or loose pulley can prevent the alternator from reaching proper RPM, leading to low output.
Wiring and Ground Integrity
Examine the alternator’s B+ output wire for corrosion, fraying, or loose connections at both the alternator and the battery. Check the ground strap between the engine block and the chassis, and the negative battery cable. Poor grounds are a common cause of undercharging and can produce erratic voltage readings. Use a multimeter to measure voltage drop across connections—anything over 0.2 volts indicates excessive resistance.
Warning
Alternator Testing: The Complete DIY Guide to Diagnosing Charging System Failures
The alternator is the unsung workhorse of your vehicle’s electrical system—a belt-driven generator that converts mechanical energy from the engine into alternating current (AC), which is then rectified into direct current (DC) to recharge the battery and power every electrical component while the engine runs. Unlike the battery, which only stores energy, the alternator is the primary source of electrical power once your engine is turning. When it fails, you’re not just looking at a dead battery; you’re looking at a cascading electrical failure that can strand you anywhere, from a busy intersection to a remote trailhead. That’s why understanding alternator testing isn’t a luxury—it’s a fundamental diagnostic skill for any vehicle owner.
In this complete DIY guide, we’ll walk you through the essential attributes of alternator testing: the voltage and amperage output specs you need to verify, the critical difference between a failing alternator and a weak battery, and the specific tools—from a simple digital multimeter to a dedicated alternator bench tester—that give you accurate results. You’ll learn how to perform a load test, check for diode ripple, and interpret the warning signs like dimming headlights, a whining alternator bearing, or the dreaded battery warning light. We’ll also cover the safety protocols for working around high-amperage charging circuits and the common pitfalls that lead DIYers to misdiagnose a perfectly good alternator.
What sets this guide apart is the data-driven approach: we’ll provide real-world voltage readings, amperage draw tables for common vehicle classes, and honest limitations of each testing method. You won’t find vague advice here—you’ll find actionable thresholds, step-by-step procedures, and the reasoning behind each test. Whether you’re troubleshooting a parasitic drain, confirming a remanufactured alternator’s output, or just want to understand your charging system better, this guide gives you the entity-level knowledge to diagnose with confidence and avoid throwing parts at a problem that might have a simpler fix.
What Is Alternator Testing and Why It Matters

Alternator testing is the process of measuring your vehicle’s charging system output to determine whether the alternator is converting mechanical energy into electrical energy correctly. You perform these tests when you suspect the alternator is failing to keep the battery charged. The test itself is simple: you measure voltage at the battery terminals while the engine runs, then compare that reading against known-good specifications. But the diagnostic depth goes far beyond a single voltage check—it involves static testing, dynamic testing under load, ripple analysis for diode health, and verification of the entire charging circuit including belts, pulleys, wiring, and grounds.
The Alternator’s Role in Your Vehicle’s Electrical System
The alternator works in tandem with the battery and voltage regulator. The battery provides the initial cranking power and acts as a buffer, while the alternator supplies continuous current to run the ignition system, fuel pump, lights, infotainment, and all other electrical loads once the engine is running. The voltage regulator—whether internal or external—controls the alternator’s field current to maintain a stable output, typically between 13.5 and 14.8 volts depending on temperature and load. Without a properly functioning alternator, the battery will deplete within minutes of engine start, leading to a stall or complete electrical shutdown.
How Alternator Testing Differs from Battery and Starter Testing
Battery testing focuses on state of charge and capacity—measuring resting voltage, conducting a load test, and checking cold cranking amps. Starter testing evaluates the cranking circuit’s ability to draw high current and turn the engine. Alternator testing, by contrast, verifies the charging system’s ability to generate and regulate voltage and current while the engine runs. A common mistake is blaming the battery when the alternator is the culprit, or vice versa. Alternator testing specifically isolates the generation and regulation functions, which battery and starter tests cannot do.
Signs That You Need to Test Your Alternator
Common warning signs include a battery warning light on the dashboard, dimming or flickering headlights, a weak or dead battery that repeatedly needs jump-starts, electrical accessories that slow down or malfunction, a whining or grinding noise from the alternator bearing, and a burning rubber or electrical smell. If you experience any of these, testing the alternator should be your first diagnostic step before replacing any parts.
Essential Tools for Alternator Testing

Digital Multimeter (DMM)
The digital multimeter is the cornerstone of alternator testing. You’ll need a DMM capable of measuring DC voltage (at least 20V range), AC voltage (for ripple testing), and DC amperage (ideally with a clamp meter function). A quality DMM with a peak-hold or min/max function is especially useful for capturing transient voltage spikes. For most DIY testing, a basic DMM with 0.1V resolution is sufficient, but for accurate ripple measurements, you’ll want a meter with AC millivolt capability.
Load Tester or Carbon Pile Tester
A load tester applies a controlled electrical load to the charging system to verify the alternator’s output under real-world demand. Carbon pile testers are the professional standard, allowing you to draw 50-100 amps or more while monitoring voltage. For DIY use, a simple headlight load or a dedicated alternator load tester can suffice, but a carbon pile gives the most accurate results.
Clamp Meter (AC/DC)
A clamp meter measures current without disconnecting wires—essential for checking amperage output at the alternator’s B+ terminal. Look for a clamp meter that handles at least 100 amps DC and has a low-current sensitivity for parasitic draw testing. This tool is critical for verifying that the alternator is producing its rated amperage, not just voltage.
Oscilloscope (Optional but Recommended)
For advanced diode testing, an oscilloscope provides a visual representation of the alternator’s AC ripple waveform. A healthy alternator produces a smooth DC output with minimal ripple; a failing diode creates a distinctive pattern of voltage dips. While not strictly necessary for basic testing, an oscilloscope is invaluable for diagnosing intermittent diode failures that a multimeter might miss.
Battery Tester and Hydrometer
Before testing the alternator, you must verify the battery is in good condition. A weak or sulfated battery can cause misleading alternator readings. Use a conductance tester or a traditional hydrometer to check specific gravity in each cell. The battery must be at least 75% charged before alternator testing begins.
Safety Equipment
Always wear safety glasses and insulated gloves when working around the charging system. The alternator can produce over 100 amps at 14 volts—enough to cause severe burns or start a fire if a tool slips and shorts the B+ terminal to ground. Keep loose clothing, jewelry, and tools away from the serpentine belt and rotating pulleys.
Pre-Test Inspection: Battery, Belts, and Wiring

Battery Condition Check
Begin with a visual inspection of the battery. Check for corrosion on terminals, loose connections, cracked case, or bulging sides. Measure resting voltage—a fully charged battery should read 12.6 volts or higher. If the battery reads below 12.4 volts, charge it fully before proceeding. Perform a load test if you suspect the battery may be weak; a battery that fails a load test will skew all subsequent alternator readings.
Serpentine Belt and Pulley Inspection
Inspect the serpentine belt for cracks, fraying, glazing, or excessive wear. Check belt tension—a loose belt will slip and cause the alternator to underperform. Look for a worn or damaged belt tensioner and check the alternator pulley for wobble or bearing noise. A seized or loose pulley can prevent the alternator from reaching proper RPM, leading to low output.
Wiring and Ground Integrity
Examine the alternator’s B+ output wire for corrosion, fraying, or loose connections at both the alternator and the battery. Check the ground strap between the engine block and the chassis, and the negative battery cable. Poor grounds are a common cause of undercharging and can produce erratic voltage readings. Use a multimeter to measure voltage drop across connections—anything over 0.2 volts indicates excessive resistance.
Warning
Alternator Testing: The Complete DIY Guide to Diagnosing Charging System Failures
The alternator is the unsung workhorse of your vehicle’s electrical system—a belt-driven generator that converts mechanical energy from the engine into alternating current (AC), which is then rectified into direct current (DC) to recharge the battery and power every electrical component while the engine runs. Unlike the battery, which only stores energy, the alternator is the primary source of electrical power once your engine is turning. When it fails, you’re not just looking at a dead battery; you’re looking at a cascading electrical failure that can strand you anywhere, from a busy intersection to a remote trailhead. That’s why understanding alternator testing isn’t a luxury—it’s a fundamental diagnostic skill for any vehicle owner.
In this complete DIY guide, we’ll walk you through the essential attributes of alternator testing: the voltage and amperage output specs you need to verify, the critical difference between a failing alternator and a weak battery, and the specific tools—from a simple digital multimeter to a dedicated alternator bench tester—that give you accurate results. You’ll learn how to perform a load test, check for diode ripple, and interpret the warning signs like dimming headlights, a whining alternator bearing, or the dreaded battery warning light. We’ll also cover the safety protocols for working around high-amperage charging circuits and the common pitfalls that lead DIYers to misdiagnose a perfectly good alternator.
What sets this guide apart is the data-driven approach: we’ll provide real-world voltage readings, amperage draw tables for common vehicle classes, and honest limitations of each testing method. You won’t find vague advice here—you’ll find actionable thresholds, step-by-step procedures, and the reasoning behind each test. Whether you’re troubleshooting a parasitic drain, confirming a remanufactured alternator’s output, or just want to understand your charging system better, this guide gives you the entity-level knowledge to diagnose with confidence and avoid throwing parts at a problem that might have a simpler fix.
What Is Alternator Testing and Why It Matters

Alternator testing is the process of measuring your vehicle’s charging system output to determine whether the alternator is converting mechanical energy into electrical energy correctly. You perform these tests when you suspect the alternator is failing to keep the battery charged. The test itself is simple: you measure voltage at the battery terminals while the engine runs, then compare that reading against known-good specifications. But the diagnostic depth goes far beyond a single voltage check—it involves static testing, dynamic testing under load, ripple analysis for diode health, and verification of the entire charging circuit including belts, pulleys, wiring, and grounds.
The Alternator’s Role in Your Vehicle’s Electrical System
The alternator works in tandem with the battery and voltage regulator. The battery provides the initial cranking power and acts as a buffer, while the alternator supplies continuous current to run the ignition system, fuel pump, lights, infotainment, and all other electrical loads once the engine is running. The voltage regulator—whether internal or external—controls the alternator’s field current to maintain a stable output, typically between 13.5 and 14.8 volts depending on temperature and load. Without a properly functioning alternator, the battery will deplete within minutes of engine start, leading to a stall or complete electrical shutdown.
How Alternator Testing Differs from Battery and Starter Testing
Battery testing focuses on state of charge and capacity—measuring resting voltage, conducting a load test, and checking cold cranking amps. Starter testing evaluates the cranking circuit’s ability to draw high current and turn the engine. Alternator testing, by contrast, verifies the charging system’s ability to generate and regulate voltage and current while the engine runs. A common mistake is blaming the battery when the alternator is the culprit, or vice versa. Alternator testing specifically isolates the generation and regulation functions, which battery and starter tests cannot do.
Signs That You Need to Test Your Alternator
Common warning signs include a battery warning light on the dashboard, dimming or flickering headlights, a weak or dead battery that repeatedly needs jump-starts, electrical accessories that slow down or malfunction, a whining or grinding noise from the alternator bearing, and a burning rubber or electrical smell. If you experience any of these, testing the alternator should be your first diagnostic step before replacing any parts.
Essential Tools for Alternator Testing

Digital Multimeter (DMM)
The digital multimeter is the cornerstone of alternator testing. You’ll need a DMM capable of measuring DC voltage (at least 20V range), AC voltage (for ripple testing), and DC amperage (ideally with a clamp meter function). A quality DMM with a peak-hold or min/max function is especially useful for capturing transient voltage spikes. For most DIY testing, a basic DMM with 0.1V resolution is sufficient, but for accurate ripple measurements, you’ll want a meter with AC millivolt capability.
Load Tester or Carbon Pile Tester
A load tester applies a controlled electrical load to the charging system to verify the alternator’s output under real-world demand. Carbon pile testers are the professional standard, allowing you to draw 50-100 amps or more while monitoring voltage. For DIY use, a simple headlight load or a dedicated alternator load tester can suffice, but a carbon pile gives the most accurate results.
Clamp Meter (AC/DC)
A clamp meter measures current without disconnecting wires—essential for checking amperage output at the alternator’s B+ terminal. Look for a clamp meter that handles at least 100 amps DC and has a low-current sensitivity for parasitic draw testing. This tool is critical for verifying that the alternator is producing its rated amperage, not just voltage.
Oscilloscope (Optional but Recommended)
For advanced diode testing, an oscilloscope provides a visual representation of the alternator’s AC ripple waveform. A healthy alternator produces a smooth DC output with minimal ripple; a failing diode creates a distinctive pattern of voltage dips. While not strictly necessary for basic testing, an oscilloscope is invaluable for diagnosing intermittent diode failures that a multimeter might miss.
Battery Tester and Hydrometer
Before testing the alternator, you must verify the battery is in good condition. A weak or sulfated battery can cause misleading alternator readings. Use a conductance tester or a traditional hydrometer to check specific gravity in each cell. The battery must be at least 75% charged before alternator testing begins.
Safety Equipment
Always wear safety glasses and insulated gloves when working around the charging system. The alternator can produce over 100 amps at 14 volts—enough to cause severe burns or start a fire if a tool slips and shorts the B+ terminal to ground. Keep loose clothing, jewelry, and tools away from the serpentine belt and rotating pulleys.
Pre-Test Inspection: Battery, Belts, and Wiring

Battery Condition Check
Begin with a visual inspection of the battery. Check for corrosion on terminals, loose connections, cracked case, or bulging sides. Measure resting voltage—a fully charged battery should read 12.6 volts or higher. If the battery reads below 12.4 volts, charge it fully before proceeding. Perform a load test if you suspect the battery may be weak; a battery that fails a load test will skew all subsequent alternator readings.
Serpentine Belt and Pulley Inspection
Inspect the serpentine belt for cracks, fraying, glazing, or excessive wear. Check belt tension—a loose belt will slip and cause the alternator to underperform. Look for a worn or damaged belt tensioner and check the alternator pulley for wobble or bearing noise. A seized or loose pulley can prevent the alternator from reaching proper RPM, leading to low output.
Wiring and Ground Integrity
Examine the alternator’s B+ output wire for corrosion, fraying, or loose connections at both the alternator and the battery. Check the ground strap between the engine block and the chassis, and the negative battery cable. Poor grounds are a common cause of undercharging and can produce erratic voltage readings. Use a multimeter to measure voltage drop across connections—anything over 0.2 volts indicates excessive resistance.
Warning
The alternator is the unsung workhorse of your vehicle’s electrical system—a belt-driven generator that converts mechanical energy from the engine into alternating current (AC), which is then rectified into direct current (DC) to recharge the battery and power every electrical component while the engine runs. Unlike the battery, which only stores energy, the alternator is the primary source of electrical power once your engine is turning. When it fails, you’re not just looking at a dead battery; you’re looking at a cascading electrical failure that can strand you anywhere, from a busy intersection to a remote trailhead. That’s why understanding alternator testing isn’t a luxury—it’s a fundamental diagnostic skill for any vehicle owner.
In this complete DIY guide, we’ll walk you through the essential attributes of alternator testing: the voltage and amperage output specs you need to verify, the critical difference between a failing alternator and a weak battery, and the specific tools—from a simple digital multimeter to a dedicated alternator bench tester—that give you accurate results. You’ll learn how to perform a load test, check for diode ripple, and interpret the warning signs like dimming headlights, a whining alternator bearing, or the dreaded battery warning light. We’ll also cover the safety protocols for working around high-amperage charging circuits and the common pitfalls that lead DIYers to misdiagnose a perfectly good alternator.
What sets this guide apart is the data-driven approach: we’ll provide real-world voltage readings, amperage draw tables for common vehicle classes, and honest limitations of each testing method. You won’t find vague advice here—you’ll find actionable thresholds, step-by-step procedures, and the reasoning behind each test. Whether you’re troubleshooting a parasitic drain, confirming a remanufactured alternator’s output, or just want to understand your charging system better, this guide gives you the entity-level knowledge to diagnose with confidence and avoid throwing parts at a problem that might have a simpler fix.
What Is Alternator Testing and Why It Matters

Alternator testing is the process of measuring your vehicle’s charging system output to determine whether the alternator is converting mechanical energy into electrical energy correctly. You perform these tests when you suspect the alternator is failing to keep the battery charged. The test itself is simple: you measure voltage at the battery terminals while the engine runs, then compare that reading against known-good specifications. But the diagnostic depth goes far beyond a single voltage check—it involves static testing, dynamic testing under load, ripple analysis for diode health, and verification of the entire charging circuit including belts, pulleys, wiring, and grounds.
The Alternator’s Role in Your Vehicle’s Electrical System
The alternator works in tandem with the battery and voltage regulator. The battery provides the initial cranking power and acts as a buffer, while the alternator supplies continuous current to run the ignition system, fuel pump, lights, infotainment, and all other electrical loads once the engine is running. The voltage regulator—whether internal or external—controls the alternator’s field current to maintain a stable output, typically between 13.5 and 14.8 volts depending on temperature and load. Without a properly functioning alternator, the battery will deplete within minutes of engine start, leading to a stall or complete electrical shutdown.
How Alternator Testing Differs from Battery and Starter Testing
Battery testing focuses on state of charge and capacity—measuring resting voltage, conducting a load test, and checking cold cranking amps. Starter testing evaluates the cranking circuit’s ability to draw high current and turn the engine. Alternator testing, by contrast, verifies the charging system’s ability to generate and regulate voltage and current while the engine runs. A common mistake is blaming the battery when the alternator is the culprit, or vice versa. Alternator testing specifically isolates the generation and regulation functions, which battery and starter tests cannot do.
Signs That You Need to Test Your Alternator
Common warning signs include a battery warning light on the dashboard, dimming or flickering headlights, a weak or dead battery that repeatedly needs jump-starts, electrical accessories that slow down or malfunction, a whining or grinding noise from the alternator bearing, and a burning rubber or electrical smell. If you experience any of these, testing the alternator should be your first diagnostic step before replacing any parts.
Essential Tools for Alternator Testing

Digital Multimeter (DMM)
The digital multimeter is the cornerstone of alternator testing. You’ll need a DMM capable of measuring DC voltage (at least 20V range), AC voltage (for ripple testing), and DC amperage (ideally with a clamp meter function). A quality DMM with a peak-hold or min/max function is especially useful for capturing transient voltage spikes. For most DIY testing, a basic DMM with 0.1V resolution is sufficient, but for accurate ripple measurements, you’ll want a meter with AC millivolt capability.
Load Tester or Carbon Pile Tester
A load tester applies a controlled electrical load to the charging system to verify the alternator’s output under real-world demand. Carbon pile testers are the professional standard, allowing you to draw 50-100 amps or more while monitoring voltage. For DIY use, a simple headlight load or a dedicated alternator load tester can suffice, but a carbon pile gives the most accurate results.
Clamp Meter (AC/DC)
A clamp meter measures current without disconnecting wires—essential for checking amperage output at the alternator’s B+ terminal. Look for a clamp meter that handles at least 100 amps DC and has a low-current sensitivity for parasitic draw testing. This tool is critical for verifying that the alternator is producing its rated amperage, not just voltage.
Oscilloscope (Optional but Recommended)
For advanced diode testing, an oscilloscope provides a visual representation of the alternator’s AC ripple waveform. A healthy alternator produces a smooth DC output with minimal ripple; a failing diode creates a distinctive pattern of voltage dips. While not strictly necessary for basic testing, an oscilloscope is invaluable for diagnosing intermittent diode failures that a multimeter might miss.
Battery Tester and Hydrometer
Before testing the alternator, you must verify the battery is in good condition. A weak or sulfated battery can cause misleading alternator readings. Use a conductance tester or a traditional hydrometer to check specific gravity in each cell. The battery must be at least 75% charged before alternator testing begins.
Safety Equipment
Always wear safety glasses and insulated gloves when working around the charging system. The alternator can produce over 100 amps at 14 volts—enough to cause severe burns or start a fire if a tool slips and shorts the B+ terminal to ground. Keep loose clothing, jewelry, and tools away from the serpentine belt and rotating pulleys.
Pre-Test Inspection: Battery, Belts, and Wiring

Battery Condition Check
Begin with a visual inspection of the battery. Check for corrosion on terminals, loose connections, cracked case, or bulging sides. Measure resting voltage—a fully charged battery should read 12.6 volts or higher. If the battery reads below 12.4 volts, charge it fully before proceeding. Perform a load test if you suspect the battery may be weak; a battery that fails a load test will skew all subsequent alternator readings.
Serpentine Belt and Pulley Inspection
Inspect the serpentine belt for cracks, fraying, glazing, or excessive wear. Check belt tension—a loose belt will slip and cause the alternator to underperform. Look for a worn or damaged belt tensioner and check the alternator pulley for wobble or bearing noise. A seized or loose pulley can prevent the alternator from reaching proper RPM, leading to low output.
Wiring and Ground Integrity
Examine the alternator’s B+ output wire for corrosion, fraying, or loose connections at both the alternator and the battery. Check the ground strap between the engine block and the chassis, and the negative battery cable. Poor grounds are a common cause of undercharging and can produce erratic voltage readings. Use a multimeter to measure voltage drop across connections—anything over 0.2 volts indicates excessive resistance.
Warning
Alternator Testing: The Complete DIY Guide to Diagnosing Charging System Failures
The alternator is the unsung workhorse of your vehicle’s electrical system—a belt-driven generator that converts mechanical energy from the engine into alternating current (AC), which is then rectified into direct current (DC) to recharge the battery and power every electrical component while the engine runs. Unlike the battery, which only stores energy, the alternator is the primary source of electrical power once your engine is turning. When it fails, you’re not just looking at a dead battery; you’re looking at a cascading electrical failure that can strand you anywhere, from a busy intersection to a remote trailhead. That’s why understanding alternator testing isn’t a luxury—it’s a fundamental diagnostic skill for any vehicle owner.
In this complete DIY guide, we’ll walk you through the essential attributes of alternator testing: the voltage and amperage output specs you need to verify, the critical difference between a failing alternator and a weak battery, and the specific tools—from a simple digital multimeter to a dedicated alternator bench tester—that give you accurate results. You’ll learn how to perform a load test, check for diode ripple, and interpret the warning signs like dimming headlights, a whining alternator bearing, or the dreaded battery warning light. We’ll also cover the safety protocols for working around high-amperage charging circuits and the common pitfalls that lead DIYers to misdiagnose a perfectly good alternator.
What sets this guide apart is the data-driven approach: we’ll provide real-world voltage readings, amperage draw tables for common vehicle classes, and honest limitations of each testing method. You won’t find vague advice here—you’ll find actionable thresholds, step-by-step procedures, and the reasoning behind each test. Whether you’re troubleshooting a parasitic drain, confirming a remanufactured alternator’s output, or just want to understand your charging system better, this guide gives you the entity-level knowledge to diagnose with confidence and avoid throwing parts at a problem that might have a simpler fix.
What Is Alternator Testing and Why It Matters

Alternator testing is the process of measuring your vehicle’s charging system output to determine whether the alternator is converting mechanical energy into electrical energy correctly. You perform these tests when you suspect the alternator is failing to keep the battery charged. The test itself is simple: you measure voltage at the battery terminals while the engine runs, then compare that reading against known-good specifications. But the diagnostic depth goes far beyond a single voltage check—it involves static testing, dynamic testing under load, ripple analysis for diode health, and verification of the entire charging circuit including belts, pulleys, wiring, and grounds.
The Alternator’s Role in Your Vehicle’s Electrical System
The alternator works in tandem with the battery and voltage regulator. The battery provides the initial cranking power and acts as a buffer, while the alternator supplies continuous current to run the ignition system, fuel pump, lights, infotainment, and all other electrical loads once the engine is running. The voltage regulator—whether internal or external—controls the alternator’s field current to maintain a stable output, typically between 13.5 and 14.8 volts depending on temperature and load. Without a properly functioning alternator, the battery will deplete within minutes of engine start, leading to a stall or complete electrical shutdown.
How Alternator Testing Differs from Battery and Starter Testing
Battery testing focuses on state of charge and capacity—measuring resting voltage, conducting a load test, and checking cold cranking amps. Starter testing evaluates the cranking circuit’s ability to draw high current and turn the engine. Alternator testing, by contrast, verifies the charging system’s ability to generate and regulate voltage and current while the engine runs. A common mistake is blaming the battery when the alternator is the culprit, or vice versa. Alternator testing specifically isolates the generation and regulation functions, which battery and starter tests cannot do.
Signs That You Need to Test Your Alternator
Common warning signs include a battery warning light on the dashboard, dimming or flickering headlights, a weak or dead battery that repeatedly needs jump-starts, electrical accessories that slow down or malfunction, a whining or grinding noise from the alternator bearing, and a burning rubber or electrical smell. If you experience any of these, testing the alternator should be your first diagnostic step before replacing any parts.
Essential Tools for Alternator Testing

Digital Multimeter (DMM)
The digital multimeter is the cornerstone of alternator testing. You’ll need a DMM capable of measuring DC voltage (at least 20V range), AC voltage (for ripple testing), and DC amperage (ideally with a clamp meter function). A quality DMM with a peak-hold or min/max function is especially useful for capturing transient voltage spikes. For most DIY testing, a basic DMM with 0.1V resolution is sufficient, but for accurate ripple measurements, you’ll want a meter with AC millivolt capability.
Load Tester or Carbon Pile Tester
A load tester applies a controlled electrical load to the charging system to verify the alternator’s output under real-world demand. Carbon pile testers are the professional standard, allowing you to draw 50-100 amps or more while monitoring voltage. For DIY use, a simple headlight load or a dedicated alternator load tester can suffice, but a carbon pile gives the most accurate results.
Clamp Meter (AC/DC)
A clamp meter measures current without disconnecting wires—essential for checking amperage output at the alternator’s B+ terminal. Look for a clamp meter that handles at least 100 amps DC and has a low-current sensitivity for parasitic draw testing. This tool is critical for verifying that the alternator is producing its rated amperage, not just voltage.
Oscilloscope (Optional but Recommended)
For advanced diode testing, an oscilloscope provides a visual representation of the alternator’s AC ripple waveform. A healthy alternator produces a smooth DC output with minimal ripple; a failing diode creates a distinctive pattern of voltage dips. While not strictly necessary for basic testing, an oscilloscope is invaluable for diagnosing intermittent diode failures that a multimeter might miss.
Battery Tester and Hydrometer
Before testing the alternator, you must verify the battery is in good condition. A weak or sulfated battery can cause misleading alternator readings. Use a conductance tester or a traditional hydrometer to check specific gravity in each cell. The battery must be at least 75% charged before alternator testing begins.
Safety Equipment
Always wear safety glasses and insulated gloves when working around the charging system. The alternator can produce over 100 amps at 14 volts—enough to cause severe burns or start a fire if a tool slips and shorts the B+ terminal to ground. Keep loose clothing, jewelry, and tools away from the serpentine belt and rotating pulleys.
Pre-Test Inspection: Battery, Belts, and Wiring

Battery Condition Check
Begin with a visual inspection of the battery. Check for corrosion on terminals, loose connections, cracked case, or bulging sides. Measure resting voltage—a fully charged battery should read 12.6 volts or higher. If the battery reads below 12.4 volts, charge it fully before proceeding. Perform a load test if you suspect the battery may be weak; a battery that fails a load test will skew all subsequent alternator readings.
Serpentine Belt and Pulley Inspection
Inspect the serpentine belt for cracks, fraying, glazing, or excessive wear. Check belt tension—a loose belt will slip and cause the alternator to underperform. Look for a worn or damaged belt tensioner and check the alternator pulley for wobble or bearing noise. A seized or loose pulley can prevent the alternator from reaching proper RPM, leading to low output.
Wiring and Ground Integrity
Examine the alternator’s B+ output wire for corrosion, fraying, or loose connections at both the alternator and the battery. Check the ground strap between the engine block and the chassis, and the negative battery cable. Poor grounds are a common cause of undercharging and can produce erratic voltage readings. Use a multimeter to measure voltage drop across connections—anything over 0.2 volts indicates excessive resistance.
Warning
Alternator Testing: The Complete DIY Guide to Diagnosing Charging System Failures
The alternator is the unsung workhorse of your vehicle’s electrical system—a belt-driven generator that converts mechanical energy from the engine into alternating current (AC), which is then rectified into direct current (DC) to recharge the battery and power every electrical component while the engine runs. Unlike the battery, which only stores energy, the alternator is the primary source of electrical power once your engine is turning. When it fails, you’re not just looking at a dead battery; you’re looking at a cascading electrical failure that can strand you anywhere, from a busy intersection to a remote trailhead. That’s why understanding alternator testing isn’t a luxury—it’s a fundamental diagnostic skill for any vehicle owner.
In this complete DIY guide, we’ll walk you through the essential attributes of alternator testing: the voltage and amperage output specs you need to verify, the critical difference between a failing alternator and a weak battery, and the specific tools—from a simple digital multimeter to a dedicated alternator bench tester—that give you accurate results. You’ll learn how to perform a load test, check for diode ripple, and interpret the warning signs like dimming headlights, a whining alternator bearing, or the dreaded battery warning light. We’ll also cover the safety protocols for working around high-amperage charging circuits and the common pitfalls that lead DIYers to misdiagnose a perfectly good alternator.
What sets this guide apart is the data-driven approach: we’ll provide real-world voltage readings, amperage draw tables for common vehicle classes, and honest limitations of each testing method. You won’t find vague advice here—you’ll find actionable thresholds, step-by-step procedures, and the reasoning behind each test. Whether you’re troubleshooting a parasitic drain, confirming a remanufactured alternator’s output, or just want to understand your charging system better, this guide gives you the entity-level knowledge to diagnose with confidence and avoid throwing parts at a problem that might have a simpler fix.
What Is Alternator Testing and Why It Matters

Alternator testing is the process of measuring your vehicle’s charging system output to determine whether the alternator is converting mechanical energy into electrical energy correctly. You perform these tests when you suspect the alternator is failing to keep the battery charged. The test itself is simple: you measure voltage at the battery terminals while the engine runs, then compare that reading against known-good specifications. But the diagnostic depth goes far beyond a single voltage check—it involves static testing, dynamic testing under load, ripple analysis for diode health, and verification of the entire charging circuit including belts, pulleys, wiring, and grounds.
The Alternator’s Role in Your Vehicle’s Electrical System
The alternator works in tandem with the battery and voltage regulator. The battery provides the initial cranking power and acts as a buffer, while the alternator supplies continuous current to run the ignition system, fuel pump, lights, infotainment, and all other electrical loads once the engine is running. The voltage regulator—whether internal or external—controls the alternator’s field current to maintain a stable output, typically between 13.5 and 14.8 volts depending on temperature and load. Without a properly functioning alternator, the battery will deplete within minutes of engine start, leading to a stall or complete electrical shutdown.
How Alternator Testing Differs from Battery and Starter Testing
Battery testing focuses on state of charge and capacity—measuring resting voltage, conducting a load test, and checking cold cranking amps. Starter testing evaluates the cranking circuit’s ability to draw high current and turn the engine. Alternator testing, by contrast, verifies the charging system’s ability to generate and regulate voltage and current while the engine runs. A common mistake is blaming the battery when the alternator is the culprit, or vice versa. Alternator testing specifically isolates the generation and regulation functions, which battery and starter tests cannot do.
Signs That You Need to Test Your Alternator
Common warning signs include a battery warning light on the dashboard, dimming or flickering headlights, a weak or dead battery that repeatedly needs jump-starts, electrical accessories that slow down or malfunction, a whining or grinding noise from the alternator bearing, and a burning rubber or electrical smell. If you experience any of these, testing the alternator should be your first diagnostic step before replacing any parts.
Essential Tools for Alternator Testing

Digital Multimeter (DMM)
The digital multimeter is the cornerstone of alternator testing. You’ll need a DMM capable of measuring DC voltage (at least 20V range), AC voltage (for ripple testing), and DC amperage (ideally with a clamp meter function). A quality DMM with a peak-hold or min/max function is especially useful for capturing transient voltage spikes. For most DIY testing, a basic DMM with 0.1V resolution is sufficient, but for accurate ripple measurements, you’ll want a meter with AC millivolt capability.
Load Tester or Carbon Pile Tester
A load tester applies a controlled electrical load to the charging system to verify the alternator’s output under real-world demand. Carbon pile testers are the professional standard, allowing you to draw 50-100 amps or more while monitoring voltage. For DIY use, a simple headlight load or a dedicated alternator load tester can suffice, but a carbon pile gives the most accurate results.
Clamp Meter (AC/DC)
A clamp meter measures current without disconnecting wires—essential for checking amperage output at the alternator’s B+ terminal. Look for a clamp meter that handles at least 100 amps DC and has a low-current sensitivity for parasitic draw testing. This tool is critical for verifying that the alternator is producing its rated amperage, not just voltage.
Oscilloscope (Optional but Recommended)
For advanced diode testing, an oscilloscope provides a visual representation of the alternator’s AC ripple waveform. A healthy alternator produces a smooth DC output with minimal ripple; a failing diode creates a distinctive pattern of voltage dips. While not strictly necessary for basic testing, an oscilloscope is invaluable for diagnosing intermittent diode failures that a multimeter might miss.
Battery Tester and Hydrometer
Before testing the alternator, you must verify the battery is in good condition. A weak or sulfated battery can cause misleading alternator readings. Use a conductance tester or a traditional hydrometer to check specific gravity in each cell. The battery must be at least 75% charged before alternator testing begins.
Safety Equipment
Always wear safety glasses and insulated gloves when working around the charging system. The alternator can produce over 100 amps at 14 volts—enough to cause severe burns or start a fire if a tool slips and shorts the B+ terminal to ground. Keep loose clothing, jewelry, and tools away from the serpentine belt and rotating pulleys.
Pre-Test Inspection: Battery, Belts, and Wiring

Battery Condition Check
Begin with a visual inspection of the battery. Check for corrosion on terminals, loose connections, cracked case, or bulging sides. Measure resting voltage—a fully charged battery should read 12.6 volts or higher. If the battery reads below 12.4 volts, charge it fully before proceeding. Perform a load test if you suspect the battery may be weak; a battery that fails a load test will skew all subsequent alternator readings.
Serpentine Belt and Pulley Inspection
Inspect the serpentine belt for cracks, fraying, glazing, or excessive wear. Check belt tension—a loose belt will slip and cause the alternator to underperform. Look for a worn or damaged belt tensioner and check the alternator pulley for wobble or bearing noise. A seized or loose pulley can prevent the alternator from reaching proper RPM, leading to low output.
Wiring and Ground Integrity
Examine the alternator’s B+ output wire for corrosion, fraying, or loose connections at both the alternator and the battery. Check the ground strap between the engine block and the chassis, and the negative battery cable. Poor grounds are a common cause of undercharging and can produce erratic voltage readings. Use a multimeter to measure voltage drop across connections—anything over 0.2 volts indicates excessive resistance.
Warning
Alternator Testing: The Complete DIY Guide to Diagnosing Charging System Failures
The alternator is the unsung workhorse of your vehicle’s electrical system—a belt-driven generator that converts mechanical energy from the engine into alternating current (AC), which is then rectified into direct current (DC) to recharge the battery and power every electrical component while the engine runs. Unlike the battery, which only stores energy, the alternator is the primary source of electrical power once your engine is turning. When it fails, you’re not just looking at a dead battery; you’re looking at a cascading electrical failure that can strand you anywhere, from a busy intersection to a remote trailhead. That’s why understanding alternator testing isn’t a luxury—it’s a fundamental diagnostic skill for any vehicle owner.
In this complete DIY guide, we’ll walk you through the essential attributes of alternator testing: the voltage and amperage output specs you need to verify, the critical difference between a failing alternator and a weak battery, and the specific tools—from a simple digital multimeter to a dedicated alternator bench tester—that give you accurate results. You’ll learn how to perform a load test, check for diode ripple, and interpret the warning signs like dimming headlights, a whining alternator bearing, or the dreaded battery warning light. We’ll also cover the safety protocols for working around high-amperage charging circuits and the common pitfalls that lead DIYers to misdiagnose a perfectly good alternator.
What sets this guide apart is the data-driven approach: we’ll provide real-world voltage readings, amperage draw tables for common vehicle classes, and honest limitations of each testing method. You won’t find vague advice here—you’ll find actionable thresholds, step-by-step procedures, and the reasoning behind each test. Whether you’re troubleshooting a parasitic drain, confirming a remanufactured alternator’s output, or just want to understand your charging system better, this guide gives you the entity-level knowledge to diagnose with confidence and avoid throwing parts at a problem that might have a simpler fix.
What Is Alternator Testing and Why It Matters

Alternator testing is the process of measuring your vehicle’s charging system output to determine whether the alternator is converting mechanical energy into electrical energy correctly. You perform these tests when you suspect the alternator is failing to keep the battery charged. The test itself is simple: you measure voltage at the battery terminals while the engine runs, then compare that reading against known-good specifications. But the diagnostic depth goes far beyond a single voltage check—it involves static testing, dynamic testing under load, ripple analysis for diode health, and verification of the entire charging circuit including belts, pulleys, wiring, and grounds.
The Alternator’s Role in Your Vehicle’s Electrical System
The alternator works in tandem with the battery and voltage regulator. The battery provides the initial cranking power and acts as a buffer, while the alternator supplies continuous current to run the ignition system, fuel pump, lights, infotainment, and all other electrical loads once the engine is running. The voltage regulator—whether internal or external—controls the alternator’s field current to maintain a stable output, typically between 13.5 and 14.8 volts depending on temperature and load. Without a properly functioning alternator, the battery will deplete within minutes of engine start, leading to a stall or complete electrical shutdown.
How Alternator Testing Differs from Battery and Starter Testing
Battery testing focuses on state of charge and capacity—measuring resting voltage, conducting a load test, and checking cold cranking amps. Starter testing evaluates the cranking circuit’s ability to draw high current and turn the engine. Alternator testing, by contrast, verifies the charging system’s ability to generate and regulate voltage and current while the engine runs. A common mistake is blaming the battery when the alternator is the culprit, or vice versa. Alternator testing specifically isolates the generation and regulation functions, which battery and starter tests cannot do.
Signs That You Need to Test Your Alternator
Common warning signs include a battery warning light on the dashboard, dimming or flickering headlights, a weak or dead battery that repeatedly needs jump-starts, electrical accessories that slow down or malfunction, a whining or grinding noise from the alternator bearing, and a burning rubber or electrical smell. If you experience any of these, testing the alternator should be your first diagnostic step before replacing any parts.
Essential Tools for Alternator Testing

Digital Multimeter (DMM)
The digital multimeter is the cornerstone of alternator testing. You’ll need a DMM capable of measuring DC voltage (at least 20V range), AC voltage (for ripple testing), and DC amperage (ideally with a clamp meter function). A quality DMM with a peak-hold or min/max function is especially useful for capturing transient voltage spikes. For most DIY testing, a basic DMM with 0.1V resolution is sufficient, but for accurate ripple measurements, you’ll want a meter with AC millivolt capability.
Load Tester or Carbon Pile Tester
A load tester applies a controlled electrical load to the charging system to verify the alternator’s output under real-world demand. Carbon pile testers are the professional standard, allowing you to draw 50-100 amps or more while monitoring voltage. For DIY use, a simple headlight load or a dedicated alternator load tester can suffice, but a carbon pile gives the most accurate results.
Clamp Meter (AC/DC)
A clamp meter measures current without disconnecting wires—essential for checking amperage output at the alternator’s B+ terminal. Look for a clamp meter that handles at least 100 amps DC and has a low-current sensitivity for parasitic draw testing. This tool is critical for verifying that the alternator is producing its rated amperage, not just voltage.
Oscilloscope (Optional but Recommended)
For advanced diode testing, an oscilloscope provides a visual representation of the alternator’s AC ripple waveform. A healthy alternator produces a smooth DC output with minimal ripple; a failing diode creates a distinctive pattern of voltage dips. While not strictly necessary for basic testing, an oscilloscope is invaluable for diagnosing intermittent diode failures that a multimeter might miss.
Battery Tester and Hydrometer
Before testing the alternator, you must verify the battery is in good condition. A weak or sulfated battery can cause misleading alternator readings. Use a conductance tester or a traditional hydrometer to check specific gravity in each cell. The battery must be at least 75% charged before alternator testing begins.
Safety Equipment
Always wear safety glasses and insulated gloves when working around the charging system. The alternator can produce over 100 amps at 14 volts—enough to cause severe burns or start a fire if a tool slips and shorts the B+ terminal to ground. Keep loose clothing, jewelry, and tools away from the serpentine belt and rotating pulleys.
Pre-Test Inspection: Battery, Belts, and Wiring

Battery Condition Check
Begin with a visual inspection of the battery. Check for corrosion on terminals, loose connections, cracked case, or bulging sides. Measure resting voltage—a fully charged battery should read 12.6 volts or higher. If the battery reads below 12.4 volts, charge it fully before proceeding. Perform a load test if you suspect the battery may be weak; a battery that fails a load test will skew all subsequent alternator readings.
Serpentine Belt and Pulley Inspection
Inspect the serpentine belt for cracks, fraying, glazing, or excessive wear. Check belt tension—a loose belt will slip and cause the alternator to underperform. Look for a worn or damaged belt tensioner and check the alternator pulley for wobble or bearing noise. A seized or loose pulley can prevent the alternator from reaching proper RPM, leading to low output.
Wiring and Ground Integrity
Examine the alternator’s B+ output wire for corrosion, fraying, or loose connections at both the alternator and the battery. Check the ground strap between the engine block and the chassis, and the negative battery cable. Poor grounds are a common cause of undercharging and can produce erratic voltage readings. Use a multimeter to measure voltage drop across connections—anything over 0.2 volts indicates excessive resistance.
Warning
Alternator Testing: The Complete DIY Guide to Diagnosing Charging System Failures
The alternator is the unsung workhorse of your vehicle’s electrical system—a belt-driven generator that converts mechanical energy from the engine into alternating current (AC), which is then rectified into direct current (DC) to recharge the battery and power every electrical component while the engine runs. Unlike the battery, which only stores energy, the alternator is the primary source of electrical power once your engine is turning. When it fails, you’re not just looking at a dead battery; you’re looking at a cascading electrical failure that can strand you anywhere, from a busy intersection to a remote trailhead. That’s why understanding alternator testing isn’t a luxury—it’s a fundamental diagnostic skill for any vehicle owner.
In this complete DIY guide, we’ll walk you through the essential attributes of alternator testing: the voltage and amperage output specs you need to verify, the critical difference between a failing alternator and a weak battery, and the specific tools—from a simple digital multimeter to a dedicated alternator bench tester—that give you accurate results. You’ll learn how to perform a load test, check for diode ripple, and interpret the warning signs like dimming headlights, a whining alternator bearing, or the dreaded battery warning light. We’ll also cover the safety protocols for working around high-amperage charging circuits and the common pitfalls that lead DIYers to misdiagnose a perfectly good alternator.
What sets this guide apart is the data-driven approach: we’ll provide real-world voltage readings, amperage draw tables for common vehicle classes, and honest limitations of each testing method. You won’t find vague advice here—you’ll find actionable thresholds, step-by-step procedures, and the reasoning behind each test. Whether you’re troubleshooting a parasitic drain, confirming a remanufactured alternator’s output, or just want to understand your charging system better, this guide gives you the entity-level knowledge to diagnose with confidence and avoid throwing parts at a problem that might have a simpler fix.
What Is Alternator Testing and Why It Matters

Alternator testing is the process of measuring your vehicle’s charging system output to determine whether the alternator is converting mechanical energy into electrical energy correctly. You perform these tests when you suspect the alternator is failing to keep the battery charged. The test itself is simple: you measure voltage at the battery terminals while the engine runs, then compare that reading against known-good specifications. But the diagnostic depth goes far beyond a single voltage check—it involves static testing, dynamic testing under load, ripple analysis for diode health, and verification of the entire charging circuit including belts, pulleys, wiring, and grounds.
The Alternator’s Role in Your Vehicle’s Electrical System
The alternator works in tandem with the battery and voltage regulator. The battery provides the initial cranking power and acts as a buffer, while the alternator supplies continuous current to run the ignition system, fuel pump, lights, infotainment, and all other electrical loads once the engine is running. The voltage regulator—whether internal or external—controls the alternator’s field current to maintain a stable output, typically between 13.5 and 14.8 volts depending on temperature and load. Without a properly functioning alternator, the battery will deplete within minutes of engine start, leading to a stall or complete electrical shutdown.
How Alternator Testing Differs from Battery and Starter Testing
Battery testing focuses on state of charge and capacity—measuring resting voltage, conducting a load test, and checking cold cranking amps. Starter testing evaluates the cranking circuit’s ability to draw high current and turn the engine. Alternator testing, by contrast, verifies the charging system’s ability to generate and regulate voltage and current while the engine runs. A common mistake is blaming the battery when the alternator is the culprit, or vice versa. Alternator testing specifically isolates the generation and regulation functions, which battery and starter tests cannot do.
Signs That You Need to Test Your Alternator
Common warning signs include a battery warning light on the dashboard, dimming or flickering headlights, a weak or dead battery that repeatedly needs jump-starts, electrical accessories that slow down or malfunction, a whining or grinding noise from the alternator bearing, and a burning rubber or electrical smell. If you experience any of these, testing the alternator should be your first diagnostic step before replacing any parts.
Essential Tools for Alternator Testing

Digital Multimeter (DMM)
The digital multimeter is the cornerstone of alternator testing. You’ll need a DMM capable of measuring DC voltage (at least 20V range), AC voltage (for ripple testing), and DC amperage (ideally with a clamp meter function). A quality DMM with a peak-hold or min/max function is especially useful for capturing transient voltage spikes. For most DIY testing, a basic DMM with 0.1V resolution is sufficient, but for accurate ripple measurements, you’ll want a meter with AC millivolt capability.
Load Tester or Carbon Pile Tester
A load tester applies a controlled electrical load to the charging system to verify the alternator’s output under real-world demand. Carbon pile testers are the professional standard, allowing you to draw 50-100 amps or more while monitoring voltage. For DIY use, a simple headlight load or a dedicated alternator load tester can suffice, but a carbon pile gives the most accurate results.
Clamp Meter (AC/DC)
A clamp meter measures current without disconnecting wires—essential for checking amperage output at the alternator’s B+ terminal. Look for a clamp meter that handles at least 100 amps DC and has a low-current sensitivity for parasitic draw testing. This tool is critical for verifying that the alternator is producing its rated amperage, not just voltage.
Oscilloscope (Optional but Recommended)
For advanced diode testing, an oscilloscope provides a visual representation of the alternator’s AC ripple waveform. A healthy alternator produces a smooth DC output with minimal ripple; a failing diode creates a distinctive pattern of voltage dips. While not strictly necessary for basic testing, an oscilloscope is invaluable for diagnosing intermittent diode failures that a multimeter might miss.
Battery Tester and Hydrometer
Before testing the alternator, you must verify the battery is in good condition. A weak or sulfated battery can cause misleading alternator readings. Use a conductance tester or a traditional hydrometer to check specific gravity in each cell. The battery must be at least 75% charged before alternator testing begins.
Safety Equipment
Always wear safety glasses and insulated gloves when working around the charging system. The alternator can produce over 100 amps at 14 volts—enough to cause severe burns or start a fire if a tool slips and shorts the B+ terminal to ground. Keep loose clothing, jewelry, and tools away from the serpentine belt and rotating pulleys.
Pre-Test Inspection: Battery, Belts, and Wiring

Battery Condition Check
Begin with a visual inspection of the battery. Check for corrosion on terminals, loose connections, cracked case, or bulging sides. Measure resting voltage—a fully charged battery should read 12.6 volts or higher. If the battery reads below 12.4 volts, charge it fully before proceeding. Perform a load test if you suspect the battery may be weak; a battery that fails a load test will skew all subsequent alternator readings.
Serpentine Belt and Pulley Inspection
Inspect the serpentine belt for cracks, fraying, glazing, or excessive wear. Check belt tension—a loose belt will slip and cause the alternator to underperform. Look for a worn or damaged belt tensioner and check the alternator pulley for wobble or bearing noise. A seized or loose pulley can prevent the alternator from reaching proper RPM, leading to low output.
Wiring and Ground Integrity
Examine the alternator’s B+ output wire for corrosion, fraying, or loose connections at both the alternator and the battery. Check the ground strap between the engine block and the chassis, and the negative battery cable. Poor grounds are a common cause of undercharging and can produce erratic voltage readings. Use a multimeter to measure voltage drop across connections—anything over 0.2 volts indicates excessive resistance.
Warning
Alternator Testing: The Complete DIY Guide to Diagnosing Charging System Failures
The alternator is the unsung workhorse of your vehicle’s electrical system—a belt-driven generator that converts mechanical energy from the engine into alternating current (AC), which is then rectified into direct current (DC) to recharge the battery and power every electrical component while the engine runs. Unlike the battery, which only stores energy, the alternator is the primary source of electrical power once your engine is turning. When it fails, you’re not just looking at a dead battery; you’re looking at a cascading electrical failure that can strand you anywhere, from a busy intersection to a remote trailhead. That’s why understanding alternator testing isn’t a luxury—it’s a fundamental diagnostic skill for any vehicle owner.
In this complete DIY guide, we’ll walk you through the essential attributes of alternator testing: the voltage and amperage output specs you need to verify, the critical difference between a failing alternator and a weak battery, and the specific tools—from a simple digital multimeter to a dedicated alternator bench tester—that give you accurate results. You’ll learn how to perform a load test, check for diode ripple, and interpret the warning signs like dimming headlights, a whining alternator bearing, or the dreaded battery warning light. We’ll also cover the safety protocols for working around high-amperage charging circuits and the common pitfalls that lead DIYers to misdiagnose a perfectly good alternator.
What sets this guide apart is the data-driven approach: we’ll provide real-world voltage readings, amperage draw tables for common vehicle classes, and honest limitations of each testing method. You won’t find vague advice here—you’ll find actionable thresholds, step-by-step procedures, and the reasoning behind each test. Whether you’re troubleshooting a parasitic drain, confirming a remanufactured alternator’s output, or just want to understand your charging system better, this guide gives you the entity-level knowledge to diagnose with confidence and avoid throwing parts at a problem that might have a simpler fix.
What Is Alternator Testing and Why It Matters

Alternator testing is the process of measuring your vehicle’s charging system output to determine whether the alternator is converting mechanical energy into electrical energy correctly. You perform these tests when you suspect the alternator is failing to keep the battery charged. The test itself is simple: you measure voltage at the battery terminals while the engine runs, then compare that reading against known-good specifications. But the diagnostic depth goes far beyond a single voltage check—it involves static testing, dynamic testing under load, ripple analysis for diode health, and verification of the entire charging circuit including belts, pulleys, wiring, and grounds.
The Alternator’s Role in Your Vehicle’s Electrical System
The alternator works in tandem with the battery and voltage regulator. The battery provides the initial cranking power and acts as a buffer, while the alternator supplies continuous current to run the ignition system, fuel pump, lights, infotainment, and all other electrical loads once the engine is running. The voltage regulator—whether internal or external—controls the alternator’s field current to maintain a stable output, typically between 13.5 and 14.8 volts depending on temperature and load. Without a properly functioning alternator, the battery will deplete within minutes of engine start, leading to a stall or complete electrical shutdown.
How Alternator Testing Differs from Battery and Starter Testing
Battery testing focuses on state of charge and capacity—measuring resting voltage, conducting a load test, and checking cold cranking amps. Starter testing evaluates the cranking circuit’s ability to draw high current and turn the engine. Alternator testing, by contrast, verifies the charging system’s ability to generate and regulate voltage and current while the engine runs. A common mistake is blaming the battery when the alternator is the culprit, or vice versa. Alternator testing specifically isolates the generation and regulation functions, which battery and starter tests cannot do.
Signs That You Need to Test Your Alternator
Common warning signs include a battery warning light on the dashboard, dimming or flickering headlights, a weak or dead battery that repeatedly needs jump-starts, electrical accessories that slow down or malfunction, a whining or grinding noise from the alternator bearing, and a burning rubber or electrical smell. If you experience any of these, testing the alternator should be your first diagnostic step before replacing any parts.
Essential Tools for Alternator Testing

Digital Multimeter (DMM)
The digital multimeter is the cornerstone of alternator testing. You’ll need a DMM capable of measuring DC voltage (at least 20V range), AC voltage (for ripple testing), and DC amperage (ideally with a clamp meter function). A quality DMM with a peak-hold or min/max function is especially useful for capturing transient voltage spikes. For most DIY testing, a basic DMM with 0.1V resolution is sufficient, but for accurate ripple measurements, you’ll want a meter with AC millivolt capability.
Load Tester or Carbon Pile Tester
A load tester applies a controlled electrical load to the charging system to verify the alternator’s output under real-world demand. Carbon pile testers are the professional standard, allowing you to draw 50-100 amps or more while monitoring voltage. For DIY use, a simple headlight load or a dedicated alternator load tester can suffice, but a carbon pile gives the most accurate results.
Clamp Meter (AC/DC)
A clamp meter measures current without disconnecting wires—essential for checking amperage output at the alternator’s B+ terminal. Look for a clamp meter that handles at least 100 amps DC and has a low-current sensitivity for parasitic draw testing. This tool is critical for verifying that the alternator is producing its rated amperage, not just voltage.
Oscilloscope (Optional but Recommended)
For advanced diode testing, an oscilloscope provides a visual representation of the alternator’s AC ripple waveform. A healthy alternator produces a smooth DC output with minimal ripple; a failing diode creates a distinctive pattern of voltage dips. While not strictly necessary for basic testing, an oscilloscope is invaluable for diagnosing intermittent diode failures that a multimeter might miss.
Battery Tester and Hydrometer
Before testing the alternator, you must verify the battery is in good condition. A weak or sulfated battery can cause misleading alternator readings. Use a conductance tester or a traditional hydrometer to check specific gravity in each cell. The battery must be at least 75% charged before alternator testing begins.
Safety Equipment
Always wear safety glasses and insulated gloves when working around the charging system. The alternator can produce over 100 amps at 14 volts—enough to cause severe burns or start a fire if a tool slips and shorts the B+ terminal to ground. Keep loose clothing, jewelry, and tools away from the serpentine belt and rotating pulleys.
Pre-Test Inspection: Battery, Belts, and Wiring

Battery Condition Check
Begin with a visual inspection of the battery. Check for corrosion on terminals, loose connections, cracked case, or bulging sides. Measure resting voltage—a fully charged battery should read 12.6 volts or higher. If the battery reads below 12.4 volts, charge it fully before proceeding. Perform a load test if you suspect the battery may be weak; a battery that fails a load test will skew all subsequent alternator readings.
Serpentine Belt and Pulley Inspection
Inspect the serpentine belt for cracks, fraying, glazing, or excessive wear. Check belt tension—a loose belt will slip and cause the alternator to underperform. Look for a worn or damaged belt tensioner and check the alternator pulley for wobble or bearing noise. A seized or loose pulley can prevent the alternator from reaching proper RPM, leading to low output.
Wiring and Ground Integrity
Examine the alternator’s B+ output wire for corrosion, fraying, or loose connections at both the alternator and the battery. Check the ground strap between the engine block and the chassis, and the negative battery cable. Poor grounds are a common cause of undercharging and can produce erratic voltage readings. Use a multimeter to measure voltage drop across connections—anything over 0.2 volts indicates excessive resistance.
Warning
The alternator is the unsung workhorse of your vehicle’s electrical system—a belt-driven generator that converts mechanical energy from the engine into alternating current (AC), which is then rectified into direct current (DC) to recharge the battery and power every electrical component while the engine runs. Unlike the battery, which only stores energy, the alternator is the primary source of electrical power once your engine is turning. When it fails, you’re not just looking at a dead battery; you’re looking at a cascading electrical failure that can strand you anywhere, from a busy intersection to a remote trailhead. That’s why understanding alternator testing isn’t a luxury—it’s a fundamental diagnostic skill for any vehicle owner.
In this complete DIY guide, we’ll walk you through the essential attributes of alternator testing: the voltage and amperage output specs you need to verify, the critical difference between a failing alternator and a weak battery, and the specific tools—from a simple digital multimeter to a dedicated alternator bench tester—that give you accurate results. You’ll learn how to perform a load test, check for diode ripple, and interpret the warning signs like dimming headlights, a whining alternator bearing, or the dreaded battery warning light. We’ll also cover the safety protocols for working around high-amperage charging circuits and the common pitfalls that lead DIYers to misdiagnose a perfectly good alternator.
What sets this guide apart is the data-driven approach: we’ll provide real-world voltage readings, amperage draw tables for common vehicle classes, and honest limitations of each testing method. You won’t find vague advice here—you’ll find actionable thresholds, step-by-step procedures, and the reasoning behind each test. Whether you’re troubleshooting a parasitic drain, confirming a remanufactured alternator’s output, or just want to understand your charging system better, this guide gives you the entity-level knowledge to diagnose with confidence and avoid throwing parts at a problem that might have a simpler fix.
What Is Alternator Testing and Why It Matters

Alternator testing is the process of measuring your vehicle’s charging system output to determine whether the alternator is converting mechanical energy into electrical energy correctly. You perform these tests when you suspect the alternator is failing to keep the battery charged. The test itself is simple: you measure voltage at the battery terminals while the engine runs, then compare that reading against known-good specifications. But the diagnostic depth goes far beyond a single voltage check—it involves static testing, dynamic testing under load, ripple analysis for diode health, and verification of the entire charging circuit including belts, pulleys, wiring, and grounds.
The Alternator’s Role in Your Vehicle’s Electrical System
The alternator works in tandem with the battery and voltage regulator. The battery provides the initial cranking power and acts as a buffer, while the alternator supplies continuous current to run the ignition system, fuel pump, lights, infotainment, and all other electrical loads once the engine is running. The voltage regulator—whether internal or external—controls the alternator’s field current to maintain a stable output, typically between 13.5 and 14.8 volts depending on temperature and load. Without a properly functioning alternator, the battery will deplete within minutes of engine start, leading to a stall or complete electrical shutdown.
How Alternator Testing Differs from Battery and Starter Testing
Battery testing focuses on state of charge and capacity—measuring resting voltage, conducting a load test, and checking cold cranking amps. Starter testing evaluates the cranking circuit’s ability to draw high current and turn the engine. Alternator testing, by contrast, verifies the charging system’s ability to generate and regulate voltage and current while the engine runs. A common mistake is blaming the battery when the alternator is the culprit, or vice versa. Alternator testing specifically isolates the generation and regulation functions, which battery and starter tests cannot do.
Signs That You Need to Test Your Alternator
Common warning signs include a battery warning light on the dashboard, dimming or flickering headlights, a weak or dead battery that repeatedly needs jump-starts, electrical accessories that slow down or malfunction, a whining or grinding noise from the alternator bearing, and a burning rubber or electrical smell. If you experience any of these, testing the alternator should be your first diagnostic step before replacing any parts.
Essential Tools for Alternator Testing

Digital Multimeter (DMM)
The digital multimeter is the cornerstone of alternator testing. You’ll need a DMM capable of measuring DC voltage (at least 20V range), AC voltage (for ripple testing), and DC amperage (ideally with a clamp meter function). A quality DMM with a peak-hold or min/max function is especially useful for capturing transient voltage spikes. For most DIY testing, a basic DMM with 0.1V resolution is sufficient, but for accurate ripple measurements, you’ll want a meter with AC millivolt capability.
Load Tester or Carbon Pile Tester
A load tester applies a controlled electrical load to the charging system to verify the alternator’s output under real-world demand. Carbon pile testers are the professional standard, allowing you to draw 50-100 amps or more while monitoring voltage. For DIY use, a simple headlight load or a dedicated alternator load tester can suffice, but a carbon pile gives the most accurate results.
Clamp Meter (AC/DC)
A clamp meter measures current without disconnecting wires—essential for checking amperage output at the alternator’s B+ terminal. Look for a clamp meter that handles at least 100 amps DC and has a low-current sensitivity for parasitic draw testing. This tool is critical for verifying that the alternator is producing its rated amperage, not just voltage.
Oscilloscope (Optional but Recommended)
For advanced diode testing, an oscilloscope provides a visual representation of the alternator’s AC ripple waveform. A healthy alternator produces a smooth DC output with minimal ripple; a failing diode creates a distinctive pattern of voltage dips. While not strictly necessary for basic testing, an oscilloscope is invaluable for diagnosing intermittent diode failures that a multimeter might miss.
Battery Tester and Hydrometer
Before testing the alternator, you must verify the battery is in good condition. A weak or sulfated battery can cause misleading alternator readings. Use a conductance tester or a traditional hydrometer to check specific gravity in each cell. The battery must be at least 75% charged before alternator testing begins.
Safety Equipment
Always wear safety glasses and insulated gloves when working around the charging system. The alternator can produce over 100 amps at 14 volts—enough to cause severe burns or start a fire if a tool slips and shorts the B+ terminal to ground. Keep loose clothing, jewelry, and tools away from the serpentine belt and rotating pulleys.
Pre-Test Inspection: Battery, Belts, and Wiring

Battery Condition Check
Begin with a visual inspection of the battery. Check for corrosion on terminals, loose connections, cracked case, or bulging sides. Measure resting voltage—a fully charged battery should read 12.6 volts or higher. If the battery reads below 12.4 volts, charge it fully before proceeding. Perform a load test if you suspect the battery may be weak; a battery that fails a load test will skew all subsequent alternator readings.
Serpentine Belt and Pulley Inspection
Inspect the serpentine belt for cracks, fraying, glazing, or excessive wear. Check belt tension—a loose belt will slip and cause the alternator to underperform. Look for a worn or damaged belt tensioner and check the alternator pulley for wobble or bearing noise. A seized or loose pulley can prevent the alternator from reaching proper RPM, leading to low output.
Wiring and Ground Integrity
Examine the alternator’s B+ output wire for corrosion, fraying, or loose connections at both the alternator and the battery. Check the ground strap between the engine block and the chassis, and the negative battery cable. Poor grounds are a common cause of undercharging and can produce erratic voltage readings. Use a multimeter to measure voltage drop across connections—anything over 0.2 volts indicates excessive resistance.
Warning
Alternator Testing: The Complete DIY Guide to Diagnosing Charging System Failures
The alternator is the unsung workhorse of your vehicle’s electrical system—a belt-driven generator that converts mechanical energy from the engine into alternating current (AC), which is then rectified into direct current (DC) to recharge the battery and power every electrical component while the engine runs. Unlike the battery, which only stores energy, the alternator is the primary source of electrical power once your engine is turning. When it fails, you’re not just looking at a dead battery; you’re looking at a cascading electrical failure that can strand you anywhere, from a busy intersection to a remote trailhead. That’s why understanding alternator testing isn’t a luxury—it’s a fundamental diagnostic skill for any vehicle owner.
In this complete DIY guide, we’ll walk you through the essential attributes of alternator testing: the voltage and amperage output specs you need to verify, the critical difference between a failing alternator and a weak battery, and the specific tools—from a simple digital multimeter to a dedicated alternator bench tester—that give you accurate results. You’ll learn how to perform a load test, check for diode ripple, and interpret the warning signs like dimming headlights, a whining alternator bearing, or the dreaded battery warning light. We’ll also cover the safety protocols for working around high-amperage charging circuits and the common pitfalls that lead DIYers to misdiagnose a perfectly good alternator.
What sets this guide apart is the data-driven approach: we’ll provide real-world voltage readings, amperage draw tables for common vehicle classes, and honest limitations of each testing method. You won’t find vague advice here—you’ll find actionable thresholds, step-by-step procedures, and the reasoning behind each test. Whether you’re troubleshooting a parasitic drain, confirming a remanufactured alternator’s output, or just want to understand your charging system better, this guide gives you the entity-level knowledge to diagnose with confidence and avoid throwing parts at a problem that might have a simpler fix.
What Is Alternator Testing and Why It Matters

Alternator testing is the process of measuring your vehicle’s charging system output to determine whether the alternator is converting mechanical energy into electrical energy correctly. You perform these tests when you suspect the alternator is failing to keep the battery charged. The test itself is simple: you measure voltage at the battery terminals while the engine runs, then compare that reading against known-good specifications. But the diagnostic depth goes far beyond a single voltage check—it involves static testing, dynamic testing under load, ripple analysis for diode health, and verification of the entire charging circuit including belts, pulleys, wiring, and grounds.
The Alternator’s Role in Your Vehicle’s Electrical System
The alternator works in tandem with the battery and voltage regulator. The battery provides the initial cranking power and acts as a buffer, while the alternator supplies continuous current to run the ignition system, fuel pump, lights, infotainment, and all other electrical loads once the engine is running. The voltage regulator—whether internal or external—controls the alternator’s field current to maintain a stable output, typically between 13.5 and 14.8 volts depending on temperature and load. Without a properly functioning alternator, the battery will deplete within minutes of engine start, leading to a stall or complete electrical shutdown.
How Alternator Testing Differs from Battery and Starter Testing
Battery testing focuses on state of charge and capacity—measuring resting voltage, conducting a load test, and checking cold cranking amps. Starter testing evaluates the cranking circuit’s ability to draw high current and turn the engine. Alternator testing, by contrast, verifies the charging system’s ability to generate and regulate voltage and current while the engine runs. A common mistake is blaming the battery when the alternator is the culprit, or vice versa. Alternator testing specifically isolates the generation and regulation functions, which battery and starter tests cannot do.
Signs That You Need to Test Your Alternator
Common warning signs include a battery warning light on the dashboard, dimming or flickering headlights, a weak or dead battery that repeatedly needs jump-starts, electrical accessories that slow down or malfunction, a whining or grinding noise from the alternator bearing, and a burning rubber or electrical smell. If you experience any of these, testing the alternator should be your first diagnostic step before replacing any parts.
Essential Tools for Alternator Testing

Digital Multimeter (DMM)
The digital multimeter is the cornerstone of alternator testing. You’ll need a DMM capable of measuring DC voltage (at least 20V range), AC voltage (for ripple testing), and DC amperage (ideally with a clamp meter function). A quality DMM with a peak-hold or min/max function is especially useful for capturing transient voltage spikes. For most DIY testing, a basic DMM with 0.1V resolution is sufficient, but for accurate ripple measurements, you’ll want a meter with AC millivolt capability.
Load Tester or Carbon Pile Tester
A load tester applies a controlled electrical load to the charging system to verify the alternator’s output under real-world demand. Carbon pile testers are the professional standard, allowing you to draw 50-100 amps or more while monitoring voltage. For DIY use, a simple headlight load or a dedicated alternator load tester can suffice, but a carbon pile gives the most accurate results.
Clamp Meter (AC/DC)
A clamp meter measures current without disconnecting wires—essential for checking amperage output at the alternator’s B+ terminal. Look for a clamp meter that handles at least 100 amps DC and has a low-current sensitivity for parasitic draw testing. This tool is critical for verifying that the alternator is producing its rated amperage, not just voltage.
Oscilloscope (Optional but Recommended)
For advanced diode testing, an oscilloscope provides a visual representation of the alternator’s AC ripple waveform. A healthy alternator produces a smooth DC output with minimal ripple; a failing diode creates a distinctive pattern of voltage dips. While not strictly necessary for basic testing, an oscilloscope is invaluable for diagnosing intermittent diode failures that a multimeter might miss.
Battery Tester and Hydrometer
Before testing the alternator, you must verify the battery is in good condition. A weak or sulfated battery can cause misleading alternator readings. Use a conductance tester or a traditional hydrometer to check specific gravity in each cell. The battery must be at least 75% charged before alternator testing begins.
Safety Equipment
Always wear safety glasses and insulated gloves when working around the charging system. The alternator can produce over 100 amps at 14 volts—enough to cause severe burns or start a fire if a tool slips and shorts the B+ terminal to ground. Keep loose clothing, jewelry, and tools away from the serpentine belt and rotating pulleys.
Pre-Test Inspection: Battery, Belts, and Wiring

Battery Condition Check
Begin with a visual inspection of the battery. Check for corrosion on terminals, loose connections, cracked case, or bulging sides. Measure resting voltage—a fully charged battery should read 12.6 volts or higher. If the battery reads below 12.4 volts, charge it fully before proceeding. Perform a load test if you suspect the battery may be weak; a battery that fails a load test will skew all subsequent alternator readings.
Serpentine Belt and Pulley Inspection
Inspect the serpentine belt for cracks, fraying, glazing, or excessive wear. Check belt tension—a loose belt will slip and cause the alternator to underperform. Look for a worn or damaged belt tensioner and check the alternator pulley for wobble or bearing noise. A seized or loose pulley can prevent the alternator from reaching proper RPM, leading to low output.
Wiring and Ground Integrity
Examine the alternator’s B+ output wire for corrosion, fraying, or loose connections at both the alternator and the battery. Check the ground strap between the engine block and the chassis, and the negative battery cable. Poor grounds are a common cause of undercharging and can produce erratic voltage readings. Use a multimeter to measure voltage drop across connections—anything over 0.2 volts indicates excessive resistance.
Warning
Alternator Testing: The Complete DIY Guide to Diagnosing Charging System Failures
The alternator is the unsung workhorse of your vehicle’s electrical system—a belt-driven generator that converts mechanical energy from the engine into alternating current (AC), which is then rectified into direct current (DC) to recharge the battery and power every electrical component while the engine runs. Unlike the battery, which only stores energy, the alternator is the primary source of electrical power once your engine is turning. When it fails, you’re not just looking at a dead battery; you’re looking at a cascading electrical failure that can strand you anywhere, from a busy intersection to a remote trailhead. That’s why understanding alternator testing isn’t a luxury—it’s a fundamental diagnostic skill for any vehicle owner.
In this complete DIY guide, we’ll walk you through the essential attributes of alternator testing: the voltage and amperage output specs you need to verify, the critical difference between a failing alternator and a weak battery, and the specific tools—from a simple digital multimeter to a dedicated alternator bench tester—that give you accurate results. You’ll learn how to perform a load test, check for diode ripple, and interpret the warning signs like dimming headlights, a whining alternator bearing, or the dreaded battery warning light. We’ll also cover the safety protocols for working around high-amperage charging circuits and the common pitfalls that lead DIYers to misdiagnose a perfectly good alternator.
What sets this guide apart is the data-driven approach: we’ll provide real-world voltage readings, amperage draw tables for common vehicle classes, and honest limitations of each testing method. You won’t find vague advice here—you’ll find actionable thresholds, step-by-step procedures, and the reasoning behind each test. Whether you’re troubleshooting a parasitic drain, confirming a remanufactured alternator’s output, or just want to understand your charging system better, this guide gives you the entity-level knowledge to diagnose with confidence and avoid throwing parts at a problem that might have a simpler fix.
What Is Alternator Testing and Why It Matters

Alternator testing is the process of measuring your vehicle’s charging system output to determine whether the alternator is converting mechanical energy into electrical energy correctly. You perform these tests when you suspect the alternator is failing to keep the battery charged. The test itself is simple: you measure voltage at the battery terminals while the engine runs, then compare that reading against known-good specifications. But the diagnostic depth goes far beyond a single voltage check—it involves static testing, dynamic testing under load, ripple analysis for diode health, and verification of the entire charging circuit including belts, pulleys, wiring, and grounds.
The Alternator’s Role in Your Vehicle’s Electrical System
The alternator works in tandem with the battery and voltage regulator. The battery provides the initial cranking power and acts as a buffer, while the alternator supplies continuous current to run the ignition system, fuel pump, lights, infotainment, and all other electrical loads once the engine is running. The voltage regulator—whether internal or external—controls the alternator’s field current to maintain a stable output, typically between 13.5 and 14.8 volts depending on temperature and load. Without a properly functioning alternator, the battery will deplete within minutes of engine start, leading to a stall or complete electrical shutdown.
How Alternator Testing Differs from Battery and Starter Testing
Battery testing focuses on state of charge and capacity—measuring resting voltage, conducting a load test, and checking cold cranking amps. Starter testing evaluates the cranking circuit’s ability to draw high current and turn the engine. Alternator testing, by contrast, verifies the charging system’s ability to generate and regulate voltage and current while the engine runs. A common mistake is blaming the battery when the alternator is the culprit, or vice versa. Alternator testing specifically isolates the generation and regulation functions, which battery and starter tests cannot do.
Signs That You Need to Test Your Alternator
Common warning signs include a battery warning light on the dashboard, dimming or flickering headlights, a weak or dead battery that repeatedly needs jump-starts, electrical accessories that slow down or malfunction, a whining or grinding noise from the alternator bearing, and a burning rubber or electrical smell. If you experience any of these, testing the alternator should be your first diagnostic step before replacing any parts.
Essential Tools for Alternator Testing

Digital Multimeter (DMM)
The digital multimeter is the cornerstone of alternator testing. You’ll need a DMM capable of measuring DC voltage (at least 20V range), AC voltage (for ripple testing), and DC amperage (ideally with a clamp meter function). A quality DMM with a peak-hold or min/max function is especially useful for capturing transient voltage spikes. For most DIY testing, a basic DMM with 0.1V resolution is sufficient, but for accurate ripple measurements, you’ll want a meter with AC millivolt capability.
Load Tester or Carbon Pile Tester
A load tester applies a controlled electrical load to the charging system to verify the alternator’s output under real-world demand. Carbon pile testers are the professional standard, allowing you to draw 50-100 amps or more while monitoring voltage. For DIY use, a simple headlight load or a dedicated alternator load tester can suffice, but a carbon pile gives the most accurate results.
Clamp Meter (AC/DC)
A clamp meter measures current without disconnecting wires—essential for checking amperage output at the alternator’s B+ terminal. Look for a clamp meter that handles at least 100 amps DC and has a low-current sensitivity for parasitic draw testing. This tool is critical for verifying that the alternator is producing its rated amperage, not just voltage.
Oscilloscope (Optional but Recommended)
For advanced diode testing, an oscilloscope provides a visual representation of the alternator’s AC ripple waveform. A healthy alternator produces a smooth DC output with minimal ripple; a failing diode creates a distinctive pattern of voltage dips. While not strictly necessary for basic testing, an oscilloscope is invaluable for diagnosing intermittent diode failures that a multimeter might miss.
Battery Tester and Hydrometer
Before testing the alternator, you must verify the battery is in good condition. A weak or sulfated battery can cause misleading alternator readings. Use a conductance tester or a traditional hydrometer to check specific gravity in each cell. The battery must be at least 75% charged before alternator testing begins.
Safety Equipment
Always wear safety glasses and insulated gloves when working around the charging system. The alternator can produce over 100 amps at 14 volts—enough to cause severe burns or start a fire if a tool slips and shorts the B+ terminal to ground. Keep loose clothing, jewelry, and tools away from the serpentine belt and rotating pulleys.
Pre-Test Inspection: Battery, Belts, and Wiring

Battery Condition Check
Begin with a visual inspection of the battery. Check for corrosion on terminals, loose connections, cracked case, or bulging sides. Measure resting voltage—a fully charged battery should read 12.6 volts or higher. If the battery reads below 12.4 volts, charge it fully before proceeding. Perform a load test if you suspect the battery may be weak; a battery that fails a load test will skew all subsequent alternator readings.
Serpentine Belt and Pulley Inspection
Inspect the serpentine belt for cracks, fraying, glazing, or excessive wear. Check belt tension—a loose belt will slip and cause the alternator to underperform. Look for a worn or damaged belt tensioner and check the alternator pulley for wobble or bearing noise. A seized or loose pulley can prevent the alternator from reaching proper RPM, leading to low output.
Wiring and Ground Integrity
Examine the alternator’s B+ output wire for corrosion, fraying, or loose connections at both the alternator and the battery. Check the ground strap between the engine block and the chassis, and the negative battery cable. Poor grounds are a common cause of undercharging and can produce erratic voltage readings. Use a multimeter to measure voltage drop across connections—anything over 0.2 volts indicates excessive resistance.
Warning
Alternator Testing: The Complete DIY Guide to Diagnosing Charging System Failures
The alternator is the unsung workhorse of your vehicle’s electrical system—a belt-driven generator that converts mechanical energy from the engine into alternating current (AC), which is then rectified into direct current (DC) to recharge the battery and power every electrical component while the engine runs. Unlike the battery, which only stores energy, the alternator is the primary source of electrical power once your engine is turning. When it fails, you’re not just looking at a dead battery; you’re looking at a cascading electrical failure that can strand you anywhere, from a busy intersection to a remote trailhead. That’s why understanding alternator testing isn’t a luxury—it’s a fundamental diagnostic skill for any vehicle owner.
In this complete DIY guide, we’ll walk you through the essential attributes of alternator testing: the voltage and amperage output specs you need to verify, the critical difference between a failing alternator and a weak battery, and the specific tools—from a simple digital multimeter to a dedicated alternator bench tester—that give you accurate results. You’ll learn how to perform a load test, check for diode ripple, and interpret the warning signs like dimming headlights, a whining alternator bearing, or the dreaded battery warning light. We’ll also cover the safety protocols for working around high-amperage charging circuits and the common pitfalls that lead DIYers to misdiagnose a perfectly good alternator.
What sets this guide apart is the data-driven approach: we’ll provide real-world voltage readings, amperage draw tables for common vehicle classes, and honest limitations of each testing method. You won’t find vague advice here—you’ll find actionable thresholds, step-by-step procedures, and the reasoning behind each test. Whether you’re troubleshooting a parasitic drain, confirming a remanufactured alternator’s output, or just want to understand your charging system better, this guide gives you the entity-level knowledge to diagnose with confidence and avoid throwing parts at a problem that might have a simpler fix.
What Is Alternator Testing and Why It Matters

Alternator testing is the process of measuring your vehicle’s charging system output to determine whether the alternator is converting mechanical energy into electrical energy correctly. You perform these tests when you suspect the alternator is failing to keep the battery charged. The test itself is simple: you measure voltage at the battery terminals while the engine runs, then compare that reading against known-good specifications. But the diagnostic depth goes far beyond a single voltage check—it involves static testing, dynamic testing under load, ripple analysis for diode health, and verification of the entire charging circuit including belts, pulleys, wiring, and grounds.
The Alternator’s Role in Your Vehicle’s Electrical System
The alternator works in tandem with the battery and voltage regulator. The battery provides the initial cranking power and acts as a buffer, while the alternator supplies continuous current to run the ignition system, fuel pump, lights, infotainment, and all other electrical loads once the engine is running. The voltage regulator—whether internal or external—controls the alternator’s field current to maintain a stable output, typically between 13.5 and 14.8 volts depending on temperature and load. Without a properly functioning alternator, the battery will deplete within minutes of engine start, leading to a stall or complete electrical shutdown.
How Alternator Testing Differs from Battery and Starter Testing
Battery testing focuses on state of charge and capacity—measuring resting voltage, conducting a load test, and checking cold cranking amps. Starter testing evaluates the cranking circuit’s ability to draw high current and turn the engine. Alternator testing, by contrast, verifies the charging system’s ability to generate and regulate voltage and current while the engine runs. A common mistake is blaming the battery when the alternator is the culprit, or vice versa. Alternator testing specifically isolates the generation and regulation functions, which battery and starter tests cannot do.
Signs That You Need to Test Your Alternator
Common warning signs include a battery warning light on the dashboard, dimming or flickering headlights, a weak or dead battery that repeatedly needs jump-starts, electrical accessories that slow down or malfunction, a whining or grinding noise from the alternator bearing, and a burning rubber or electrical smell. If you experience any of these, testing the alternator should be your first diagnostic step before replacing any parts.
Essential Tools for Alternator Testing

Digital Multimeter (DMM)
The digital multimeter is the cornerstone of alternator testing. You’ll need a DMM capable of measuring DC voltage (at least 20V range), AC voltage (for ripple testing), and DC amperage (ideally with a clamp meter function). A quality DMM with a peak-hold or min/max function is especially useful for capturing transient voltage spikes. For most DIY testing, a basic DMM with 0.1V resolution is sufficient, but for accurate ripple measurements, you’ll want a meter with AC millivolt capability.
Load Tester or Carbon Pile Tester
A load tester applies a controlled electrical load to the charging system to verify the alternator’s output under real-world demand. Carbon pile testers are the professional standard, allowing you to draw 50-100 amps or more while monitoring voltage. For DIY use, a simple headlight load or a dedicated alternator load tester can suffice, but a carbon pile gives the most accurate results.
Clamp Meter (AC/DC)
A clamp meter measures current without disconnecting wires—essential for checking amperage output at the alternator’s B+ terminal. Look for a clamp meter that handles at least 100 amps DC and has a low-current sensitivity for parasitic draw testing. This tool is critical for verifying that the alternator is producing its rated amperage, not just voltage.
Oscilloscope (Optional but Recommended)
For advanced diode testing, an oscilloscope provides a visual representation of the alternator’s AC ripple waveform. A healthy alternator produces a smooth DC output with minimal ripple; a failing diode creates a distinctive pattern of voltage dips. While not strictly necessary for basic testing, an oscilloscope is invaluable for diagnosing intermittent diode failures that a multimeter might miss.
Battery Tester and Hydrometer
Before testing the alternator, you must verify the battery is in good condition. A weak or sulfated battery can cause misleading alternator readings. Use a conductance tester or a traditional hydrometer to check specific gravity in each cell. The battery must be at least 75% charged before alternator testing begins.
Safety Equipment
Always wear safety glasses and insulated gloves when working around the charging system. The alternator can produce over 100 amps at 14 volts—enough to cause severe burns or start a fire if a tool slips and shorts the B+ terminal to ground. Keep loose clothing, jewelry, and tools away from the serpentine belt and rotating pulleys.
Pre-Test Inspection: Battery, Belts, and Wiring

Battery Condition Check
Begin with a visual inspection of the battery. Check for corrosion on terminals, loose connections, cracked case, or bulging sides. Measure resting voltage—a fully charged battery should read 12.6 volts or higher. If the battery reads below 12.4 volts, charge it fully before proceeding. Perform a load test if you suspect the battery may be weak; a battery that fails a load test will skew all subsequent alternator readings.
Serpentine Belt and Pulley Inspection
Inspect the serpentine belt for cracks, fraying, glazing, or excessive wear. Check belt tension—a loose belt will slip and cause the alternator to underperform. Look for a worn or damaged belt tensioner and check the alternator pulley for wobble or bearing noise. A seized or loose pulley can prevent the alternator from reaching proper RPM, leading to low output.
Wiring and Ground Integrity
Examine the alternator’s B+ output wire for corrosion, fraying, or loose connections at both the alternator and the battery. Check the ground strap between the engine block and the chassis, and the negative battery cable. Poor grounds are a common cause of undercharging and can produce erratic voltage readings. Use a multimeter to measure voltage drop across connections—anything over 0.2 volts indicates excessive resistance.
Warning
Alternator Testing: The Complete DIY Guide to Diagnosing Charging System Failures
The alternator is the unsung workhorse of your vehicle’s electrical system—a belt-driven generator that converts mechanical energy from the engine into alternating current (AC), which is then rectified into direct current (DC) to recharge the battery and power every electrical component while the engine runs. Unlike the battery, which only stores energy, the alternator is the primary source of electrical power once your engine is turning. When it fails, you’re not just looking at a dead battery; you’re looking at a cascading electrical failure that can strand you anywhere, from a busy intersection to a remote trailhead. That’s why understanding alternator testing isn’t a luxury—it’s a fundamental diagnostic skill for any vehicle owner.
In this complete DIY guide, we’ll walk you through the essential attributes of alternator testing: the voltage and amperage output specs you need to verify, the critical difference between a failing alternator and a weak battery, and the specific tools—from a simple digital multimeter to a dedicated alternator bench tester—that give you accurate results. You’ll learn how to perform a load test, check for diode ripple, and interpret the warning signs like dimming headlights, a whining alternator bearing, or the dreaded battery warning light. We’ll also cover the safety protocols for working around high-amperage charging circuits and the common pitfalls that lead DIYers to misdiagnose a perfectly good alternator.
What sets this guide apart is the data-driven approach: we’ll provide real-world voltage readings, amperage draw tables for common vehicle classes, and honest limitations of each testing method. You won’t find vague advice here—you’ll find actionable thresholds, step-by-step procedures, and the reasoning behind each test. Whether you’re troubleshooting a parasitic drain, confirming a remanufactured alternator’s output, or just want to understand your charging system better, this guide gives you the entity-level knowledge to diagnose with confidence and avoid throwing parts at a problem that might have a simpler fix.
What Is Alternator Testing and Why It Matters

Alternator testing is the process of measuring your vehicle’s charging system output to determine whether the alternator is converting mechanical energy into electrical energy correctly. You perform these tests when you suspect the alternator is failing to keep the battery charged. The test itself is simple: you measure voltage at the battery terminals while the engine runs, then compare that reading against known-good specifications. But the diagnostic depth goes far beyond a single voltage check—it involves static testing, dynamic testing under load, ripple analysis for diode health, and verification of the entire charging circuit including belts, pulleys, wiring, and grounds.
The Alternator’s Role in Your Vehicle’s Electrical System
The alternator works in tandem with the battery and voltage regulator. The battery provides the initial cranking power and acts as a buffer, while the alternator supplies continuous current to run the ignition system, fuel pump, lights, infotainment, and all other electrical loads once the engine is running. The voltage regulator—whether internal or external—controls the alternator’s field current to maintain a stable output, typically between 13.5 and 14.8 volts depending on temperature and load. Without a properly functioning alternator, the battery will deplete within minutes of engine start, leading to a stall or complete electrical shutdown.
How Alternator Testing Differs from Battery and Starter Testing
Battery testing focuses on state of charge and capacity—measuring resting voltage, conducting a load test, and checking cold cranking amps. Starter testing evaluates the cranking circuit’s ability to draw high current and turn the engine. Alternator testing, by contrast, verifies the charging system’s ability to generate and regulate voltage and current while the engine runs. A common mistake is blaming the battery when the alternator is the culprit, or vice versa. Alternator testing specifically isolates the generation and regulation functions, which battery and starter tests cannot do.
Signs That You Need to Test Your Alternator
Common warning signs include a battery warning light on the dashboard, dimming or flickering headlights, a weak or dead battery that repeatedly needs jump-starts, electrical accessories that slow down or malfunction, a whining or grinding noise from the alternator bearing, and a burning rubber or electrical smell. If you experience any of these, testing the alternator should be your first diagnostic step before replacing any parts.
Essential Tools for Alternator Testing

Digital Multimeter (DMM)
The digital multimeter is the cornerstone of alternator testing. You’ll need a DMM capable of measuring DC voltage (at least 20V range), AC voltage (for ripple testing), and DC amperage (ideally with a clamp meter function). A quality DMM with a peak-hold or min/max function is especially useful for capturing transient voltage spikes. For most DIY testing, a basic DMM with 0.1V resolution is sufficient, but for accurate ripple measurements, you’ll want a meter with AC millivolt capability.
Load Tester or Carbon Pile Tester
A load tester applies a controlled electrical load to the charging system to verify the alternator’s output under real-world demand. Carbon pile testers are the professional standard, allowing you to draw 50-100 amps or more while monitoring voltage. For DIY use, a simple headlight load or a dedicated alternator load tester can suffice, but a carbon pile gives the most accurate results.
Clamp Meter (AC/DC)
A clamp meter measures current without disconnecting wires—essential for checking amperage output at the alternator’s B+ terminal. Look for a clamp meter that handles at least 100 amps DC and has a low-current sensitivity for parasitic draw testing. This tool is critical for verifying that the alternator is producing its rated amperage, not just voltage.
Oscilloscope (Optional but Recommended)
For advanced diode testing, an oscilloscope provides a visual representation of the alternator’s AC ripple waveform. A healthy alternator produces a smooth DC output with minimal ripple; a failing diode creates a distinctive pattern of voltage dips. While not strictly necessary for basic testing, an oscilloscope is invaluable for diagnosing intermittent diode failures that a multimeter might miss.
Battery Tester and Hydrometer
Before testing the alternator, you must verify the battery is in good condition. A weak or sulfated battery can cause misleading alternator readings. Use a conductance tester or a traditional hydrometer to check specific gravity in each cell. The battery must be at least 75% charged before alternator testing begins.
Safety Equipment
Always wear safety glasses and insulated gloves when working around the charging system. The alternator can produce over 100 amps at 14 volts—enough to cause severe burns or start a fire if a tool slips and shorts the B+ terminal to ground. Keep loose clothing, jewelry, and tools away from the serpentine belt and rotating pulleys.
Pre-Test Inspection: Battery, Belts, and Wiring

Battery Condition Check
Begin with a visual inspection of the battery. Check for corrosion on terminals, loose connections, cracked case, or bulging sides. Measure resting voltage—a fully charged battery should read 12.6 volts or higher. If the battery reads below 12.4 volts, charge it fully before proceeding. Perform a load test if you suspect the battery may be weak; a battery that fails a load test will skew all subsequent alternator readings.
Serpentine Belt and Pulley Inspection
Inspect the serpentine belt for cracks, fraying, glazing, or excessive wear. Check belt tension—a loose belt will slip and cause the alternator to underperform. Look for a worn or damaged belt tensioner and check the alternator pulley for wobble or bearing noise. A seized or loose pulley can prevent the alternator from reaching proper RPM, leading to low output.
Wiring and Ground Integrity
Examine the alternator’s B+ output wire for corrosion, fraying, or loose connections at both the alternator and the battery. Check the ground strap between the engine block and the chassis, and the negative battery cable. Poor grounds are a common cause of undercharging and can produce erratic voltage readings. Use a multimeter to measure voltage drop across connections—anything over 0.2 volts indicates excessive resistance.
Warning
The alternator is the unsung workhorse of your vehicle’s electrical system—a belt-driven generator that converts mechanical energy from the engine into alternating current (AC), which is then rectified into direct current (DC) to recharge the battery and power every electrical component while the engine runs. Unlike the battery, which only stores energy, the alternator is the primary source of electrical power once your engine is turning. When it fails, you’re not just looking at a dead battery; you’re looking at a cascading electrical failure that can strand you anywhere, from a busy intersection to a remote trailhead. That’s why understanding alternator testing isn’t a luxury—it’s a fundamental diagnostic skill for any vehicle owner.
In this complete DIY guide, we’ll walk you through the essential attributes of alternator testing: the voltage and amperage output specs you need to verify, the critical difference between a failing alternator and a weak battery, and the specific tools—from a simple digital multimeter to a dedicated alternator bench tester—that give you accurate results. You’ll learn how to perform a load test, check for diode ripple, and interpret the warning signs like dimming headlights, a whining alternator bearing, or the dreaded battery warning light. We’ll also cover the safety protocols for working around high-amperage charging circuits and the common pitfalls that lead DIYers to misdiagnose a perfectly good alternator.
What sets this guide apart is the data-driven approach: we’ll provide real-world voltage readings, amperage draw tables for common vehicle classes, and honest limitations of each testing method. You won’t find vague advice here—you’ll find actionable thresholds, step-by-step procedures, and the reasoning behind each test. Whether you’re troubleshooting a parasitic drain, confirming a remanufactured alternator’s output, or just want to understand your charging system better, this guide gives you the entity-level knowledge to diagnose with confidence and avoid throwing parts at a problem that might have a simpler fix.
What Is Alternator Testing and Why It Matters

Alternator testing is the process of measuring your vehicle’s charging system output to determine whether the alternator is converting mechanical energy into electrical energy correctly. You perform these tests when you suspect the alternator is failing to keep the battery charged. The test itself is simple: you measure voltage at the battery terminals while the engine runs, then compare that reading against known-good specifications. But the diagnostic depth goes far beyond a single voltage check—it involves static testing, dynamic testing under load, ripple analysis for diode health, and verification of the entire charging circuit including belts, pulleys, wiring, and grounds.
The Alternator’s Role in Your Vehicle’s Electrical System
The alternator works in tandem with the battery and voltage regulator. The battery provides the initial cranking power and acts as a buffer, while the alternator supplies continuous current to run the ignition system, fuel pump, lights, infotainment, and all other electrical loads once the engine is running. The voltage regulator—whether internal or external—controls the alternator’s field current to maintain a stable output, typically between 13.5 and 14.8 volts depending on temperature and load. Without a properly functioning alternator, the battery will deplete within minutes of engine start, leading to a stall or complete electrical shutdown.
How Alternator Testing Differs from Battery and Starter Testing
Battery testing focuses on state of charge and capacity—measuring resting voltage, conducting a load test, and checking cold cranking amps. Starter testing evaluates the cranking circuit’s ability to draw high current and turn the engine. Alternator testing, by contrast, verifies the charging system’s ability to generate and regulate voltage and current while the engine runs. A common mistake is blaming the battery when the alternator is the culprit, or vice versa. Alternator testing specifically isolates the generation and regulation functions, which battery and starter tests cannot do.
Signs That You Need to Test Your Alternator
Common warning signs include a battery warning light on the dashboard, dimming or flickering headlights, a weak or dead battery that repeatedly needs jump-starts, electrical accessories that slow down or malfunction, a whining or grinding noise from the alternator bearing, and a burning rubber or electrical smell. If you experience any of these, testing the alternator should be your first diagnostic step before replacing any parts.
Essential Tools for Alternator Testing

Digital Multimeter (DMM)
The digital multimeter is the cornerstone of alternator testing. You’ll need a DMM capable of measuring DC voltage (at least 20V range), AC voltage (for ripple testing), and DC amperage (ideally with a clamp meter function). A quality DMM with a peak-hold or min/max function is especially useful for capturing transient voltage spikes. For most DIY testing, a basic DMM with 0.1V resolution is sufficient, but for accurate ripple measurements, you’ll want a meter with AC millivolt capability.
Load Tester or Carbon Pile Tester
A load tester applies a controlled electrical load to the charging system to verify the alternator’s output under real-world demand. Carbon pile testers are the professional standard, allowing you to draw 50-100 amps or more while monitoring voltage. For DIY use, a simple headlight load or a dedicated alternator load tester can suffice, but a carbon pile gives the most accurate results.
Clamp Meter (AC/DC)
A clamp meter measures current without disconnecting wires—essential for checking amperage output at the alternator’s B+ terminal. Look for a clamp meter that handles at least 100 amps DC and has a low-current sensitivity for parasitic draw testing. This tool is critical for verifying that the alternator is producing its rated amperage, not just voltage.
Oscilloscope (Optional but Recommended)
For advanced diode testing, an oscilloscope provides a visual representation of the alternator’s AC ripple waveform. A healthy alternator produces a smooth DC output with minimal ripple; a failing diode creates a distinctive pattern of voltage dips. While not strictly necessary for basic testing, an oscilloscope is invaluable for diagnosing intermittent diode failures that a multimeter might miss.
Battery Tester and Hydrometer
Before testing the alternator, you must verify the battery is in good condition. A weak or sulfated battery can cause misleading alternator readings. Use a conductance tester or a traditional hydrometer to check specific gravity in each cell. The battery must be at least 75% charged before alternator testing begins.
Safety Equipment
Always wear safety glasses and insulated gloves when working around the charging system. The alternator can produce over 100 amps at 14 volts—enough to cause severe burns or start a fire if a tool slips and shorts the B+ terminal to ground. Keep loose clothing, jewelry, and tools away from the serpentine belt and rotating pulleys.
Pre-Test Inspection: Battery, Belts, and Wiring

Battery Condition Check
Begin with a visual inspection of the battery. Check for corrosion on terminals, loose connections, cracked case, or bulging sides. Measure resting voltage—a fully charged battery should read 12.6 volts or higher. If the battery reads below 12.4 volts, charge it fully before proceeding. Perform a load test if you suspect the battery may be weak; a battery that fails a load test will skew all subsequent alternator readings.
Serpentine Belt and Pulley Inspection
Inspect the serpentine belt for cracks, fraying, glazing, or excessive wear. Check belt tension—a loose belt will slip and cause the alternator to underperform. Look for a worn or damaged belt tensioner and check the alternator pulley for wobble or bearing noise. A seized or loose pulley can prevent the alternator from reaching proper RPM, leading to low output.
Wiring and Ground Integrity
Examine the alternator’s B+ output wire for corrosion, fraying, or loose connections at both the alternator and the battery. Check the ground strap between the engine block and the chassis, and the negative battery cable. Poor grounds are a common cause of undercharging and can produce erratic voltage readings. Use a multimeter to measure voltage drop across connections—anything over 0.2 volts indicates excessive resistance.
Warning
Alternator Testing: The Complete DIY Guide to Diagnosing Charging System Failures
The alternator is the unsung workhorse of your vehicle’s electrical system—a belt-driven generator that converts mechanical energy from the engine into alternating current (AC), which is then rectified into direct current (DC) to recharge the battery and power every electrical component while the engine runs. Unlike the battery, which only stores energy, the alternator is the primary source of electrical power once your engine is turning. When it fails, you’re not just looking at a dead battery; you’re looking at a cascading electrical failure that can strand you anywhere, from a busy intersection to a remote trailhead. That’s why understanding alternator testing isn’t a luxury—it’s a fundamental diagnostic skill for any vehicle owner.
In this complete DIY guide, we’ll walk you through the essential attributes of alternator testing: the voltage and amperage output specs you need to verify, the critical difference between a failing alternator and a weak battery, and the specific tools—from a simple digital multimeter to a dedicated alternator bench tester—that give you accurate results. You’ll learn how to perform a load test, check for diode ripple, and interpret the warning signs like dimming headlights, a whining alternator bearing, or the dreaded battery warning light. We’ll also cover the safety protocols for working around high-amperage charging circuits and the common pitfalls that lead DIYers to misdiagnose a perfectly good alternator.
What sets this guide apart is the data-driven approach: we’ll provide real-world voltage readings, amperage draw tables for common vehicle classes, and honest limitations of each testing method. You won’t find vague advice here—you’ll find actionable thresholds, step-by-step procedures, and the reasoning behind each test. Whether you’re troubleshooting a parasitic drain, confirming a remanufactured alternator’s output, or just want to understand your charging system better, this guide gives you the entity-level knowledge to diagnose with confidence and avoid throwing parts at a problem that might have a simpler fix.
What Is Alternator Testing and Why It Matters

Alternator testing is the process of measuring your vehicle’s charging system output to determine whether the alternator is converting mechanical energy into electrical energy correctly. You perform these tests when you suspect the alternator is failing to keep the battery charged. The test itself is simple: you measure voltage at the battery terminals while the engine runs, then compare that reading against known-good specifications. But the diagnostic depth goes far beyond a single voltage check—it involves static testing, dynamic testing under load, ripple analysis for diode health, and verification of the entire charging circuit including belts, pulleys, wiring, and grounds.
The Alternator’s Role in Your Vehicle’s Electrical System
The alternator works in tandem with the battery and voltage regulator. The battery provides the initial cranking power and acts as a buffer, while the alternator supplies continuous current to run the ignition system, fuel pump, lights, infotainment, and all other electrical loads once the engine is running. The voltage regulator—whether internal or external—controls the alternator’s field current to maintain a stable output, typically between 13.5 and 14.8 volts depending on temperature and load. Without a properly functioning alternator, the battery will deplete within minutes of engine start, leading to a stall or complete electrical shutdown.
How Alternator Testing Differs from Battery and Starter Testing
Battery testing focuses on state of charge and capacity—measuring resting voltage, conducting a load test, and checking cold cranking amps. Starter testing evaluates the cranking circuit’s ability to draw high current and turn the engine. Alternator testing, by contrast, verifies the charging system’s ability to generate and regulate voltage and current while the engine runs. A common mistake is blaming the battery when the alternator is the culprit, or vice versa. Alternator testing specifically isolates the generation and regulation functions, which battery and starter tests cannot do.
Signs That You Need to Test Your Alternator
Common warning signs include a battery warning light on the dashboard, dimming or flickering headlights, a weak or dead battery that repeatedly needs jump-starts, electrical accessories that slow down or malfunction, a whining or grinding noise from the alternator bearing, and a burning rubber or electrical smell. If you experience any of these, testing the alternator should be your first diagnostic step before replacing any parts.
Essential Tools for Alternator Testing

Digital Multimeter (DMM)
The digital multimeter is the cornerstone of alternator testing. You’ll need a DMM capable of measuring DC voltage (at least 20V range), AC voltage (for ripple testing), and DC amperage (ideally with a clamp meter function). A quality DMM with a peak-hold or min/max function is especially useful for capturing transient voltage spikes. For most DIY testing, a basic DMM with 0.1V resolution is sufficient, but for accurate ripple measurements, you’ll want a meter with AC millivolt capability.
Load Tester or Carbon Pile Tester
A load tester applies a controlled electrical load to the charging system to verify the alternator’s output under real-world demand. Carbon pile testers are the professional standard, allowing you to draw 50-100 amps or more while monitoring voltage. For DIY use, a simple headlight load or a dedicated alternator load tester can suffice, but a carbon pile gives the most accurate results.
Clamp Meter (AC/DC)
A clamp meter measures current without disconnecting wires—essential for checking amperage output at the alternator’s B+ terminal. Look for a clamp meter that handles at least 100 amps DC and has a low-current sensitivity for parasitic draw testing. This tool is critical for verifying that the alternator is producing its rated amperage, not just voltage.
Oscilloscope (Optional but Recommended)
For advanced diode testing, an oscilloscope provides a visual representation of the alternator’s AC ripple waveform. A healthy alternator produces a smooth DC output with minimal ripple; a failing diode creates a distinctive pattern of voltage dips. While not strictly necessary for basic testing, an oscilloscope is invaluable for diagnosing intermittent diode failures that a multimeter might miss.
Battery Tester and Hydrometer
Before testing the alternator, you must verify the battery is in good condition. A weak or sulfated battery can cause misleading alternator readings. Use a conductance tester or a traditional hydrometer to check specific gravity in each cell. The battery must be at least 75% charged before alternator testing begins.
Safety Equipment
Always wear safety glasses and insulated gloves when working around the charging system. The alternator can produce over 100 amps at 14 volts—enough to cause severe burns or start a fire if a tool slips and shorts the B+ terminal to ground. Keep loose clothing, jewelry, and tools away from the serpentine belt and rotating pulleys.
Pre-Test Inspection: Battery, Belts, and Wiring

Battery Condition Check
Begin with a visual inspection of the battery. Check for corrosion on terminals, loose connections, cracked case, or bulging sides. Measure resting voltage—a fully charged battery should read 12.6 volts or higher. If the battery reads below 12.4 volts, charge it fully before proceeding. Perform a load test if you suspect the battery may be weak; a battery that fails a load test will skew all subsequent alternator readings.
Serpentine Belt and Pulley Inspection
Inspect the serpentine belt for cracks, fraying, glazing, or excessive wear. Check belt tension—a loose belt will slip and cause the alternator to underperform. Look for a worn or damaged belt tensioner and check the alternator pulley for wobble or bearing noise. A seized or loose pulley can prevent the alternator from reaching proper RPM, leading to low output.
Wiring and Ground Integrity
Examine the alternator’s B+ output wire for corrosion, fraying, or loose connections at both the alternator and the battery. Check the ground strap between the engine block and the chassis, and the negative battery cable. Poor grounds are a common cause of undercharging and can produce erratic voltage readings. Use a multimeter to measure voltage drop across connections—anything over 0.2 volts indicates excessive resistance.
Warning
Alternator Testing: The Complete DIY Guide to Diagnosing Charging System Failures
The alternator is the unsung workhorse of your vehicle’s electrical system—a belt-driven generator that converts mechanical energy from the engine into alternating current (AC), which is then rectified into direct current (DC) to recharge the battery and power every electrical component while the engine runs. Unlike the battery, which only stores energy, the alternator is the primary source of electrical power once your engine is turning. When it fails, you’re not just looking at a dead battery; you’re looking at a cascading electrical failure that can strand you anywhere, from a busy intersection to a remote trailhead. That’s why understanding alternator testing isn’t a luxury—it’s a fundamental diagnostic skill for any vehicle owner.
In this complete DIY guide, we’ll walk you through the essential attributes of alternator testing: the voltage and amperage output specs you need to verify, the critical difference between a failing alternator and a weak battery, and the specific tools—from a simple digital multimeter to a dedicated alternator bench tester—that give you accurate results. You’ll learn how to perform a load test, check for diode ripple, and interpret the warning signs like dimming headlights, a whining alternator bearing, or the dreaded battery warning light. We’ll also cover the safety protocols for working around high-amperage charging circuits and the common pitfalls that lead DIYers to misdiagnose a perfectly good alternator.
What sets this guide apart is the data-driven approach: we’ll provide real-world voltage readings, amperage draw tables for common vehicle classes, and honest limitations of each testing method. You won’t find vague advice here—you’ll find actionable thresholds, step-by-step procedures, and the reasoning behind each test. Whether you’re troubleshooting a parasitic drain, confirming a remanufactured alternator’s output, or just want to understand your charging system better, this guide gives you the entity-level knowledge to diagnose with confidence and avoid throwing parts at a problem that might have a simpler fix.
What Is Alternator Testing and Why It Matters

Alternator testing is the process of measuring your vehicle’s charging system output to determine whether the alternator is converting mechanical energy into electrical energy correctly. You perform these tests when you suspect the alternator is failing to keep the battery charged. The test itself is simple: you measure voltage at the battery terminals while the engine runs, then compare that reading against known-good specifications. But the diagnostic depth goes far beyond a single voltage check—it involves static testing, dynamic testing under load, ripple analysis for diode health, and verification of the entire charging circuit including belts, pulleys, wiring, and grounds.
The Alternator’s Role in Your Vehicle’s Electrical System
The alternator works in tandem with the battery and voltage regulator. The battery provides the initial cranking power and acts as a buffer, while the alternator supplies continuous current to run the ignition system, fuel pump, lights, infotainment, and all other electrical loads once the engine is running. The voltage regulator—whether internal or external—controls the alternator’s field current to maintain a stable output, typically between 13.5 and 14.8 volts depending on temperature and load. Without a properly functioning alternator, the battery will deplete within minutes of engine start, leading to a stall or complete electrical shutdown.
How Alternator Testing Differs from Battery and Starter Testing
Battery testing focuses on state of charge and capacity—measuring resting voltage, conducting a load test, and checking cold cranking amps. Starter testing evaluates the cranking circuit’s ability to draw high current and turn the engine. Alternator testing, by contrast, verifies the charging system’s ability to generate and regulate voltage and current while the engine runs. A common mistake is blaming the battery when the alternator is the culprit, or vice versa. Alternator testing specifically isolates the generation and regulation functions, which battery and starter tests cannot do.
Signs That You Need to Test Your Alternator
Common warning signs include a battery warning light on the dashboard, dimming or flickering headlights, a weak or dead battery that repeatedly needs jump-starts, electrical accessories that slow down or malfunction, a whining or grinding noise from the alternator bearing, and a burning rubber or electrical smell. If you experience any of these, testing the alternator should be your first diagnostic step before replacing any parts.
Essential Tools for Alternator Testing

Digital Multimeter (DMM)
The digital multimeter is the cornerstone of alternator testing. You’ll need a DMM capable of measuring DC voltage (at least 20V range), AC voltage (for ripple testing), and DC amperage (ideally with a clamp meter function). A quality DMM with a peak-hold or min/max function is especially useful for capturing transient voltage spikes. For most DIY testing, a basic DMM with 0.1V resolution is sufficient, but for accurate ripple measurements, you’ll want a meter with AC millivolt capability.
Load Tester or Carbon Pile Tester
A load tester applies a controlled electrical load to the charging system to verify the alternator’s output under real-world demand. Carbon pile testers are the professional standard, allowing you to draw 50-100 amps or more while monitoring voltage. For DIY use, a simple headlight load or a dedicated alternator load tester can suffice, but a carbon pile gives the most accurate results.
Clamp Meter (AC/DC)
A clamp meter measures current without disconnecting wires—essential for checking amperage output at the alternator’s B+ terminal. Look for a clamp meter that handles at least 100 amps DC and has a low-current sensitivity for parasitic draw testing. This tool is critical for verifying that the alternator is producing its rated amperage, not just voltage.
Oscilloscope (Optional but Recommended)
For advanced diode testing, an oscilloscope provides a visual representation of the alternator’s AC ripple waveform. A healthy alternator produces a smooth DC output with minimal ripple; a failing diode creates a distinctive pattern of voltage dips. While not strictly necessary for basic testing, an oscilloscope is invaluable for diagnosing intermittent diode failures that a multimeter might miss.
Battery Tester and Hydrometer
Before testing the alternator, you must verify the battery is in good condition. A weak or sulfated battery can cause misleading alternator readings. Use a conductance tester or a traditional hydrometer to check specific gravity in each cell. The battery must be at least 75% charged before alternator testing begins.
Safety Equipment
Always wear safety glasses and insulated gloves when working around the charging system. The alternator can produce over 100 amps at 14 volts—enough to cause severe burns or start a fire if a tool slips and shorts the B+ terminal to ground. Keep loose clothing, jewelry, and tools away from the serpentine belt and rotating pulleys.
Pre-Test Inspection: Battery, Belts, and Wiring

Battery Condition Check
Begin with a visual inspection of the battery. Check for corrosion on terminals, loose connections, cracked case, or bulging sides. Measure resting voltage—a fully charged battery should read 12.6 volts or higher. If the battery reads below 12.4 volts, charge it fully before proceeding. Perform a load test if you suspect the battery may be weak; a battery that fails a load test will skew all subsequent alternator readings.
Serpentine Belt and Pulley Inspection
Inspect the serpentine belt for cracks, fraying, glazing, or excessive wear. Check belt tension—a loose belt will slip and cause the alternator to underperform. Look for a worn or damaged belt tensioner and check the alternator pulley for wobble or bearing noise. A seized or loose pulley can prevent the alternator from reaching proper RPM, leading to low output.
Wiring and Ground Integrity
Examine the alternator’s B+ output wire for corrosion, fraying, or loose connections at both the alternator and the battery. Check the ground strap between the engine block and the chassis, and the negative battery cable. Poor grounds are a common cause of undercharging and can produce erratic voltage readings. Use a multimeter to measure voltage drop across connections—anything over 0.2 volts indicates excessive resistance.
Warning
Alternator Testing: The Complete DIY Guide to Diagnosing Charging System Failures
The alternator is the unsung workhorse of your vehicle’s electrical system—a belt-driven generator that converts mechanical energy from the engine into alternating current (AC), which is then rectified into direct current (DC) to recharge the battery and power every electrical component while the engine runs. Unlike the battery, which only stores energy, the alternator is the primary source of electrical power once your engine is turning. When it fails, you’re not just looking at a dead battery; you’re looking at a cascading electrical failure that can strand you anywhere, from a busy intersection to a remote trailhead. That’s why understanding alternator testing isn’t a luxury—it’s a fundamental diagnostic skill for any vehicle owner.
In this complete DIY guide, we’ll walk you through the essential attributes of alternator testing: the voltage and amperage output specs you need to verify, the critical difference between a failing alternator and a weak battery, and the specific tools—from a simple digital multimeter to a dedicated alternator bench tester—that give you accurate results. You’ll learn how to perform a load test, check for diode ripple, and interpret the warning signs like dimming headlights, a whining alternator bearing, or the dreaded battery warning light. We’ll also cover the safety protocols for working around high-amperage charging circuits and the common pitfalls that lead DIYers to misdiagnose a perfectly good alternator.
What sets this guide apart is the data-driven approach: we’ll provide real-world voltage readings, amperage draw tables for common vehicle classes, and honest limitations of each testing method. You won’t find vague advice here—you’ll find actionable thresholds, step-by-step procedures, and the reasoning behind each test. Whether you’re troubleshooting a parasitic drain, confirming a remanufactured alternator’s output, or just want to understand your charging system better, this guide gives you the entity-level knowledge to diagnose with confidence and avoid throwing parts at a problem that might have a simpler fix.
What Is Alternator Testing and Why It Matters

Alternator testing is the process of measuring your vehicle’s charging system output to determine whether the alternator is converting mechanical energy into electrical energy correctly. You perform these tests when you suspect the alternator is failing to keep the battery charged. The test itself is simple: you measure voltage at the battery terminals while the engine runs, then compare that reading against known-good specifications. But the diagnostic depth goes far beyond a single voltage check—it involves static testing, dynamic testing under load, ripple analysis for diode health, and verification of the entire charging circuit including belts, pulleys, wiring, and grounds.
The Alternator’s Role in Your Vehicle’s Electrical System
The alternator works in tandem with the battery and voltage regulator. The battery provides the initial cranking power and acts as a buffer, while the alternator supplies continuous current to run the ignition system, fuel pump, lights, infotainment, and all other electrical loads once the engine is running. The voltage regulator—whether internal or external—controls the alternator’s field current to maintain a stable output, typically between 13.5 and 14.8 volts depending on temperature and load. Without a properly functioning alternator, the battery will deplete within minutes of engine start, leading to a stall or complete electrical shutdown.
How Alternator Testing Differs from Battery and Starter Testing
Battery testing focuses on state of charge and capacity—measuring resting voltage, conducting a load test, and checking cold cranking amps. Starter testing evaluates the cranking circuit’s ability to draw high current and turn the engine. Alternator testing, by contrast, verifies the charging system’s ability to generate and regulate voltage and current while the engine runs. A common mistake is blaming the battery when the alternator is the culprit, or vice versa. Alternator testing specifically isolates the generation and regulation functions, which battery and starter tests cannot do.
Signs That You Need to Test Your Alternator
Common warning signs include a battery warning light on the dashboard, dimming or flickering headlights, a weak or dead battery that repeatedly needs jump-starts, electrical accessories that slow down or malfunction, a whining or grinding noise from the alternator bearing, and a burning rubber or electrical smell. If you experience any of these, testing the alternator should be your first diagnostic step before replacing any parts.
Essential Tools for Alternator Testing

Digital Multimeter (DMM)
The digital multimeter is the cornerstone of alternator testing. You’ll need a DMM capable of measuring DC voltage (at least 20V range), AC voltage (for ripple testing), and DC amperage (ideally with a clamp meter function). A quality DMM with a peak-hold or min/max function is especially useful for capturing transient voltage spikes. For most DIY testing, a basic DMM with 0.1V resolution is sufficient, but for accurate ripple measurements, you’ll want a meter with AC millivolt capability.
Load Tester or Carbon Pile Tester
A load tester applies a controlled electrical load to the charging system to verify the alternator’s output under real-world demand. Carbon pile testers are the professional standard, allowing you to draw 50-100 amps or more while monitoring voltage. For DIY use, a simple headlight load or a dedicated alternator load tester can suffice, but a carbon pile gives the most accurate results.
Clamp Meter (AC/DC)
A clamp meter measures current without disconnecting wires—essential for checking amperage output at the alternator’s B+ terminal. Look for a clamp meter that handles at least 100 amps DC and has a low-current sensitivity for parasitic draw testing. This tool is critical for verifying that the alternator is producing its rated amperage, not just voltage.
Oscilloscope (Optional but Recommended)
For advanced diode testing, an oscilloscope provides a visual representation of the alternator’s AC ripple waveform. A healthy alternator produces a smooth DC output with minimal ripple; a failing diode creates a distinctive pattern of voltage dips. While not strictly necessary for basic testing, an oscilloscope is invaluable for diagnosing intermittent diode failures that a multimeter might miss.
Battery Tester and Hydrometer
Before testing the alternator, you must verify the battery is in good condition. A weak or sulfated battery can cause misleading alternator readings. Use a conductance tester or a traditional hydrometer to check specific gravity in each cell. The battery must be at least 75% charged before alternator testing begins.
Safety Equipment
Always wear safety glasses and insulated gloves when working around the charging system. The alternator can produce over 100 amps at 14 volts—enough to cause severe burns or start a fire if a tool slips and shorts the B+ terminal to ground. Keep loose clothing, jewelry, and tools away from the serpentine belt and rotating pulleys.
Pre-Test Inspection: Battery, Belts, and Wiring

Battery Condition Check
Begin with a visual inspection of the battery. Check for corrosion on terminals, loose connections, cracked case, or bulging sides. Measure resting voltage—a fully charged battery should read 12.6 volts or higher. If the battery reads below 12.4 volts, charge it fully before proceeding. Perform a load test if you suspect the battery may be weak; a battery that fails a load test will skew all subsequent alternator readings.
Serpentine Belt and Pulley Inspection
Inspect the serpentine belt for cracks, fraying, glazing, or excessive wear. Check belt tension—a loose belt will slip and cause the alternator to underperform. Look for a worn or damaged belt tensioner and check the alternator pulley for wobble or bearing noise. A seized or loose pulley can prevent the alternator from reaching proper RPM, leading to low output.
Wiring and Ground Integrity
Examine the alternator’s B+ output wire for corrosion, fraying, or loose connections at both the alternator and the battery. Check the ground strap between the engine block and the chassis, and the negative battery cable. Poor grounds are a common cause of undercharging and can produce erratic voltage readings. Use a multimeter to measure voltage drop across connections—anything over 0.2 volts indicates excessive resistance.
Warning
The alternator is the unsung workhorse of your vehicle’s electrical system—a belt-driven generator that converts mechanical energy from the engine into alternating current (AC), which is then rectified into direct current (DC) to recharge the battery and power every electrical component while the engine runs. Unlike the battery, which only stores energy, the alternator is the primary source of electrical power once your engine is turning. When it fails, you’re not just looking at a dead battery; you’re looking at a cascading electrical failure that can strand you anywhere, from a busy intersection to a remote trailhead. That’s why understanding alternator testing isn’t a luxury—it’s a fundamental diagnostic skill for any vehicle owner.
In this complete DIY guide, we’ll walk you through the essential attributes of alternator testing: the voltage and amperage output specs you need to verify, the critical difference between a failing alternator and a weak battery, and the specific tools—from a simple digital multimeter to a dedicated alternator bench tester—that give you accurate results. You’ll learn how to perform a load test, check for diode ripple, and interpret the warning signs like dimming headlights, a whining alternator bearing, or the dreaded battery warning light. We’ll also cover the safety protocols for working around high-amperage charging circuits and the common pitfalls that lead DIYers to misdiagnose a perfectly good alternator.
What sets this guide apart is the data-driven approach: we’ll provide real-world voltage readings, amperage draw tables for common vehicle classes, and honest limitations of each testing method. You won’t find vague advice here—you’ll find actionable thresholds, step-by-step procedures, and the reasoning behind each test. Whether you’re troubleshooting a parasitic drain, confirming a remanufactured alternator’s output, or just want to understand your charging system better, this guide gives you the entity-level knowledge to diagnose with confidence and avoid throwing parts at a problem that might have a simpler fix.
What Is Alternator Testing and Why It Matters

Alternator testing is the process of measuring your vehicle’s charging system output to determine whether the alternator is converting mechanical energy into electrical energy correctly. You perform these tests when you suspect the alternator is failing to keep the battery charged. The test itself is simple: you measure voltage at the battery terminals while the engine runs, then compare that reading against known-good specifications. But the diagnostic depth goes far beyond a single voltage check—it involves static testing, dynamic testing under load, ripple analysis for diode health, and verification of the entire charging circuit including belts, pulleys, wiring, and grounds.
The Alternator’s Role in Your Vehicle’s Electrical System
The alternator works in tandem with the battery and voltage regulator. The battery provides the initial cranking power and acts as a buffer, while the alternator supplies continuous current to run the ignition system, fuel pump, lights, infotainment, and all other electrical loads once the engine is running. The voltage regulator—whether internal or external—controls the alternator’s field current to maintain a stable output, typically between 13.5 and 14.8 volts depending on temperature and load. Without a properly functioning alternator, the battery will deplete within minutes of engine start, leading to a stall or complete electrical shutdown.
How Alternator Testing Differs from Battery and Starter Testing
Battery testing focuses on state of charge and capacity—measuring resting voltage, conducting a load test, and checking cold cranking amps. Starter testing evaluates the cranking circuit’s ability to draw high current and turn the engine. Alternator testing, by contrast, verifies the charging system’s ability to generate and regulate voltage and current while the engine runs. A common mistake is blaming the battery when the alternator is the culprit, or vice versa. Alternator testing specifically isolates the generation and regulation functions, which battery and starter tests cannot do.
Signs That You Need to Test Your Alternator
Common warning signs include a battery warning light on the dashboard, dimming or flickering headlights, a weak or dead battery that repeatedly needs jump-starts, electrical accessories that slow down or malfunction, a whining or grinding noise from the alternator bearing, and a burning rubber or electrical smell. If you experience any of these, testing the alternator should be your first diagnostic step before replacing any parts.
Essential Tools for Alternator Testing

Digital Multimeter (DMM)
The digital multimeter is the cornerstone of alternator testing. You’ll need a DMM capable of measuring DC voltage (at least 20V range), AC voltage (for ripple testing), and DC amperage (ideally with a clamp meter function). A quality DMM with a peak-hold or min/max function is especially useful for capturing transient voltage spikes. For most DIY testing, a basic DMM with 0.1V resolution is sufficient, but for accurate ripple measurements, you’ll want a meter with AC millivolt capability.
Load Tester or Carbon Pile Tester
A load tester applies a controlled electrical load to the charging system to verify the alternator’s output under real-world demand. Carbon pile testers are the professional standard, allowing you to draw 50-100 amps or more while monitoring voltage. For DIY use, a simple headlight load or a dedicated alternator load tester can suffice, but a carbon pile gives the most accurate results.
Clamp Meter (AC/DC)
A clamp meter measures current without disconnecting wires—essential for checking amperage output at the alternator’s B+ terminal. Look for a clamp meter that handles at least 100 amps DC and has a low-current sensitivity for parasitic draw testing. This tool is critical for verifying that the alternator is producing its rated amperage, not just voltage.
Oscilloscope (Optional but Recommended)
For advanced diode testing, an oscilloscope provides a visual representation of the alternator’s AC ripple waveform. A healthy alternator produces a smooth DC output with minimal ripple; a failing diode creates a distinctive pattern of voltage dips. While not strictly necessary for basic testing, an oscilloscope is invaluable for diagnosing intermittent diode failures that a multimeter might miss.
Battery Tester and Hydrometer
Before testing the alternator, you must verify the battery is in good condition. A weak or sulfated battery can cause misleading alternator readings. Use a conductance tester or a traditional hydrometer to check specific gravity in each cell. The battery must be at least 75% charged before alternator testing begins.
Safety Equipment
Always wear safety glasses and insulated gloves when working around the charging system. The alternator can produce over 100 amps at 14 volts—enough to cause severe burns or start a fire if a tool slips and shorts the B+ terminal to ground. Keep loose clothing, jewelry, and tools away from the serpentine belt and rotating pulleys.
Pre-Test Inspection: Battery, Belts, and Wiring

Battery Condition Check
Begin with a visual inspection of the battery. Check for corrosion on terminals, loose connections, cracked case, or bulging sides. Measure resting voltage—a fully charged battery should read 12.6 volts or higher. If the battery reads below 12.4 volts, charge it fully before proceeding. Perform a load test if you suspect the battery may be weak; a battery that fails a load test will skew all subsequent alternator readings.
Serpentine Belt and Pulley Inspection
Inspect the serpentine belt for cracks, fraying, glazing, or excessive wear. Check belt tension—a loose belt will slip and cause the alternator to underperform. Look for a worn or damaged belt tensioner and check the alternator pulley for wobble or bearing noise. A seized or loose pulley can prevent the alternator from reaching proper RPM, leading to low output.
Wiring and Ground Integrity
Examine the alternator’s B+ output wire for corrosion, fraying, or loose connections at both the alternator and the battery. Check the ground strap between the engine block and the chassis, and the negative battery cable. Poor grounds are a common cause of undercharging and can produce erratic voltage readings. Use a multimeter to measure voltage drop across connections—anything over 0.2 volts indicates excessive resistance.
Warning
Alternator Testing: The Complete DIY Guide to Diagnosing Charging System Failures
The alternator is the unsung workhorse of your vehicle’s electrical system—a belt-driven generator that converts mechanical energy from the engine into alternating current (AC), which is then rectified into direct current (DC) to recharge the battery and power every electrical component while the engine runs. Unlike the battery, which only stores energy, the alternator is the primary source of electrical power once your engine is turning. When it fails, you’re not just looking at a dead battery; you’re looking at a cascading electrical failure that can strand you anywhere, from a busy intersection to a remote trailhead. That’s why understanding alternator testing isn’t a luxury—it’s a fundamental diagnostic skill for any vehicle owner.
In this complete DIY guide, we’ll walk you through the essential attributes of alternator testing: the voltage and amperage output specs you need to verify, the critical difference between a failing alternator and a weak battery, and the specific tools—from a simple digital multimeter to a dedicated alternator bench tester—that give you accurate results. You’ll learn how to perform a load test, check for diode ripple, and interpret the warning signs like dimming headlights, a whining alternator bearing, or the dreaded battery warning light. We’ll also cover the safety protocols for working around high-amperage charging circuits and the common pitfalls that lead DIYers to misdiagnose a perfectly good alternator.
What sets this guide apart is the data-driven approach: we’ll provide real-world voltage readings, amperage draw tables for common vehicle classes, and honest limitations of each testing method. You won’t find vague advice here—you’ll find actionable thresholds, step-by-step procedures, and the reasoning behind each test. Whether you’re troubleshooting a parasitic drain, confirming a remanufactured alternator’s output, or just want to understand your charging system better, this guide gives you the entity-level knowledge to diagnose with confidence and avoid throwing parts at a problem that might have a simpler fix.
What Is Alternator Testing and Why It Matters

Alternator testing is the process of measuring your vehicle’s charging system output to determine whether the alternator is converting mechanical energy into electrical energy correctly. You perform these tests when you suspect the alternator is failing to keep the battery charged. The test itself is simple: you measure voltage at the battery terminals while the engine runs, then compare that reading against known-good specifications. But the diagnostic depth goes far beyond a single voltage check—it involves static testing, dynamic testing under load, ripple analysis for diode health, and verification of the entire charging circuit including belts, pulleys, wiring, and grounds.
The Alternator’s Role in Your Vehicle’s Electrical System
The alternator works in tandem with the battery and voltage regulator. The battery provides the initial cranking power and acts as a buffer, while the alternator supplies continuous current to run the ignition system, fuel pump, lights, infotainment, and all other electrical loads once the engine is running. The voltage regulator—whether internal or external—controls the alternator’s field current to maintain a stable output, typically between 13.5 and 14.8 volts depending on temperature and load. Without a properly functioning alternator, the battery will deplete within minutes of engine start, leading to a stall or complete electrical shutdown.
How Alternator Testing Differs from Battery and Starter Testing
Battery testing focuses on state of charge and capacity—measuring resting voltage, conducting a load test, and checking cold cranking amps. Starter testing evaluates the cranking circuit’s ability to draw high current and turn the engine. Alternator testing, by contrast, verifies the charging system’s ability to generate and regulate voltage and current while the engine runs. A common mistake is blaming the battery when the alternator is the culprit, or vice versa. Alternator testing specifically isolates the generation and regulation functions, which battery and starter tests cannot do.
Signs That You Need to Test Your Alternator
Common warning signs include a battery warning light on the dashboard, dimming or flickering headlights, a weak or dead battery that repeatedly needs jump-starts, electrical accessories that slow down or malfunction, a whining or grinding noise from the alternator bearing, and a burning rubber or electrical smell. If you experience any of these, testing the alternator should be your first diagnostic step before replacing any parts.
Essential Tools for Alternator Testing

Digital Multimeter (DMM)
The digital multimeter is the cornerstone of alternator testing. You’ll need a DMM capable of measuring DC voltage (at least 20V range), AC voltage (for ripple testing), and DC amperage (ideally with a clamp meter function). A quality DMM with a peak-hold or min/max function is especially useful for capturing transient voltage spikes. For most DIY testing, a basic DMM with 0.1V resolution is sufficient, but for accurate ripple measurements, you’ll want a meter with AC millivolt capability.
Load Tester or Carbon Pile Tester
A load tester applies a controlled electrical load to the charging system to verify the alternator’s output under real-world demand. Carbon pile testers are the professional standard, allowing you to draw 50-100 amps or more while monitoring voltage. For DIY use, a simple headlight load or a dedicated alternator load tester can suffice, but a carbon pile gives the most accurate results.
Clamp Meter (AC/DC)
A clamp meter measures current without disconnecting wires—essential for checking amperage output at the alternator’s B+ terminal. Look for a clamp meter that handles at least 100 amps DC and has a low-current sensitivity for parasitic draw testing. This tool is critical for verifying that the alternator is producing its rated amperage, not just voltage.
Oscilloscope (Optional but Recommended)
For advanced diode testing, an oscilloscope provides a visual representation of the alternator’s AC ripple waveform. A healthy alternator produces a smooth DC output with minimal ripple; a failing diode creates a distinctive pattern of voltage dips. While not strictly necessary for basic testing, an oscilloscope is invaluable for diagnosing intermittent diode failures that a multimeter might miss.
Battery Tester and Hydrometer
Before testing the alternator, you must verify the battery is in good condition. A weak or sulfated battery can cause misleading alternator readings. Use a conductance tester or a traditional hydrometer to check specific gravity in each cell. The battery must be at least 75% charged before alternator testing begins.
Safety Equipment
Always wear safety glasses and insulated gloves when working around the charging system. The alternator can produce over 100 amps at 14 volts—enough to cause severe burns or start a fire if a tool slips and shorts the B+ terminal to ground. Keep loose clothing, jewelry, and tools away from the serpentine belt and rotating pulleys.
Pre-Test Inspection: Battery, Belts, and Wiring

Battery Condition Check
Begin with a visual inspection of the battery. Check for corrosion on terminals, loose connections, cracked case, or bulging sides. Measure resting voltage—a fully charged battery should read 12.6 volts or higher. If the battery reads below 12.4 volts, charge it fully before proceeding. Perform a load test if you suspect the battery may be weak; a battery that fails a load test will skew all subsequent alternator readings.
Serpentine Belt and Pulley Inspection
Inspect the serpentine belt for cracks, fraying, glazing, or excessive wear. Check belt tension—a loose belt will slip and cause the alternator to underperform. Look for a worn or damaged belt tensioner and check the alternator pulley for wobble or bearing noise. A seized or loose pulley can prevent the alternator from reaching proper RPM, leading to low output.
Wiring and Ground Integrity
Examine the alternator’s B+ output wire for corrosion, fraying, or loose connections at both the alternator and the battery. Check the ground strap between the engine block and the chassis, and the negative battery cable. Poor grounds are a common cause of undercharging and can produce erratic voltage readings. Use a multimeter to measure voltage drop across connections—anything over 0.2 volts indicates excessive resistance.
Warning
Alternator Testing: The Complete DIY Guide to Diagnosing Charging System Failures
The alternator is the unsung workhorse of your vehicle’s electrical system—a belt-driven generator that converts mechanical energy from the engine into alternating current (AC), which is then rectified into direct current (DC) to recharge the battery and power every electrical component while the engine runs. Unlike the battery, which only stores energy, the alternator is the primary source of electrical power once your engine is turning. When it fails, you’re not just looking at a dead battery; you’re looking at a cascading electrical failure that can strand you anywhere, from a busy intersection to a remote trailhead. That’s why understanding alternator testing isn’t a luxury—it’s a fundamental diagnostic skill for any vehicle owner.
In this complete DIY guide, we’ll walk you through the essential attributes of alternator testing: the voltage and amperage output specs you need to verify, the critical difference between a failing alternator and a weak battery, and the specific tools—from a simple digital multimeter to a dedicated alternator bench tester—that give you accurate results. You’ll learn how to perform a load test, check for diode ripple, and interpret the warning signs like dimming headlights, a whining alternator bearing, or the dreaded battery warning light. We’ll also cover the safety protocols for working around high-amperage charging circuits and the common pitfalls that lead DIYers to misdiagnose a perfectly good alternator.
What sets this guide apart is the data-driven approach: we’ll provide real-world voltage readings, amperage draw tables for common vehicle classes, and honest limitations of each testing method. You won’t find vague advice here—you’ll find actionable thresholds, step-by-step procedures, and the reasoning behind each test. Whether you’re troubleshooting a parasitic drain, confirming a remanufactured alternator’s output, or just want to understand your charging system better, this guide gives you the entity-level knowledge to diagnose with confidence and avoid throwing parts at a problem that might have a simpler fix.
What Is Alternator Testing and Why It Matters

Alternator testing is the process of measuring your vehicle’s charging system output to determine whether the alternator is converting mechanical energy into electrical energy correctly. You perform these tests when you suspect the alternator is failing to keep the battery charged. The test itself is simple: you measure voltage at the battery terminals while the engine runs, then compare that reading against known-good specifications. But the diagnostic depth goes far beyond a single voltage check—it involves static testing, dynamic testing under load, ripple analysis for diode health, and verification of the entire charging circuit including belts, pulleys, wiring, and grounds.
The Alternator’s Role in Your Vehicle’s Electrical System
The alternator works in tandem with the battery and voltage regulator. The battery provides the initial cranking power and acts as a buffer, while the alternator supplies continuous current to run the ignition system, fuel pump, lights, infotainment, and all other electrical loads once the engine is running. The voltage regulator—whether internal or external—controls the alternator’s field current to maintain a stable output, typically between 13.5 and 14.8 volts depending on temperature and load. Without a properly functioning alternator, the battery will deplete within minutes of engine start, leading to a stall or complete electrical shutdown.
How Alternator Testing Differs from Battery and Starter Testing
Battery testing focuses on state of charge and capacity—measuring resting voltage, conducting a load test, and checking cold cranking amps. Starter testing evaluates the cranking circuit’s ability to draw high current and turn the engine. Alternator testing, by contrast, verifies the charging system’s ability to generate and regulate voltage and current while the engine runs. A common mistake is blaming the battery when the alternator is the culprit, or vice versa. Alternator testing specifically isolates the generation and regulation functions, which battery and starter tests cannot do.
Signs That You Need to Test Your Alternator
Common warning signs include a battery warning light on the dashboard, dimming or flickering headlights, a weak or dead battery that repeatedly needs jump-starts, electrical accessories that slow down or malfunction, a whining or grinding noise from the alternator bearing, and a burning rubber or electrical smell. If you experience any of these, testing the alternator should be your first diagnostic step before replacing any parts.
Essential Tools for Alternator Testing

Digital Multimeter (DMM)
The digital multimeter is the cornerstone of alternator testing. You’ll need a DMM capable of measuring DC voltage (at least 20V range), AC voltage (for ripple testing), and DC amperage (ideally with a clamp meter function). A quality DMM with a peak-hold or min/max function is especially useful for capturing transient voltage spikes. For most DIY testing, a basic DMM with 0.1V resolution is sufficient, but for accurate ripple measurements, you’ll want a meter with AC millivolt capability.
Load Tester or Carbon Pile Tester
A load tester applies a controlled electrical load to the charging system to verify the alternator’s output under real-world demand. Carbon pile testers are the professional standard, allowing you to draw 50-100 amps or more while monitoring voltage. For DIY use, a simple headlight load or a dedicated alternator load tester can suffice, but a carbon pile gives the most accurate results.
Clamp Meter (AC/DC)
A clamp meter measures current without disconnecting wires—essential for checking amperage output at the alternator’s B+ terminal. Look for a clamp meter that handles at least 100 amps DC and has a low-current sensitivity for parasitic draw testing. This tool is critical for verifying that the alternator is producing its rated amperage, not just voltage.
Oscilloscope (Optional but Recommended)
For advanced diode testing, an oscilloscope provides a visual representation of the alternator’s AC ripple waveform. A healthy alternator produces a smooth DC output with minimal ripple; a failing diode creates a distinctive pattern of voltage dips. While not strictly necessary for basic testing, an oscilloscope is invaluable for diagnosing intermittent diode failures that a multimeter might miss.
Battery Tester and Hydrometer
Before testing the alternator, you must verify the battery is in good condition. A weak or sulfated battery can cause misleading alternator readings. Use a conductance tester or a traditional hydrometer to check specific gravity in each cell. The battery must be at least 75% charged before alternator testing begins.
Safety Equipment
Always wear safety glasses and insulated gloves when working around the charging system. The alternator can produce over 100 amps at 14 volts—enough to cause severe burns or start a fire if a tool slips and shorts the B+ terminal to ground. Keep loose clothing, jewelry, and tools away from the serpentine belt and rotating pulleys.
Pre-Test Inspection: Battery, Belts, and Wiring

Battery Condition Check
Begin with a visual inspection of the battery. Check for corrosion on terminals, loose connections, cracked case, or bulging sides. Measure resting voltage—a fully charged battery should read 12.6 volts or higher. If the battery reads below 12.4 volts, charge it fully before proceeding. Perform a load test if you suspect the battery may be weak; a battery that fails a load test will skew all subsequent alternator readings.
Serpentine Belt and Pulley Inspection
Inspect the serpentine belt for cracks, fraying, glazing, or excessive wear. Check belt tension—a loose belt will slip and cause the alternator to underperform. Look for a worn or damaged belt tensioner and check the alternator pulley for wobble or bearing noise. A seized or loose pulley can prevent the alternator from reaching proper RPM, leading to low output.
Wiring and Ground Integrity
Examine the alternator’s B+ output wire for corrosion, fraying, or loose connections at both the alternator and the battery. Check the ground strap between the engine block and the chassis, and the negative battery cable. Poor grounds are a common cause of undercharging and can produce erratic voltage readings. Use a multimeter to measure voltage drop across connections—anything over 0.2 volts indicates excessive resistance.
Warning
The alternator is the unsung workhorse of your vehicle’s electrical system—a belt-driven generator that converts mechanical energy from the engine into alternating current (AC), which is then rectified into direct current (DC) to recharge the battery and power every electrical component while the engine runs. Unlike the battery, which only stores energy, the alternator is the primary source of electrical power once your engine is turning. When it fails, you’re not just looking at a dead battery; you’re looking at a cascading electrical failure that can strand you anywhere, from a busy intersection to a remote trailhead. That’s why understanding alternator testing isn’t a luxury—it’s a fundamental diagnostic skill for any vehicle owner.
In this complete DIY guide, we’ll walk you through the essential attributes of alternator testing: the voltage and amperage output specs you need to verify, the critical difference between a failing alternator and a weak battery, and the specific tools—from a simple digital multimeter to a dedicated alternator bench tester—that give you accurate results. You’ll learn how to perform a load test, check for diode ripple, and interpret the warning signs like dimming headlights, a whining alternator bearing, or the dreaded battery warning light. We’ll also cover the safety protocols for working around high-amperage charging circuits and the common pitfalls that lead DIYers to misdiagnose a perfectly good alternator.
What sets this guide apart is the data-driven approach: we’ll provide real-world voltage readings, amperage draw tables for common vehicle classes, and honest limitations of each testing method. You won’t find vague advice here—you’ll find actionable thresholds, step-by-step procedures, and the reasoning behind each test. Whether you’re troubleshooting a parasitic drain, confirming a remanufactured alternator’s output, or just want to understand your charging system better, this guide gives you the entity-level knowledge to diagnose with confidence and avoid throwing parts at a problem that might have a simpler fix.
What Is Alternator Testing and Why It Matters

Alternator testing is the process of measuring your vehicle’s charging system output to determine whether the alternator is converting mechanical energy into electrical energy correctly. You perform these tests when you suspect the alternator is failing to keep the battery charged. The test itself is simple: you measure voltage at the battery terminals while the engine runs, then compare that reading against known-good specifications. But the diagnostic depth goes far beyond a single voltage check—it involves static testing, dynamic testing under load, ripple analysis for diode health, and verification of the entire charging circuit including belts, pulleys, wiring, and grounds.
The Alternator’s Role in Your Vehicle’s Electrical System
The alternator works in tandem with the battery and voltage regulator. The battery provides the initial cranking power and acts as a buffer, while the alternator supplies continuous current to run the ignition system, fuel pump, lights, infotainment, and all other electrical loads once the engine is running. The voltage regulator—whether internal or external—controls the alternator’s field current to maintain a stable output, typically between 13.5 and 14.8 volts depending on temperature and load. Without a properly functioning alternator, the battery will deplete within minutes of engine start, leading to a stall or complete electrical shutdown.
How Alternator Testing Differs from Battery and Starter Testing
Battery testing focuses on state of charge and capacity—measuring resting voltage, conducting a load test, and checking cold cranking amps. Starter testing evaluates the cranking circuit’s ability to draw high current and turn the engine. Alternator testing, by contrast, verifies the charging system’s ability to generate and regulate voltage and current while the engine runs. A common mistake is blaming the battery when the alternator is the culprit, or vice versa. Alternator testing specifically isolates the generation and regulation functions, which battery and starter tests cannot do.
Signs That You Need to Test Your Alternator
Common warning signs include a battery warning light on the dashboard, dimming or flickering headlights, a weak or dead battery that repeatedly needs jump-starts, electrical accessories that slow down or malfunction, a whining or grinding noise from the alternator bearing, and a burning rubber or electrical smell. If you experience any of these, testing the alternator should be your first diagnostic step before replacing any parts.
Essential Tools for Alternator Testing

Digital Multimeter (DMM)
The digital multimeter is the cornerstone of alternator testing. You’ll need a DMM capable of measuring DC voltage (at least 20V range), AC voltage (for ripple testing), and DC amperage (ideally with a clamp meter function). A quality DMM with a peak-hold or min/max function is especially useful for capturing transient voltage spikes. For most DIY testing, a basic DMM with 0.1V resolution is sufficient, but for accurate ripple measurements, you’ll want a meter with AC millivolt capability.
Load Tester or Carbon Pile Tester
A load tester applies a controlled electrical load to the charging system to verify the alternator’s output under real-world demand. Carbon pile testers are the professional standard, allowing you to draw 50-100 amps or more while monitoring voltage. For DIY use, a simple headlight load or a dedicated alternator load tester can suffice, but a carbon pile gives the most accurate results.
Clamp Meter (AC/DC)
A clamp meter measures current without disconnecting wires—essential for checking amperage output at the alternator’s B+ terminal. Look for a clamp meter that handles at least 100 amps DC and has a low-current sensitivity for parasitic draw testing. This tool is critical for verifying that the alternator is producing its rated amperage, not just voltage.
Oscilloscope (Optional but Recommended)
For advanced diode testing, an oscilloscope provides a visual representation of the alternator’s AC ripple waveform. A healthy alternator produces a smooth DC output with minimal ripple; a failing diode creates a distinctive pattern of voltage dips. While not strictly necessary for basic testing, an oscilloscope is invaluable for diagnosing intermittent diode failures that a multimeter might miss.
Battery Tester and Hydrometer
Before testing the alternator, you must verify the battery is in good condition. A weak or sulfated battery can cause misleading alternator readings. Use a conductance tester or a traditional hydrometer to check specific gravity in each cell. The battery must be at least 75% charged before alternator testing begins.
Safety Equipment
Always wear safety glasses and insulated gloves when working around the charging system. The alternator can produce over 100 amps at 14 volts—enough to cause severe burns or start a fire if a tool slips and shorts the B+ terminal to ground. Keep loose clothing, jewelry, and tools away from the serpentine belt and rotating pulleys.
Pre-Test Inspection: Battery, Belts, and Wiring

Battery Condition Check
Begin with a visual inspection of the battery. Check for corrosion on terminals, loose connections, cracked case, or bulging sides. Measure resting voltage—a fully charged battery should read 12.6 volts or higher. If the battery reads below 12.4 volts, charge it fully before proceeding. Perform a load test if you suspect the battery may be weak; a battery that fails a load test will skew all subsequent alternator readings.
Serpentine Belt and Pulley Inspection
Inspect the serpentine belt for cracks, fraying, glazing, or excessive wear. Check belt tension—a loose belt will slip and cause the alternator to underperform. Look for a worn or damaged belt tensioner and check the alternator pulley for wobble or bearing noise. A seized or loose pulley can prevent the alternator from reaching proper RPM, leading to low output.
Wiring and Ground Integrity
Examine the alternator’s B+ output wire for corrosion, fraying, or loose connections at both the alternator and the battery. Check the ground strap between the engine block and the chassis, and the negative battery cable. Poor grounds are a common cause of undercharging and can produce erratic voltage readings. Use a multimeter to measure voltage drop across connections—anything over 0.2 volts indicates excessive resistance.
Warning
Alternator Testing: The Complete DIY Guide to Diagnosing Charging System Failures
The alternator is the unsung workhorse of your vehicle’s electrical system—a belt-driven generator that converts mechanical energy from the engine into alternating current (AC), which is then rectified into direct current (DC) to recharge the battery and power every electrical component while the engine runs. Unlike the battery, which only stores energy, the alternator is the primary source of electrical power once your engine is turning. When it fails, you’re not just looking at a dead battery; you’re looking at a cascading electrical failure that can strand you anywhere, from a busy intersection to a remote trailhead. That’s why understanding alternator testing isn’t a luxury—it’s a fundamental diagnostic skill for any vehicle owner.
In this complete DIY guide, we’ll walk you through the essential attributes of alternator testing: the voltage and amperage output specs you need to verify, the critical difference between a failing alternator and a weak battery, and the specific tools—from a simple digital multimeter to a dedicated alternator bench tester—that give you accurate results. You’ll learn how to perform a load test, check for diode ripple, and interpret the warning signs like dimming headlights, a whining alternator bearing, or the dreaded battery warning light. We’ll also cover the safety protocols for working around high-amperage charging circuits and the common pitfalls that lead DIYers to misdiagnose a perfectly good alternator.
What sets this guide apart is the data-driven approach: we’ll provide real-world voltage readings, amperage draw tables for common vehicle classes, and honest limitations of each testing method. You won’t find vague advice here—you’ll find actionable thresholds, step-by-step procedures, and the reasoning behind each test. Whether you’re troubleshooting a parasitic drain, confirming a remanufactured alternator’s output, or just want to understand your charging system better, this guide gives you the entity-level knowledge to diagnose with confidence and avoid throwing parts at a problem that might have a simpler fix.
What Is Alternator Testing and Why It Matters

Alternator testing is the process of measuring your vehicle’s charging system output to determine whether the alternator is converting mechanical energy into electrical energy correctly. You perform these tests when you suspect the alternator is failing to keep the battery charged. The test itself is simple: you measure voltage at the battery terminals while the engine runs, then compare that reading against known-good specifications. But the diagnostic depth goes far beyond a single voltage check—it involves static testing, dynamic testing under load, ripple analysis for diode health, and verification of the entire charging circuit including belts, pulleys, wiring, and grounds.
The Alternator’s Role in Your Vehicle’s Electrical System
The alternator works in tandem with the battery and voltage regulator. The battery provides the initial cranking power and acts as a buffer, while the alternator supplies continuous current to run the ignition system, fuel pump, lights, infotainment, and all other electrical loads once the engine is running. The voltage regulator—whether internal or external—controls the alternator’s field current to maintain a stable output, typically between 13.5 and 14.8 volts depending on temperature and load. Without a properly functioning alternator, the battery will deplete within minutes of engine start, leading to a stall or complete electrical shutdown.
How Alternator Testing Differs from Battery and Starter Testing
Battery testing focuses on state of charge and capacity—measuring resting voltage, conducting a load test, and checking cold cranking amps. Starter testing evaluates the cranking circuit’s ability to draw high current and turn the engine. Alternator testing, by contrast, verifies the charging system’s ability to generate and regulate voltage and current while the engine runs. A common mistake is blaming the battery when the alternator is the culprit, or vice versa. Alternator testing specifically isolates the generation and regulation functions, which battery and starter tests cannot do.
Signs That You Need to Test Your Alternator
Common warning signs include a battery warning light on the dashboard, dimming or flickering headlights, a weak or dead battery that repeatedly needs jump-starts, electrical accessories that slow down or malfunction, a whining or grinding noise from the alternator bearing, and a burning rubber or electrical smell. If you experience any of these, testing the alternator should be your first diagnostic step before replacing any parts.
Essential Tools for Alternator Testing

Digital Multimeter (DMM)
The digital multimeter is the cornerstone of alternator testing. You’ll need a DMM capable of measuring DC voltage (at least 20V range), AC voltage (for ripple testing), and DC amperage (ideally with a clamp meter function). A quality DMM with a peak-hold or min/max function is especially useful for capturing transient voltage spikes. For most DIY testing, a basic DMM with 0.1V resolution is sufficient, but for accurate ripple measurements, you’ll want a meter with AC millivolt capability.
Load Tester or Carbon Pile Tester
A load tester applies a controlled electrical load to the charging system to verify the alternator’s output under real-world demand. Carbon pile testers are the professional standard, allowing you to draw 50-100 amps or more while monitoring voltage. For DIY use, a simple headlight load or a dedicated alternator load tester can suffice, but a carbon pile gives the most accurate results.
Clamp Meter (AC/DC)
A clamp meter measures current without disconnecting wires—essential for checking amperage output at the alternator’s B+ terminal. Look for a clamp meter that handles at least 100 amps DC and has a low-current sensitivity for parasitic draw testing. This tool is critical for verifying that the alternator is producing its rated amperage, not just voltage.
Oscilloscope (Optional but Recommended)
For advanced diode testing, an oscilloscope provides a visual representation of the alternator’s AC ripple waveform. A healthy alternator produces a smooth DC output with minimal ripple; a failing diode creates a distinctive pattern of voltage dips. While not strictly necessary for basic testing, an oscilloscope is invaluable for diagnosing intermittent diode failures that a multimeter might miss.
Battery Tester and Hydrometer
Before testing the alternator, you must verify the battery is in good condition. A weak or sulfated battery can cause misleading alternator readings. Use a conductance tester or a traditional hydrometer to check specific gravity in each cell. The battery must be at least 75% charged before alternator testing begins.
Safety Equipment
Always wear safety glasses and insulated gloves when working around the charging system. The alternator can produce over 100 amps at 14 volts—enough to cause severe burns or start a fire if a tool slips and shorts the B+ terminal to ground. Keep loose clothing, jewelry, and tools away from the serpentine belt and rotating pulleys.
Pre-Test Inspection: Battery, Belts, and Wiring

Battery Condition Check
Begin with a visual inspection of the battery. Check for corrosion on terminals, loose connections, cracked case, or bulging sides. Measure resting voltage—a fully charged battery should read 12.6 volts or higher. If the battery reads below 12.4 volts, charge it fully before proceeding. Perform a load test if you suspect the battery may be weak; a battery that fails a load test will skew all subsequent alternator readings.
Serpentine Belt and Pulley Inspection
Inspect the serpentine belt for cracks, fraying, glazing, or excessive wear. Check belt tension—a loose belt will slip and cause the alternator to underperform. Look for a worn or damaged belt tensioner and check the alternator pulley for wobble or bearing noise. A seized or loose pulley can prevent the alternator from reaching proper RPM, leading to low output.
Wiring and Ground Integrity
Examine the alternator’s B+ output wire for corrosion, fraying, or loose connections at both the alternator and the battery. Check the ground strap between the engine block and the chassis, and the negative battery cable. Poor grounds are a common cause of undercharging and can produce erratic voltage readings. Use a multimeter to measure voltage drop across connections—anything over 0.2 volts indicates excessive resistance.
Warning
The alternator is the unsung workhorse of your vehicle’s electrical system—a belt-driven generator that converts mechanical energy from the engine into alternating current (AC), which is then rectified into direct current (DC) to recharge the battery and power every electrical component while the engine runs. Unlike the battery, which only stores energy, the alternator is the primary source of electrical power once your engine is turning. When it fails, you’re not just looking at a dead battery; you’re looking at a cascading electrical failure that can strand you anywhere, from a busy intersection to a remote trailhead. That’s why understanding alternator testing isn’t a luxury—it’s a fundamental diagnostic skill for any vehicle owner.
In this complete DIY guide, we’ll walk you through the essential attributes of alternator testing: the voltage and amperage output specs you need to verify, the critical difference between a failing alternator and a weak battery, and the specific tools—from a simple digital multimeter to a dedicated alternator bench tester—that give you accurate results. You’ll learn how to perform a load test, check for diode ripple, and interpret the warning signs like dimming headlights, a whining alternator bearing, or the dreaded battery warning light. We’ll also cover the safety protocols for working around high-amperage charging circuits and the common pitfalls that lead DIYers to misdiagnose a perfectly good alternator.
What sets this guide apart is the data-driven approach: we’ll provide real-world voltage readings, amperage draw tables for common vehicle classes, and honest limitations of each testing method. You won’t find vague advice here—you’ll find actionable thresholds, step-by-step procedures, and the reasoning behind each test. Whether you’re troubleshooting a parasitic drain, confirming a remanufactured alternator’s output, or just want to understand your charging system better, this guide gives you the entity-level knowledge to diagnose with confidence and avoid throwing parts at a problem that might have a simpler fix.
What Is Alternator Testing and Why It Matters

Alternator testing is the process of measuring your vehicle’s charging system output to determine whether the alternator is converting mechanical energy into electrical energy correctly. You perform these tests when you suspect the alternator is failing to keep the battery charged. The test itself is simple: you measure voltage at the battery terminals while the engine runs, then compare that reading against known-good specifications. But the diagnostic depth goes far beyond a single voltage check—it involves static testing, dynamic testing under load, ripple analysis for diode health, and verification of the entire charging circuit including belts, pulleys, wiring, and grounds.
The Alternator’s Role in Your Vehicle’s Electrical System
The alternator works in tandem with the battery and voltage regulator. The battery provides the initial cranking power and acts as a buffer, while the alternator supplies continuous current to run the ignition system, fuel pump, lights, infotainment, and all other electrical loads once the engine is running. The voltage regulator—whether internal or external—controls the alternator’s field current to maintain a stable output, typically between 13.5 and 14.8 volts depending on temperature and load. Without a properly functioning alternator, the battery will deplete within minutes of engine start, leading to a stall or complete electrical shutdown.
How Alternator Testing Differs from Battery and Starter Testing
Battery testing focuses on state of charge and capacity—measuring resting voltage, conducting a load test, and checking cold cranking amps. Starter testing evaluates the cranking circuit’s ability to draw high current and turn the engine. Alternator testing, by contrast, verifies the charging system’s ability to generate and regulate voltage and current while the engine runs. A common mistake is blaming the battery when the alternator is the culprit, or vice versa. Alternator testing specifically isolates the generation and regulation functions, which battery and starter tests cannot do.
Signs That You Need to Test Your Alternator
Common warning signs include a battery warning light on the dashboard, dimming or flickering headlights, a weak or dead battery that repeatedly needs jump-starts, electrical accessories that slow down or malfunction, a whining or grinding noise from the alternator bearing, and a burning rubber or electrical smell. If you experience any of these, testing the alternator should be your first diagnostic step before replacing any parts.
Essential Tools for Alternator Testing

Digital Multimeter (DMM)
The digital multimeter is the cornerstone of alternator testing. You’ll need a DMM capable of measuring DC voltage (at least 20V range), AC voltage (for ripple testing), and DC amperage (ideally with a clamp meter function). A quality DMM with a peak-hold or min/max function is especially useful for capturing transient voltage spikes. For most DIY testing, a basic DMM with 0.1V resolution is sufficient, but for accurate ripple measurements, you’ll want a meter with AC millivolt capability.
Load Tester or Carbon Pile Tester
A load tester applies a controlled electrical load to the charging system to verify the alternator’s output under real-world demand. Carbon pile testers are the professional standard, allowing you to draw 50-100 amps or more while monitoring voltage. For DIY use, a simple headlight load or a dedicated alternator load tester can suffice, but a carbon pile gives the most accurate results.
Clamp Meter (AC/DC)
A clamp meter measures current without disconnecting wires—essential for checking amperage output at the alternator’s B+ terminal. Look for a clamp meter that handles at least 100 amps DC and has a low-current sensitivity for parasitic draw testing. This tool is critical for verifying that the alternator is producing its rated amperage, not just voltage.
Oscilloscope (Optional but Recommended)
For advanced diode testing, an oscilloscope provides a visual representation of the alternator’s AC ripple waveform. A healthy alternator produces a smooth DC output with minimal ripple; a failing diode creates a distinctive pattern of voltage dips. While not strictly necessary for basic testing, an oscilloscope is invaluable for diagnosing intermittent diode failures that a multimeter might miss.
Battery Tester and Hydrometer
Before testing the alternator, you must verify the battery is in good condition. A weak or sulfated battery can cause misleading alternator readings. Use a conductance tester or a traditional hydrometer to check specific gravity in each cell. The battery must be at least 75% charged before alternator testing begins.
Safety Equipment
Always wear safety glasses and insulated gloves when working around the charging system. The alternator can produce over 100 amps at 14 volts—enough to cause severe burns or start a fire if a tool slips and shorts the B+ terminal to ground. Keep loose clothing, jewelry, and tools away from the serpentine belt and rotating pulleys.
Pre-Test Inspection: Battery, Belts, and Wiring

Battery Condition Check
Begin with a visual inspection of the battery. Check for corrosion on terminals, loose connections, cracked case, or bulging sides. Measure resting voltage—a fully charged battery should read 12.6 volts or higher. If the battery reads below 12.4 volts, charge it fully before proceeding. Perform a load test if you suspect the battery may be weak; a battery that fails a load test will skew all subsequent alternator readings.
Serpentine Belt and Pulley Inspection
Inspect the serpentine belt for cracks, fraying, glazing, or excessive wear. Check belt tension—a loose belt will slip and cause the alternator to underperform. Look for a worn or damaged belt tensioner and check the alternator pulley for wobble or bearing noise. A seized or loose pulley can prevent the alternator from reaching proper RPM, leading to low output.
Wiring and Ground Integrity
Examine the alternator’s B+ output wire for corrosion, fraying, or loose connections at both the alternator and the battery. Check the ground strap between the engine block and the chassis, and the negative battery cable. Poor grounds are a common cause of undercharging and can produce erratic voltage readings. Use a multimeter to measure voltage drop across connections—anything over 0.2 volts indicates excessive resistance.
