Quick Answer: Most Japanese cars (Honda, Toyota, Nissan) equipped with a rubber ** japanese car timing belt ** need replacement every **90,000 to 105,000 miles** or every **7 to 10 years**, whichever comes first. Always verify your specific year and model in the owner’s manual.
The Tuesday That Changed Everything
It was a rainy Tuesday morning in November, the kind where the shop floor smells faintly of wet concrete and ozone. A flatbed rolled in with a 2007 Honda Accord on the hook. The customer, a guy named Dave, looked absolutely gutted. He told me he heard a “loud pop” on the highway, and the car just died. He was hoping for a broken fuse or a bad alternator.
I popped the hood, removed the oil cap, and had my helper bump the starter. The camshafts didn’t move. I looked at the timing cover and saw a fresh crack. I broke the news to him gently: his interference engine had just swallowed itself because the timing belt let go.
I’ve been an ASE Master Tech for 15 years, and I’ve seen this scene play out too many times. The sad part? A timing belt service usually runs between $600 and $1,200. Replacing a bent-valve cylinder head? That starts at $2,500 and goes up fast. Understanding your japanese car timing belt schedule isn’t just maintenance; it’s financial survival.
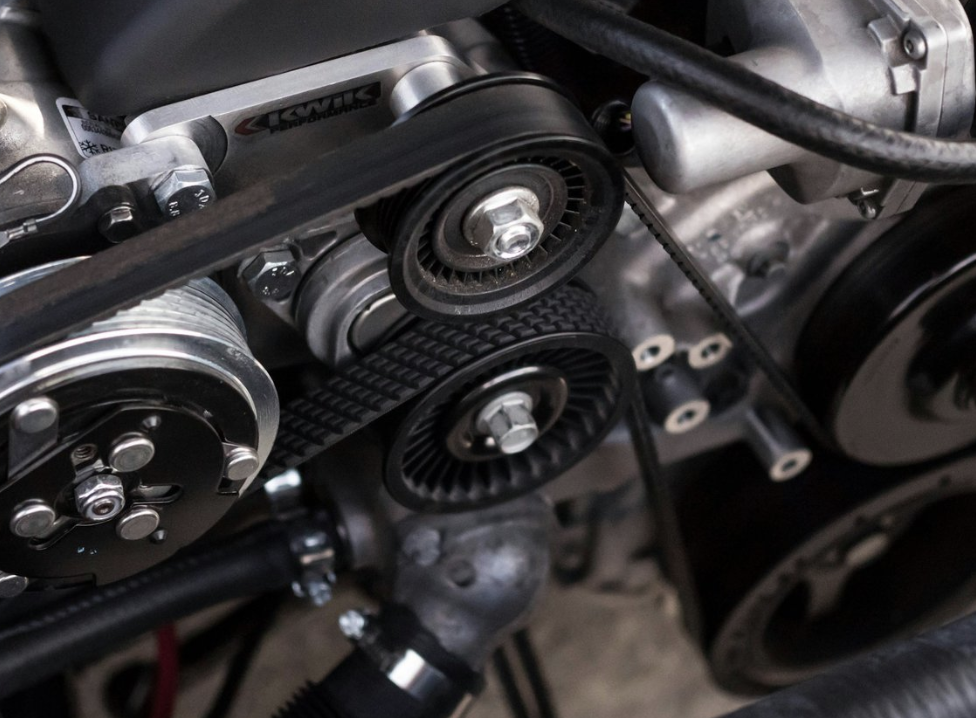
Why Timing Belts Matter (The “Interference” Factor)
Before we get into the specific schedules for Honda, Toyota, and Nissan, you need to understand why this is critical. Most Japanese engines from this era are “interference engines.” This means there is very little empty space between the pistons at the top of their travel and the valves when they are open.
The timing belt synchronizes the crankshaft (bottom of the engine) and the camshafts (top). If that belt snaps or slips a few teeth, the pistons smash into the valves. It’s mechanical carnage. You do not get a second chance.
Honda Timing Belt Interval
Honda is arguably the most critical brand to watch here. While they have largely switched to timing chains in newer models (post-2013/14 roughly), the vast majority of Accords, Civics, and Odysseys on the road still use belts.
The Schedule
- Standard Interval: 105,000 miles or 7 years.
- Severe Service: Many TSBs (Technical Service Bulletins) suggest inspecting at 60,000 miles, especially if you live in a hot climate or do short trips.
Technical Specifications: Honda Accord & Civic (4-Cyl)
For the popular R18A and K-series engines found in Civics and Accords:
- OEM Belt: Aisin or Honda OEM (Gates and Dayco are acceptable aftermarket alternatives).
- Water Pump: Driven by the timing belt. Always replace it.
- Tensioner Type: Most are automatic hydraulic tensioners.
- Torque Specs (General): Crank pulley bolt is usually around **181 ft-lbs** (and it’s a beast to break loose).
It is vital to learn about specific models like the [Honda Accord timing belt, Toyota Camry timing belt, Nissan timing belt](honda-accord-timing-belt, toyota-camry-timing-belt, nissan-timing-belt-replacement) to understand the quirks of each engine family before you start wrenching.
Toyota Timing Belt Schedule
Toyota is famous for reliability, but that reputation relies on maintenance. The 1MZ-FE (V6) and the 5S-FE (4-cyl) from the 90s and early 2000s are legends. The newer 2GR-FE V6 found in Camrys and Highlanders also utilizes a belt.
The Schedule
- Standard Interval: 90,000 miles.
- Severe Service: Toyota is very strict; they often recommend a check at 60,000.
Technical Specifications: Toyota Camry V6 (1MZ/2GR)
- Common Failure Point: The water pump seal. When the bearing fails, it throws coolant onto the belt, causing it to slip or snap instantly.
- Tensioner: Spring-loaded tensioner (older) or hydraulic (newer V6s).
- Torque Specs: Camshaft gear bolts typically require **45 ft-lbs** of torque. The crankshaft bolt varies wildly—on the 2GR-FE it uses a large 14mm hex bolt torqued to roughly **250 ft-lbs**. You will need a strong impact gun or a very long breaker bar.
Nissan Timing Belt
Nissan used timing belts extensively on the VQ30DE and VQ35DE engines found in the Maxima, Altima 3.5, Pathfinder, and Murano up until roughly the mid-2000s. The QR25DE (2.5L 4-cylinder) almost always uses a chain, so check your engine code.
The Schedule
- Standard Interval: 105,000 miles.
- Reality Check: I’ve seen them last 120k, but I’ve also seen them stretch and throw the timing off by one tooth at 90k, causing a rough idle.
Technical Specifications: Nissan VQ35DE
The VQ engine is a masterpiece of aluminum casting, but it can be tight to work on.
- Tensioner: These utilize a hydraulic tensioner and a separate tensioner arm.
- Critical Wear Item: The tensioner pivot bolt. If the threads in the block are weak (a known issue on some models), the tensioner can rip out. I always check thread condition.
- Torque Specs: Camshaft sprocket bolts are usually **65 ft-lbs**. The crank bolt is substantial—often requiring **227 ft-lbs** or more.
Tools & Materials List
Must-Have Tools (Priority High)
- Breaker Bar (1/2″ drive): Minimum 18 inches. You need leverage for the crank pulley bolt.
- Torque Wrench (1/2″ drive): Capable of 250 ft-lbs. Do not guess these bolts.
- Socket Set: Deep and shallow sockets (10mm, 12mm, 14mm, 17mm, 19mm). 6-point are preferred to avoid rounding.
- Belt Tensioner Tool: A specialized pry bar tool for Honda tensioners makes life 100% easier.
- Jack & Jackstands: Safe access to the crank pulley is usually required from underneath.
Nice-to-Have Tools
- Impact Gun: Saves time on crank bolts, but use with caution.
- Camshaft Locking Tool: Some engines require specific alignment pins (Nissan/Kia/Hyundai).
- Serpentine Belt Tool: For removing the accessory drive belts first.
Step-by-Step Replacement Guide (General Procedure)
While every model is slightly different, the logic is identical across Japanese cars. This is a “Moderate to Difficult” DIY job. It requires patience.
Phase 1: Access (1 Hour)
Disconnect Power. Disconnect the negative battery terminal.
Remove Accessories. Remove the engine covers, air intake tube, and serpentine drive belts. On Hondas, you usually have to remove the passenger side engine mount to get the cover off.
Remove Covers. Remove the upper and lower timing belt covers. Usually 10mm bolts. Keep them organized; they are different lengths.
Phase 2: Alignment & Removal (1.5 Hours)
Set TDC. Rotate the crankshaft pulley clockwise until the timing marks align. You want the Top Dead Center (TDC) mark on the crank pulley to align with the 0 on the cover.
Verify Cam Timing. Pull the spark plug #1 so it turns easier. Look at the camshaft sprockets. They should have marks pointing straight up or towards each other depending on the model. If they aren’t aligned, rotate the crank another full turn.
Lock It Down (Optional). Once aligned, take a photo. Then, some mechanics use a vice grip or specialized cam lock tool to prevent the cams from snapping shut when the belt tension is released.
Remove Belt. Loosen the tensioner bolt, push it off, and tighten it back to keep it out of the way. Slide the belt off.
Phase 3: Component Swap (1 Hour)
Water Pump. Unbolt the water pump. Clean the gasket surface until it’s spotless. Use a razor blade if needed, but don’t gouge the aluminum. Install the new pump and gasket with RTV silicone in the corners (per OEM specs). Torque to spec.
Tensioner/Idlers. Replace the belt tensioner and idler pulleys. Spin them by hand—they should be silent and smooth. If they grind or wobble, replace them.
Phase 4: Installation (2 Hours)
Install Belt. Route the new belt. This is the tricky part. The belt must be tight on the non-tensioned side (between the crank and exhaust cam).
Recheck Marks. Before releasing the tensioner, triple-check your marks. I have found myself off by one tooth countless times because the belt tension pulled it slightly. It’s better to fix it now than after the covers are on.
Apply Tension. Release the tensioner pin. If it’s a manual tensioner, use a breaker bar to set deflection. If it’s auto, just let it spring.
Rotate Engine. Hand-crank the engine (using the crank bolt) two full turns clockwise. Stop at TDC. Check the marks again. If they line up perfectly, you won the lottery. If they moved, the belt jumped. Reset and try again.
Reassemble. Put covers, belts, and mounts back on. Torque the crank pulley bolt to spec (usually **181 ft-lbs** for Honda, **250 ft-lbs** for Toyota V6).
Troubleshooting Common Problems
Symptom: Squealing After Installation
Cause: You likely tightened a pulley bolt too tight or not tight enough, or you put the serpentine belt on wrong.
Fix: Use a stethoscope or a long screwdriver to your ear to locate the noise. It’s usually the new tensioner settling in, but if it screams after 100 miles, replace it.
Symptom: Rough Idle or Check Engine Light (P0300 / P0011)
Cause: The cam timing is off by one tooth.
Fix: There is no shortcut here. You have to take the covers off and do the belt installation again. I’ve seen this happen when people don’t rotate the engine twice to verify before buttoning it up.
Cost Analysis: DIY vs. Professional
| Scenario | Estimated Cost | Details |
|---|---|---|
| DIY Parts Only | $100 – $250 | Aisin or Gates kit (includes belt, pump, tensioner). Prices vary by engine size. |
| DIY + Tools | $400 – $600 | If you need to buy a torque wrench and breaker bar. |
| Independent Shop | $600 – $900 | Includes labor and parts. Generally the best value for reliability. |
| Dealership | $900 – $1,400+ | Includes OEM parts and factory-trained techs. High markup on parts. |
Frequently Asked Questions
What happens if a timing belt breaks while driving?
If you have an interference engine (which most Hondas/Toyotas/Nissans do), the pistons will hit the valves, destroying the cylinder head. If the car is off and the belt breaks, you’re just stranded. If the engine is running, you’re looking at a major engine rebuild or replacement.
Do I really need to change the water pump at the same time?
Yes. Yes, you do. The water pump is located behind the timing belt. To replace the water pump later, you have to do the entire timing belt job all over again. The labor is free since you’re already there. It makes zero financial sense not to.
Can I reuse the old timing belt tensioner?
Never. Hydraulic tensioners lose pressure over time, and spring-loaded ones fatigue. Reusing an old tensioner is the number one cause of belt failure within 10,000 miles of a service.
Is this job safe for a beginner DIYer?
It depends on your confidence level. If you know how to change brakes and oil, this is the next step up. It requires patience and attention to detail. If you skip the “rotate engine twice” check, you can ruin the engine. If you aren’t 100% sure, hire a pro.
Conclusion
Tackling a japanese car timing belt job is a rite of passage for any serious DIY mechanic. It separates the weekend oil-changers from the true enthusiasts. The specifications are tight, the space is cramped, and the consequences of failure are high. But with the right tools—specifically a high-quality torque wrench and a breaker bar—and a healthy respect for the timing marks, it is entirely achievable.
Whether you are working on a reliable old Camry or a high-revving V6 Honda, the principles remain the same. Check the marks, replace the pump, and torque the bolts. You’ll save a grand in labor and earn the satisfaction of keeping your car on the road for another 100,000 miles. Just remember: when that crank bolt finally breaks loose and you let out that sigh of relief, make sure the transmission is in Park and the parking brake is set.