
Your brake pedal feels soft. You pump it once, twice—still not firm. What’s going on?
Brake fluid moisture contamination is likely the culprit. Even a tiny 2% water content can drop your brake fluid’s boiling point by 50%. That means vapor lock, spongy brakes, and a serious safety risk.
Let’s break down the problems, how to test for them, and—most importantly—how to fix it for good.
Why Does Brake Fluid Absorb Water?
Brake fluid is hygroscopic—it attracts and absorbs moisture from the air. This isn’t a flaw; it’s by design. The fluid pulls water in to prevent it from forming droplets that could freeze or boil in your brake lines.
But here’s the catch: DOT 3, DOT 4, and DOT 5.1 fluids all absorb water over time. DOT 5 (silicone-based) does not, but it’s not compatible with most vehicles. Most cars use DOT 3 or DOT 4, which start absorbing moisture the moment you open the bottle.
Insider Tip: Always buy brake fluid in sealed, single-use bottles. Once opened, it starts absorbing moisture from the air.
How Does Water in Brake Fluid Cause Problems?
Water in your brake fluid creates three major issues:
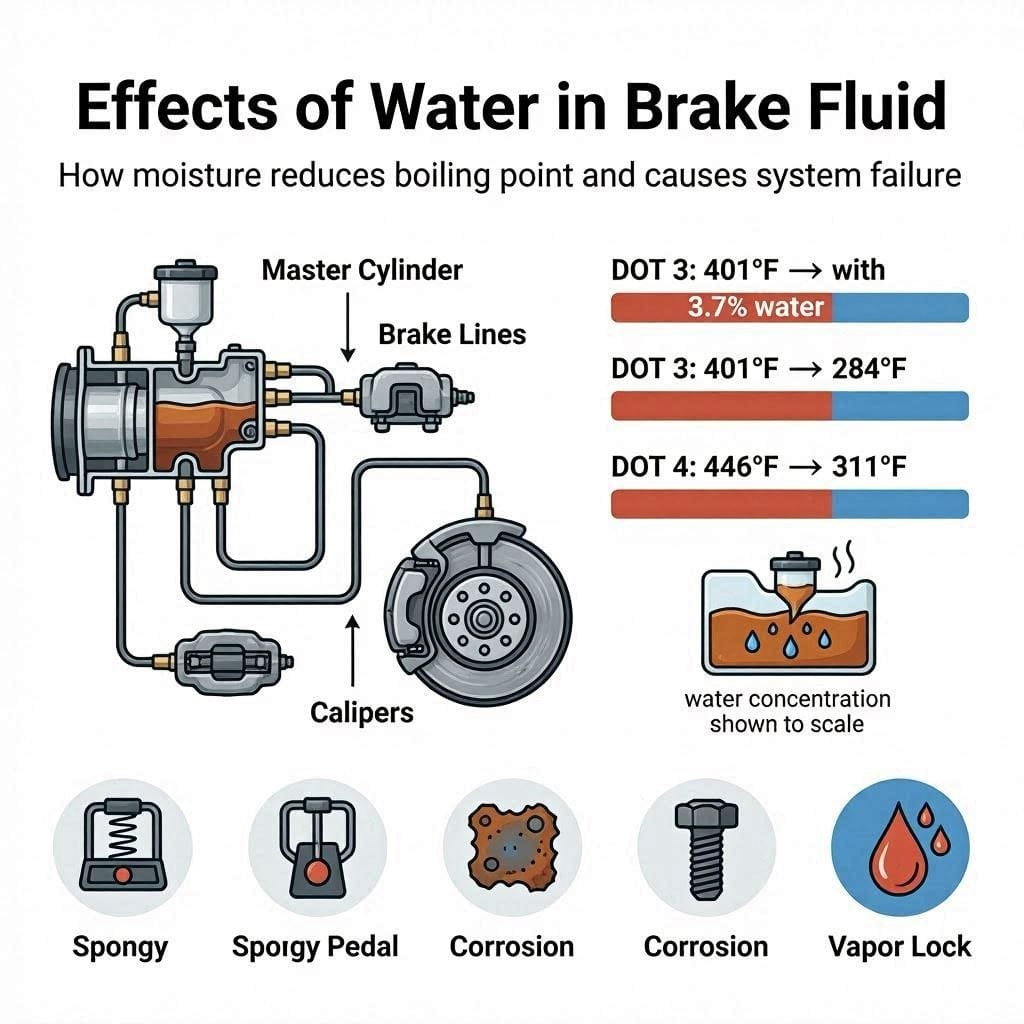
1. Lowers Boiling Point
Dry DOT 4 brake fluid boils at 446°F (230°C). Add just 3.7% water, and the boiling point drops to 284°F (140°C). Under hard braking, your fluid can boil, creating vapor bubbles. These bubbles compress instead of transferring force, leading to a spongy pedal.
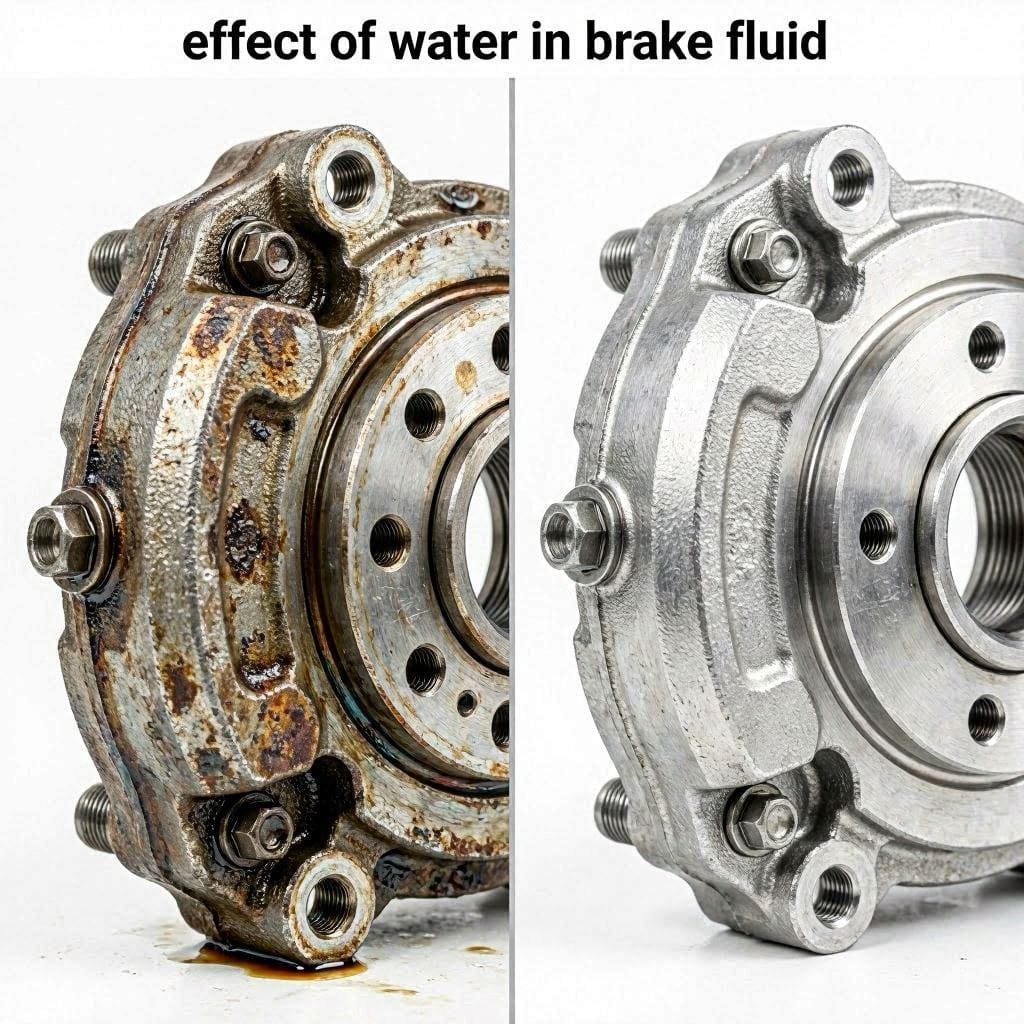
2. Causes Corrosion
Water reacts with metal components in your brake system. Over time, this leads to pitting in calipers, wheel cylinders, and brake lines. Rust particles can clog valves and damage seals.
3. Freezing in Cold Climates
In sub-zero temperatures, water in brake fluid can freeze. Ice crystals block brake lines, leading to partial or complete brake failure.
Common Mistake: Ignoring brake fluid color changes. Dark or murky fluid often means moisture contamination or debris buildup.
How to Test for Moisture in Brake Fluid
You don’t need a lab to check for water in your brake fluid. Here are three methods:
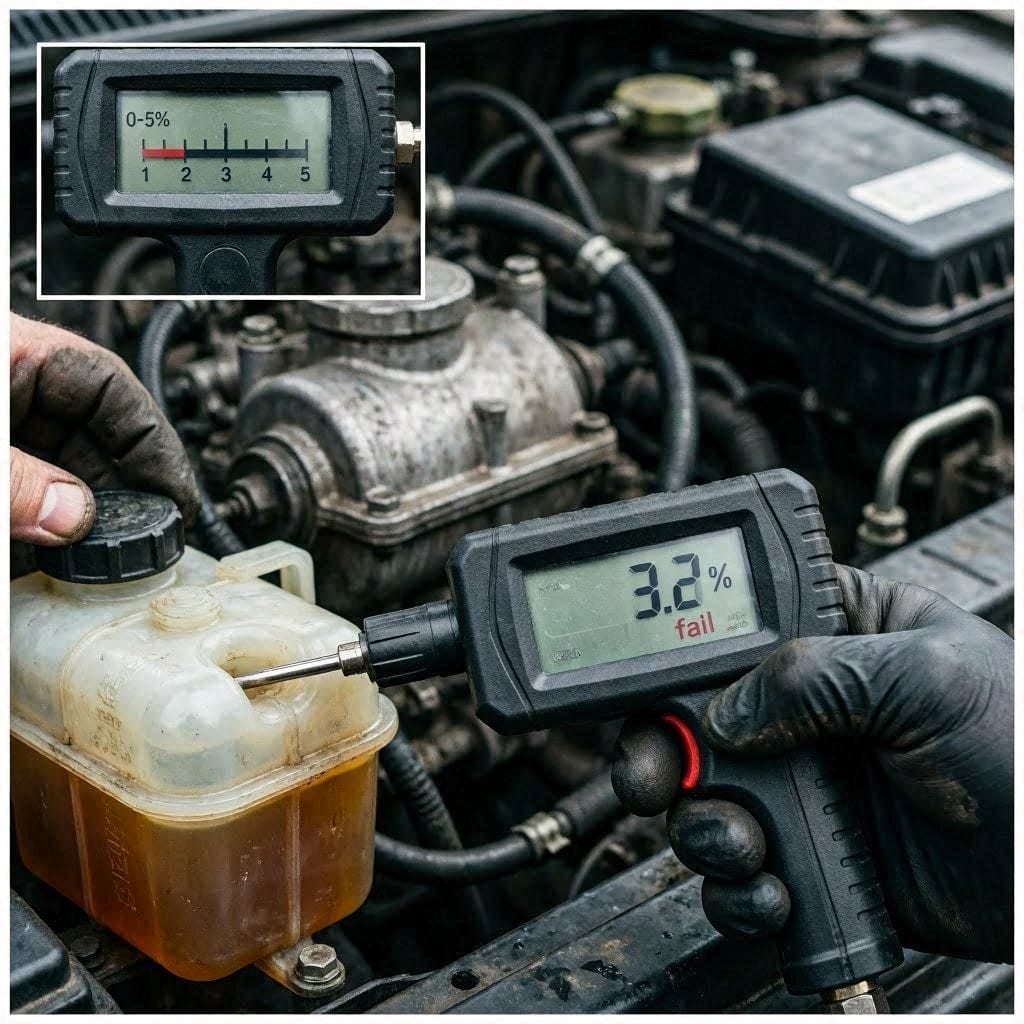
1. Use a Brake Fluid Tester
A digital brake fluid tester measures moisture content. Most testers use a probe you dip into the fluid reservoir or bleed screw.
- 0-1% water: Safe, but monitor.
- 2-3% water: Time for a flush.
- 4%+ water: Flush immediately.
Critical Hazard: Never reuse brake fluid from an open container. Even a few days of exposure can introduce enough moisture to compromise performance.
2. Check the Boiling Point
A brake fluid boiling point tester heats a sample and measures when it boils. Compare the result to your fluid’s dry boiling point (check your owner’s manual or fluid bottle).
- DOT 3: Dry BP 401°F (205°C), Wet BP 284°F (140°C)
- DOT 4: Dry BP 446°F (230°C), Wet BP 311°F (155°C)
- DOT 5.1: Dry BP 500°F (260°C), Wet BP 356°F (180°C)
If your fluid boils below the wet boiling point, it’s contaminated.
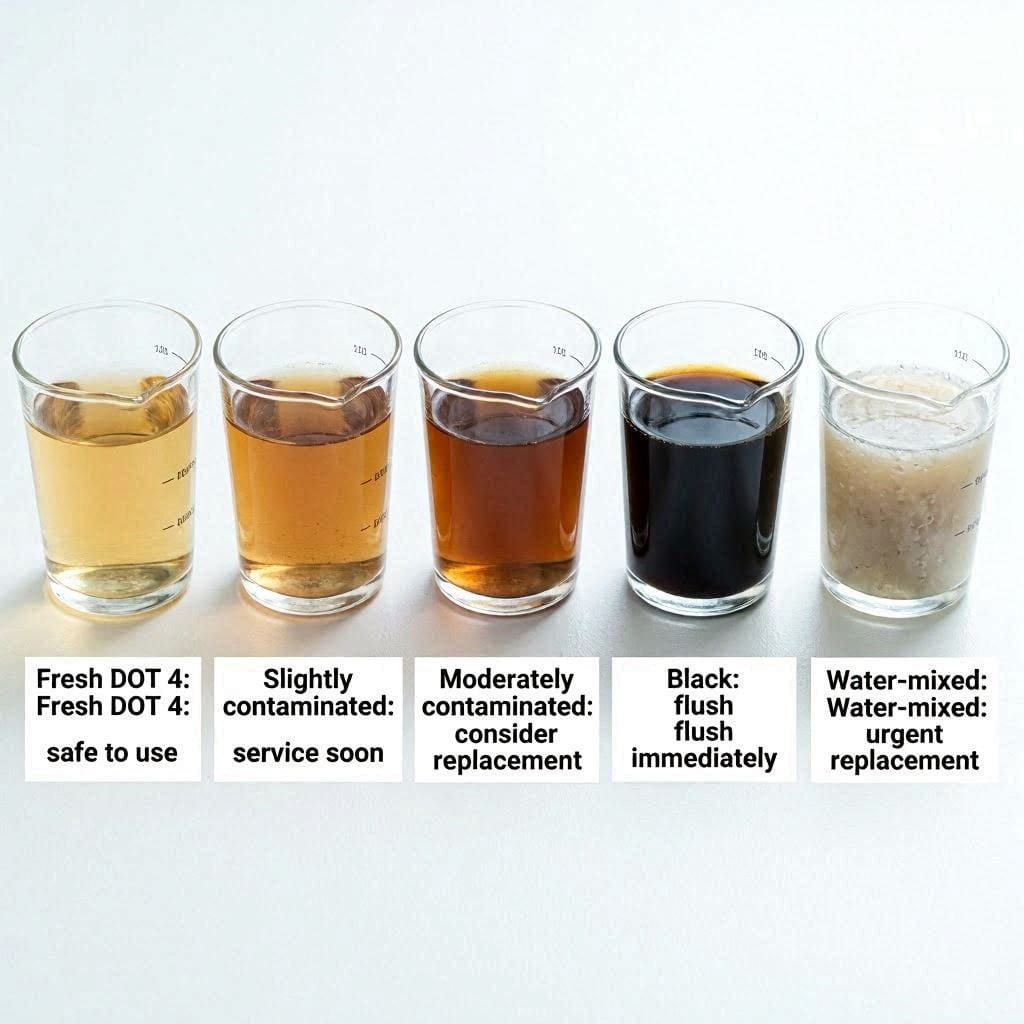
3. Visual Inspection
Fresh DOT 3 and DOT 4 fluid is clear to light amber. Over time, it darkens due to moisture and debris. If it looks dark brown or black, it’s past due for a change.
Pro Tip: Use a **white paper towel** to check fluid color. Dab a drop from the reservoir and compare it to a **brake fluid color chart**.
Brake Fluid Moisture Contamination Symptoms
Watch for these red flags:
- Spongy or soft brake pedal
- Pedal travels farther than usual
- Brakes feel weak or fade under hard use
- Brake warning light (if equipped with a moisture sensor)
- Visible rust or corrosion on brake components
How Often Should You Change Brake Fluid?
Most manufacturers recommend a brake fluid flush every 2 years or 30,000 miles, whichever comes first. But if you drive in humid climates or do a lot of towing or spirited driving, cut that interval in half.
| Service | Average Cost (USD) | Time Required |
|---|---|---|
| Brake Fluid Test | $10-$20 | 5 minutes |
| Brake Fluid Flush (DIY) | $20-$40 | 1-2 hours |
| Brake Fluid Flush (Shop) | $80-$150 | 30-60 minutes |
Step-by-Step: How to Flush Brake Fluid
Flushing brake fluid isn’t just about draining the old stuff. You need to remove all contaminated fluid and replace it with fresh, dry fluid. Here’s how:
Tools You’ll Need:
- 8mm or 10mm wrench (for bleed screws)
- Brake bleeder wrench
- Clear plastic tubing (1/4” ID)
- Drain pan
- Fresh brake fluid (check your owner’s manual for type)
- Brake fluid tester (optional but recommended)
- Jack and jack stands (or a lift)
- Brake bleeder kit (optional, for one-person bleeding)
Step 1: Prep the Vehicle
- Park on a level surface.
- Loosen the lug nuts on all wheels.
- Jack up the car and support it with jack stands.
- Remove all four wheels for easier access to bleed screws.
Critical Hazard: Never work under a car supported only by a jack. Always use **jack stands** rated for your vehicle’s weight.
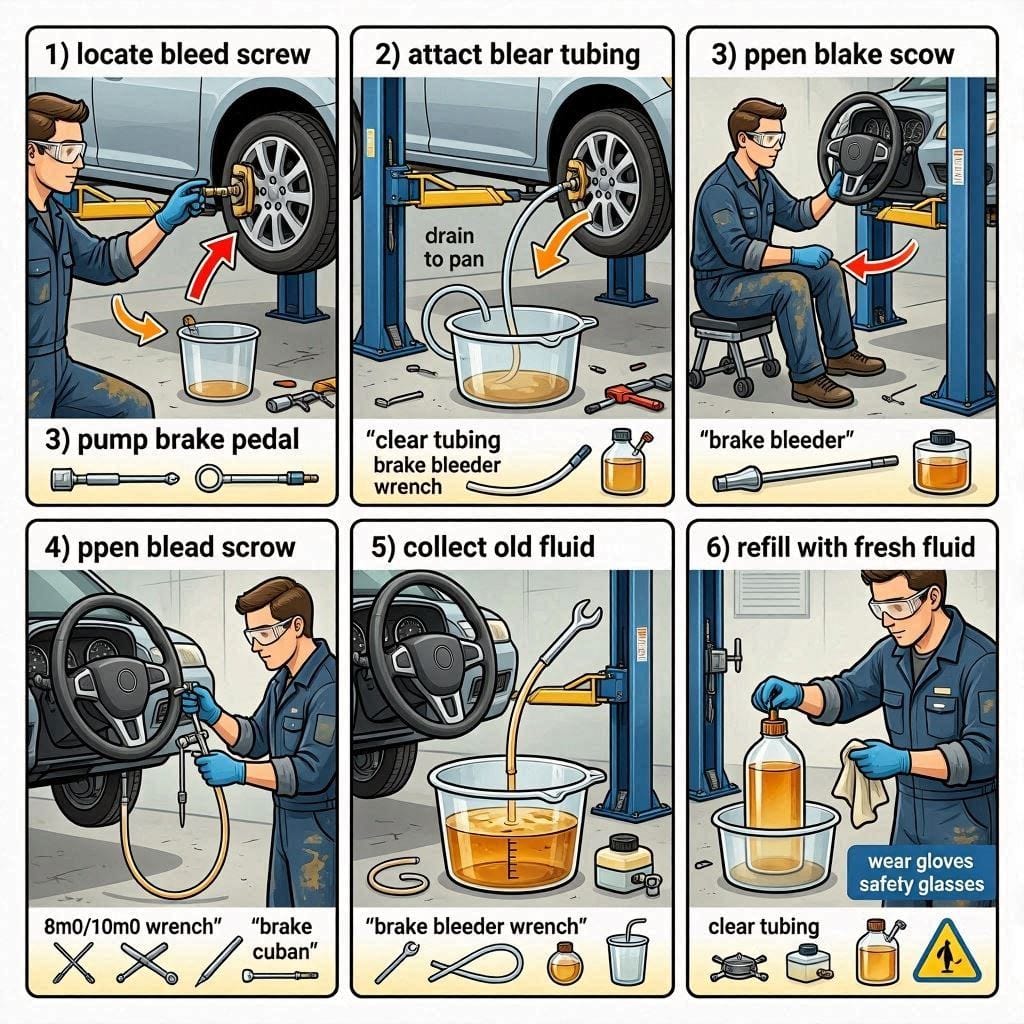
Step 2: Locate the Bleed Screws
- Find the bleed screw on each caliper or wheel cylinder. It’s usually on the back or top of the component.
- Clean the area around the bleed screw with brake cleaner to prevent dirt from entering the system.
Step 3: Start with the Wheel Farthest from the Master Cylinder
- On most vehicles, this is the rear passenger side.
- Attach the clear plastic tubing to the bleed screw and submerge the other end in the drain pan (filled with a little brake fluid to prevent air from entering the system).
Step 4: Bleed the Brakes
- Have an assistant pump the brake pedal 3-4 times, then hold it down.
- Open the bleed screw with the brake bleeder wrench. Fluid will flow through the tubing into the drain pan.
- Close the bleed screw before the pedal hits the floor.
- Repeat until clean, bubble-free fluid flows out.
- Move to the next wheel in this order:
- Rear passenger
- Rear driver
- Front passenger
- Front driver
Pro Tip: Use a **one-way valve** in your bleed line to prevent air from being sucked back into the system when the pedal is released.
Step 5: Top Off the Master Cylinder
- Check the master cylinder reservoir frequently. Never let it run dry, or you’ll introduce air into the system.
- Top off with fresh brake fluid as needed.
Step 6: Test the System
- After bleeding all four wheels, test the brake pedal. It should feel firm and responsive.
- Use a brake fluid tester to confirm moisture levels are below 2%.
Brake Fluid Types: Which One Should You Use?
Not all brake fluids are created equal. Here’s a quick comparison:
| Type | Dry Boiling Point | Wet Boiling Point | Absorbs Water? | Common Uses |
|---|---|---|---|---|
| DOT 3 | 401°F (205°C) | 284°F (140°C) | Yes | Older vehicles, standard braking |
| DOT 4 | 446°F (230°C) | 311°F (155°C) | Yes | Most modern cars, trucks, SUVs |
| DOT 5 | 500°F (260°C) | 356°F (180°C) | No | Classic cars, military vehicles |
| DOT 5.1 | 500°F (260°C) | 356°F (180°C) | Yes | High-performance vehicles, racing |
Insider Tip: **DOT 5** is silicone-based and doesn’t absorb water, but it’s not compatible with most vehicles. **Never mix DOT 5 with DOT 3, 4, or 5.1**—it can cause brake failure.
Can You Mix Brake Fluid Types?
Short answer: No.
Mixing DOT 3, DOT 4, or DOT 5.1 can lower the boiling point and reduce performance. DOT 5 (silicone) should never be mixed with any other type.
If you’re unsure what’s in your system, flush it completely and refill with the recommended fluid for your vehicle.
How to Prevent Moisture Contamination
Prevention is easier than fixing a problem. Follow these tips:
- Use sealed brake fluid bottles. Once opened, moisture starts getting in.
- Store brake fluid in a dry, cool place. Heat and humidity speed up contamination.
- Flush your brake fluid every 2 years or 30,000 miles. More often if you drive in humid or wet climates.
- Avoid spilling brake fluid on paint. It’s corrosive and can damage your car’s finish. If you spill, rinse immediately with water.
FAQs About Brake Fluid Moisture
1. How much water in brake fluid is too much?
Anything above 2% water content is cause for concern. At 3-4%, you should flush the system immediately. Most brake fluid testers will flag fluid at this level.
2. Can I drive with water in my brake fluid?
Technically, yes—but it’s not safe. Water lowers the boiling point, increasing the risk of vapor lock and brake fade. In cold climates, it can also freeze, blocking brake lines.
3. Does brake fluid go bad if unopened?
Unopened brake fluid has a shelf life of 2-3 years. After that, moisture can seep through the plastic bottle, contaminating the fluid. Always check the manufacture date before use.
4. What color should brake fluid be?
Fresh DOT 3 and DOT 4 fluid is clear to light amber. Over time, it darkens to brown or black due to moisture and debris. If your fluid looks milky or cloudy, it’s contaminated and needs flushing.
Conclusion
Brake fluid moisture contamination isn’t just a maintenance issue—it’s a safety hazard. Water in your brake fluid lowers its boiling point, causes corrosion, and can even lead to complete brake failure in extreme cases.
The good news? Testing and fixing it is straightforward. A $10 tester can tell you if your fluid is contaminated, and a DIY flush takes just a couple of hours. If you’re not comfortable doing it yourself, a shop can handle it for $80-$150.
Don’t wait until your brakes feel spongy. Check your fluid today, and if it’s been more than 2 years since your last flush, schedule one now. Your safety—and your passengers’—depends on it.
Got a brake fluid horror story? Or maybe a tip we missed? Drop it in the comments below!