
Your brakes feel fine — until they don’t. By the time you notice spongy pedal feel or longer stopping distances, your brake fluid may have been failing you for months.
Most drivers never think about brake fluid. Yet it’s the only thing standing between your foot and a full emergency stop. Neglecting it is one of the most common — and dangerous — mistakes I see in 15 years at the shop.
How Often Should You Change Brake Fluid?
Most vehicles need a brake fluid change every 2 years or 30,000 miles, whichever comes first. Manufacturer intervals vary. BMW specifies every 2 years regardless of mileage. Toyota and Honda recommend every 3 years or 45,000 miles. Always check your owner’s manual first.
Here’s the real problem: brake fluid absorbs moisture from the air. This is called hygroscopic absorption. Even a sealed system draws in water through rubber hoses and seals over time.
Fresh DOT 3 fluid has a dry boiling point of 401°F (205°C). With just 3.7% water content, that drops to 284°F (140°C). That’s brake fade territory on a hot downhill run.
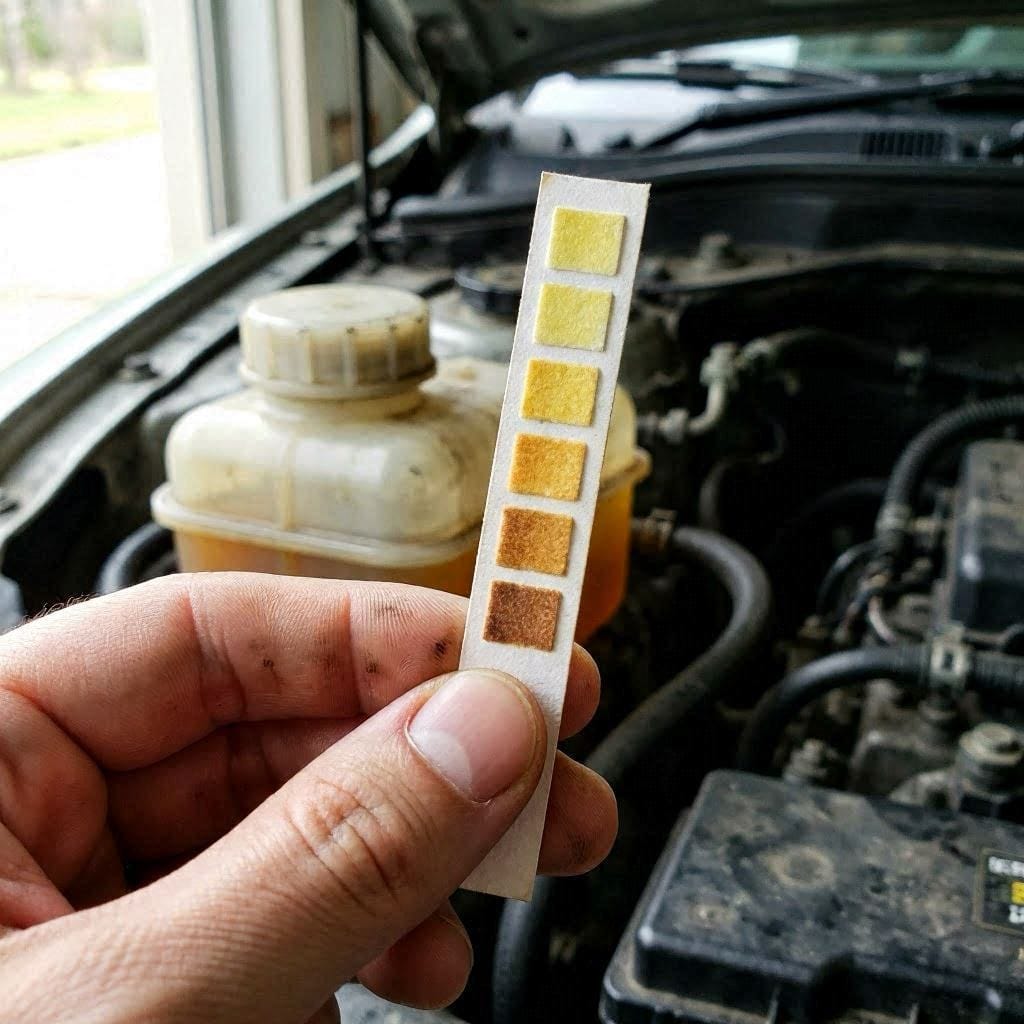
Insider Tip: Don’t just follow the calendar. Use a brake fluid test strip (such as Phoenix Systems BrakeStrip) to measure copper content in ppm. Above 200 ppm copper means your fluid is degrading your ABS module and calipers from the inside out.
What Are the Signs of Old or Bad Brake Fluid?
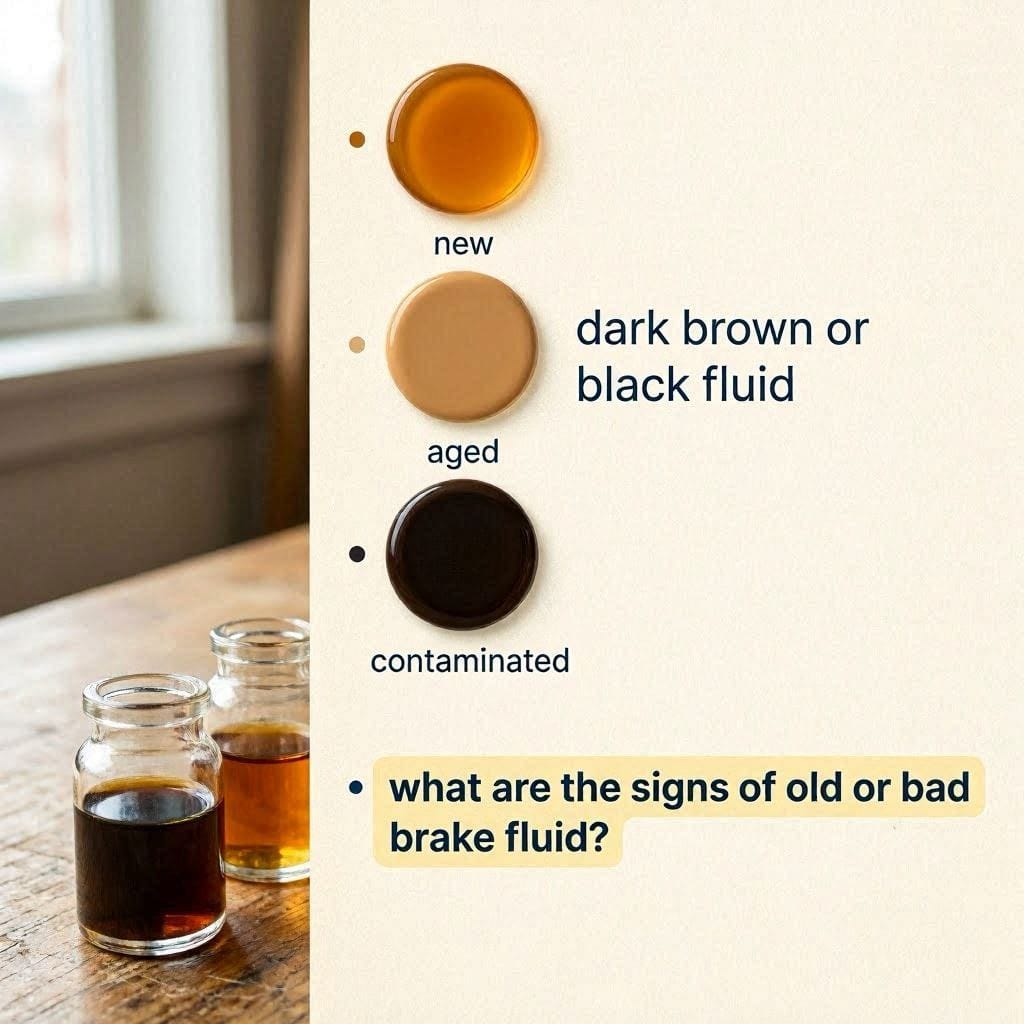
Old brake fluid shows clear warning signs: a spongy pedal, dark brown fluid color, longer stopping distances, and a burning smell after hard braking. These symptoms mean the fluid’s boiling point has dropped dangerously. Don’t ignore them.
Here’s what each sign actually means:
Spongy or soft brake pedal — Water in the fluid creates vapor bubbles under heat. Vapor compresses; fluid doesn’t. Your pedal sinks before brakes engage.
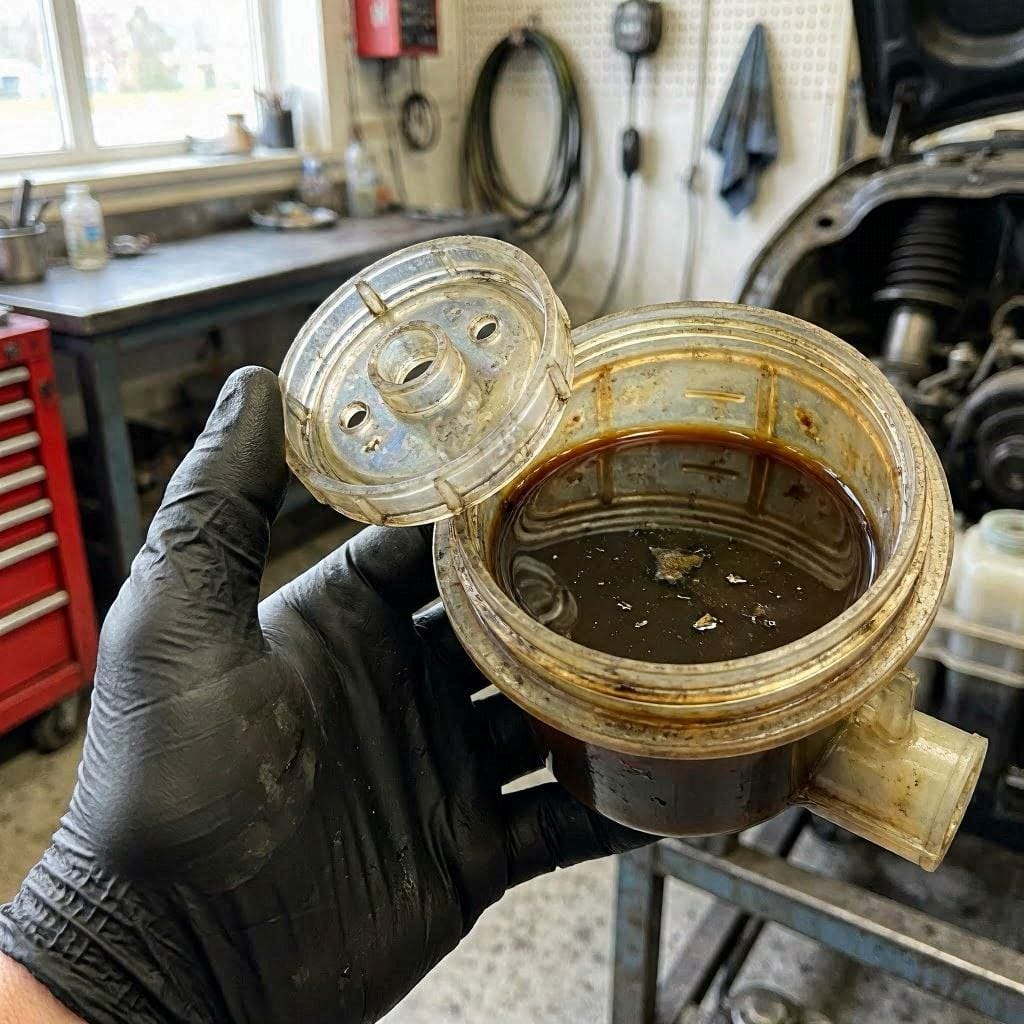
Dark brown or black fluid — Fresh brake fluid is clear to light yellow. Dark fluid means oxidation and metal particle contamination. This is a direct sign of a fluid color meaning problem.
Burning smell after braking — Fluid is boiling in the caliper. Immediate danger. Pull over safely.
ABS or brake warning light — Contaminated fluid corrodes ABS sensors and the hydraulic control unit. Repair bills run $800–$2,500 if left too long.
Common Mistake: Topping off the reservoir fixes nothing. Adding fresh fluid to degraded fluid does not restore the boiling point. A full flush is the only fix.
What Type of Brake Fluid Does My Car Need?
The correct brake fluid type is stamped on the reservoir cap. Most passenger cars use DOT 3, DOT 4, or DOT 5.1 — never mix DOT 5 silicone fluid with glycol-based fluids.
Here’s a quick comparison of the most common types:
| Fluid Type | Dry Boiling Point | Wet Boiling Point | Common Use |
|---|---|---|---|
| DOT 3 | 401°F (205°C) | 284°F (140°C) | Older domestic cars |
| DOT 4 | 446°F (230°C) | 311°F (155°C) | Most modern vehicles |
| DOT 5.1 | 500°F (260°C) | 356°F (180°C) | Performance/tow vehicles |
| DOT 5 | 500°F (260°C) | 356°F (180°C) | Classic cars, silicone-based |
DOT 4 is backward compatible with DOT 3. You can top off a DOT 3 system with DOT 4. Never use DOT 5 in an ABS-equipped vehicle. DOT 5 is silicone-based and does not mix with glycol fluids.
Insider Tip: Performance drivers and those who tow heavy loads should upgrade to DOT 5.1. It has a much higher wet boiling point — critical when brakes work overtime. Cost difference is minor: roughly $8–$15 more per quart.
How Do You Check Brake Fluid at Home?
Checking brake fluid takes under two minutes. Look at the reservoir level, inspect the color, and use a test strip for accurate moisture content readings.
Here’s exactly how to do it:
Step 1 — Locate the reservoir. It sits on top of the master cylinder, near the firewall on the driver’s side. It’s a small translucent plastic container.
Step 2 — Check the level. Fluid should sit between the MIN and MAX lines. Low fluid can mean a leak or worn brake pads (pistons push out, drawing fluid down).
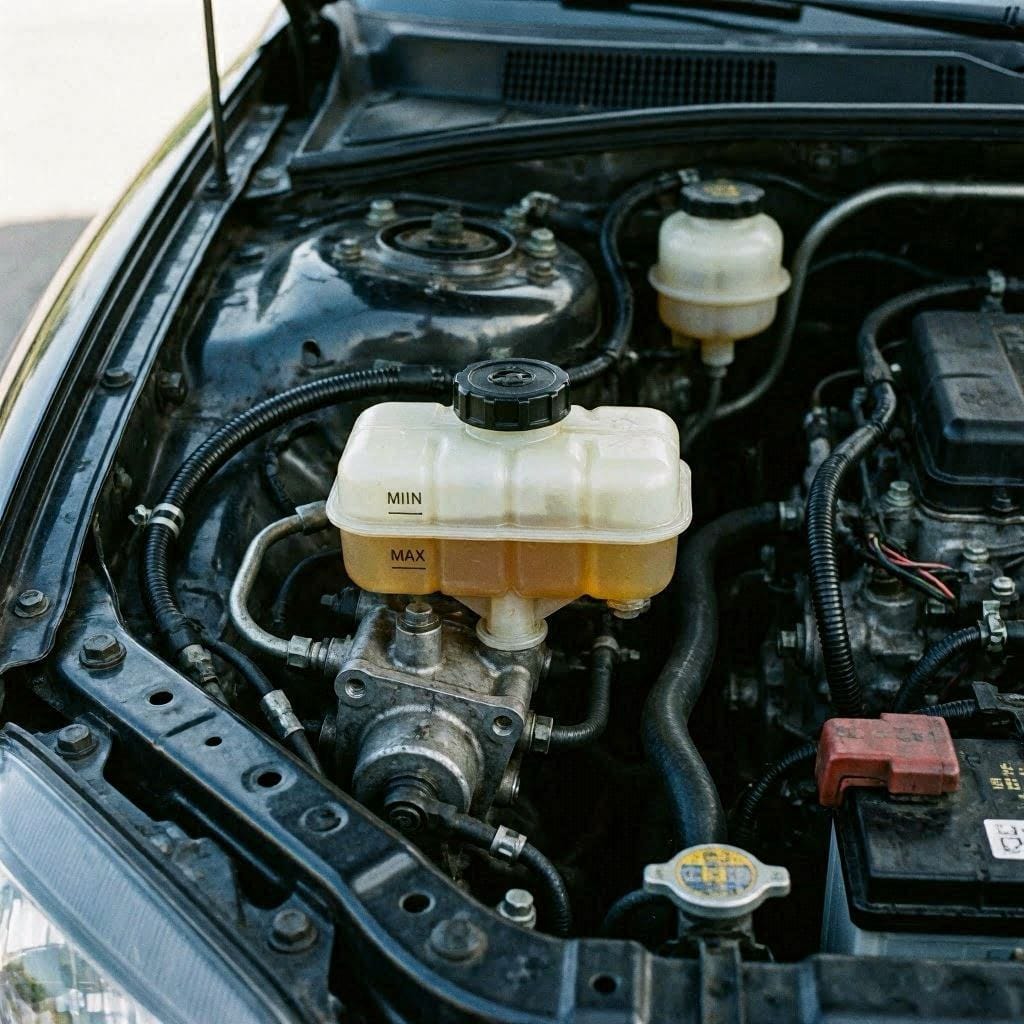
Step 3 — Check the color. Clean fluid is clear to pale yellow. Brown means moderate degradation. Black means replacement is overdue.
Step 4 — Test for moisture. Dip a Phoenix Systems BrakeStrip test strip for one second. Read results at 60 seconds. Above 200 ppm copper = replace fluid.
Critical Safety Note: Never open the reservoir near an open flame. Brake fluid is highly flammable. Work in a ventilated area. Brake fluid destroys paint on contact — keep a rag handy and wipe spills immediately with water.
How to Flush Brake Fluid: Step-by-Step DIY Guide
A DIY brake flush requires basic tools, a helper, and about 45–60 minutes. Bleeding all four corners completely replaces the old fluid with fresh fluid.
Tools You’ll Need
- 12mm box-end wrench (for bleeder screws on most vehicles)
- Clear vinyl tubing (¼ inch inner diameter)
- Catch bottle (500ml minimum)
- 1 liter of correct DOT fluid (DOT 4 for most vehicles)
- Turkey baster or fluid transfer pump
- Nitrile gloves
Steps
Step 1 — Prep the reservoir. Use a turkey baster to remove old fluid from the master cylinder reservoir. Refill with fresh fluid to the MAX line.
Step 2 — Start at the wheel farthest from the master cylinder. On most cars, that’s the right rear wheel. Work in this order: right rear → left rear → right front → left front.
Step 3 — Attach the vinyl tubing to the bleeder screw. Place the other end in your catch bottle. Keep the tube submerged in a small amount of fresh fluid to prevent air from sucking back.
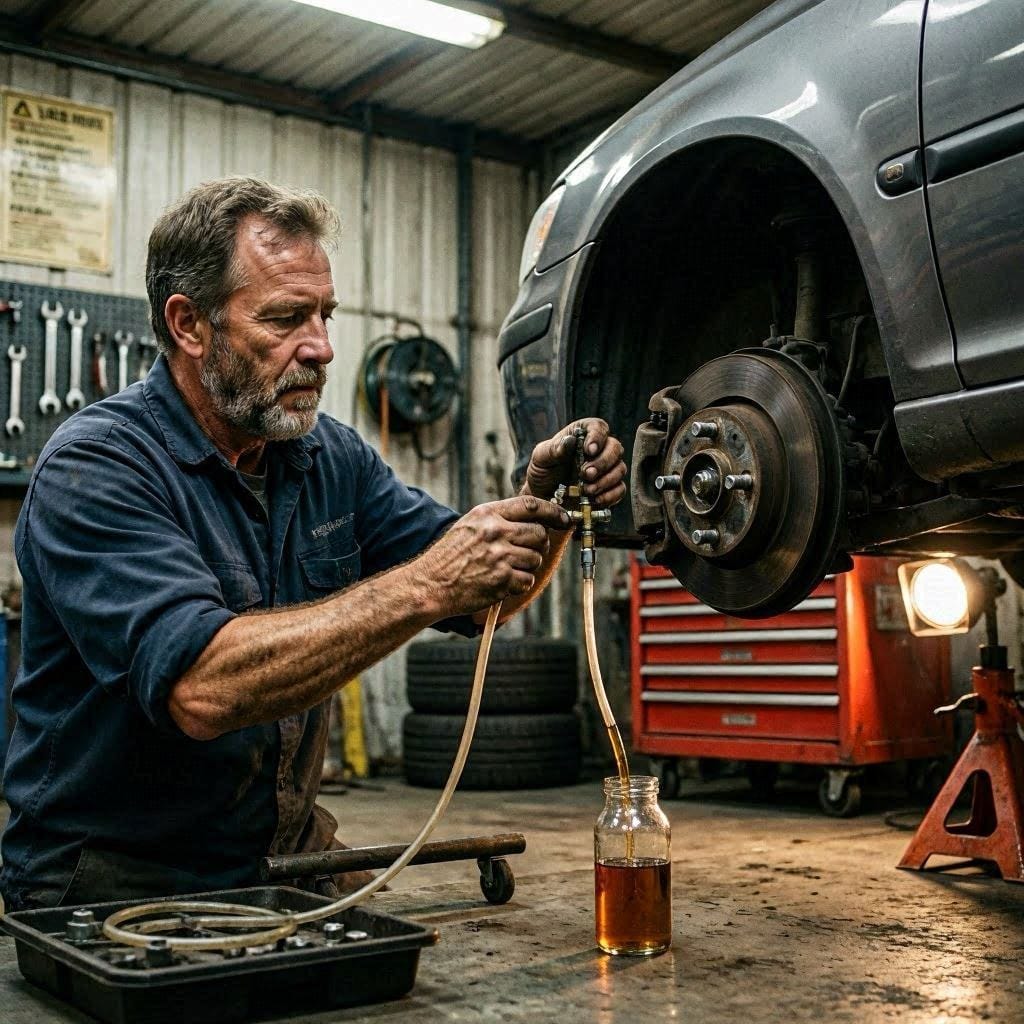
Step 4 — Have a helper pump the pedal three times, then hold it down. Open the bleeder screw ¼ turn with the 12mm wrench. Old fluid will push through. Close the screw before the pedal reaches the floor.
Step 5 — Repeat until the fluid running through the tube is clear. That typically takes 4–6 pumps per corner.
Step 6 — Top off the reservoir after each wheel. Never let it run dry. Air in the system means a complete re-bleed.
Step 7 — Torque bleeder screws to 7–10 ft-lbs. Over-tightening cracks the bleeder screw nipple.
Pro Tip: Use a one-man brake bleeder kit (such as the Motive Products Power Bleeder — around $50–$70). It pressurizes the reservoir so you can bleed solo. Saves time. Prevents air ingestion from pedal pumping errors.
What Does Brake Fluid Replacement Cost at a Shop?
Professional brake fluid replacement costs between $80 and $180 at most shops. Dealerships charge more. Independent shops are typically cheaper for the same quality job.
cost-breakdown
| Service Type | Estimated Cost |
|---|---|
| DIY fluid flush (parts only) | $15–$30 |
| Quick lube / chain shop | $80–$120 |
| Independent mechanic | $90–$150 |
| Dealership service center | $130–$180 |
| ABS module replacement (if neglected) | $800–$2,500 |
The DIY route saves real money. The brake fluid itself costs $8–$20 per quart. Most vehicles need 1–1.5 liters for a full flush. Tools are reusable for every future service.
Insider Tip: Some shops offer brake fluid flushes as part of a brake pad replacement. Always ask. If they’re already at the wheels, the labor cost is minimal. Bundle it — you’ll save $40–$60 compared to a separate visit.
Does Brake Fluid Go Bad Sitting in a Sealed Bottle?
Unopened brake fluid in a sealed metal can stays good for up to 5 years. Once opened, use it within 12 months — exposure to air begins moisture absorption immediately.
This matters for DIYers who buy a quart and use half. That open plastic bottle in your garage is absorbing humidity right now. By summer, moisture in fluid can already be high enough to lower its boiling point.
Store brake fluid in a tightly sealed metal container, not the original plastic bottle after opening. Keep it in a cool, dry location away from sunlight. Label it with the opening date.
Never use brake fluid from an unsealed container that’s been sitting for over a year. The cost of a new quart is $8–$20. The cost of a boiling brake system at highway speed is immeasurable.
Frequently Asked Questions
Q: Can I mix DOT 3 and DOT 4 brake fluid? Yes, DOT 4 is compatible with DOT 3 in glycol-based systems. Mixing them will not cause damage, but the resulting mixture will only perform as well as the lower-rated fluid. For best results, do a full flush rather than topping off.
Q: What happens if I don’t change brake fluid? Moisture accumulation lowers the boiling point. Under hard braking, the fluid boils, creates vapor, and causes brake fade or complete pedal loss. Long-term, water corrodes calipers, wheel cylinders, and ABS components. Repair costs far exceed a simple fluid flush.
Q: How do I know if my brake fluid has too much moisture? The most accurate method is a copper content test strip. Above 200 ppm copper indicates corrosion is active. A refractometer can also measure moisture percentage directly. Anything over 3% water content demands immediate fluid replacement.
Q: Is brake fluid flush the same as brake bleeding? Not exactly. Bleeding removes air bubbles from the lines. A flush replaces all old fluid with new fluid. A proper flush also bleeds the system, but the goal is fluid replacement, not just air removal. Always perform a full flush, not just a quick bleed.
Conclusion
Brake fluid is cheap. Brake failure is not. Changing brake fluid on the correct schedule — every 2 years or 30,000 miles for most vehicles — protects your ABS system, your calipers, and most importantly, your ability to stop.
Watch for the warning signs: spongy pedal, dark fluid, burning smell after heavy braking. Don’t wait for the brake warning light. By then, corrosion has already started inside your hydraulic system.
A DIY flush takes under an hour and costs under $30. A shop flush runs $80–$180. A neglected system can cost thousands in ABS module and caliper replacements — or worse, a collision because your brakes faded at the worst possible moment.
Check your fluid color today. Buy a test strip this week. If the fluid is brown, dark, or the strip reads above 200 ppm, schedule the flush now. Your brakes are the single most important safety system on your vehicle. Treat them that way.