
It was a Tuesday morning in late October—chilly enough that my breath fogged as I walked into the shop, but not so cold that the old-timers stopped showing up with their project cars. That’s when Earl rolled in with his 1972 *Chevy C10*, coughing like it had pneumonia. “Runs fine for ten minutes, then dies like someone flipped a switch,” he said, wiping grease off his forehead with a rag that had seen better decades.
I popped the hood, gave the carb a sniff—raw fuel, rich as sin—and knew before I even pulled the air cleaner off. The accelerator pump diaphragm was shot, and the needle-and-seat was leaking like a sieve. Total parts cost? Under $30. Labor at a shop? Probably $250. But Earl didn’t want to pay that. He wanted to learn. And honestly? That’s the kind of customer who reminds me why I’ve spent 18 years turning wrenches.
If you’re reading this, you’re probably like Earl: hands-on, budget-conscious, and tired of throwing money at mechanics for something you can fix yourself. Good news—you absolutely can. With the right carburetor rebuild kit, a few hours, and some patience, you’ll bring that stumbling, sputtering engine back to life. I’ve rebuilt hundreds of carbs—from Holley double-pumpers on muscle cars to Weber downdrafts on vintage Alfa Romeos—and I’ll walk you through exactly what you need, how to do it right, and which kits actually hold up.
Why You Need a Carburetor Rebuild Kit (And When It’s Time)
Carburetors don’t fail all at once. They degrade. Ethanol-laced modern fuel eats rubber components. Moisture condenses in idle bowls. Dirt sneaks past air filters. Over time, gaskets harden, floats crack, and tiny passages clog. Symptoms creep in:
- Hard starting (especially when hot)
- Rough idle or stalling
- Fuel dripping from the venturi
- Poor acceleration or hesitation
- Black smoke from the exhaust
Before you tear into the carb, rule out simpler issues. Check ignition timing, vacuum leaks, and fuel pressure. Learn about carburetor cleaning first—sometimes a deep soak in Berryman Chem-Dip is all you need. But if internal components are worn or leaking, a full carb rebuild is the only real fix.
Choosing the Right Carburetor Kit
Not all kits are created equal. A mismatched kit leads to frustration, leaks, or worse—engine damage from improper fuel mixture. Here’s how to pick the right one:
Match by Exact Carburetor Model
Look for the model number stamped on the carb body. Common examples:
- Holley: 4150, 4160, 1904, 2300 (e.g., Holley 0-80457S = 600 CFM Street HP)
- Edelbrock: Performer Series 1405, 1406; Thunder Series AVS2
- Weber: 32/36 DGV, 38 DGES, 40 DCOE
- Rochester: Quadrajet (4MV), 2GC, Monojet
Never guess. A Holley 4150 rebuild kit won’t fit a 4160—they share similar looks but different metering blocks and gasket sets.
Top Brands & Part Numbers
| Brand | Carb Type | Recommended Kit | Price Range |
|---|---|---|---|
| Holley | 4150/4160 | Holley 37-119 (basic), 37-1540 (premium w/ ethanol-resistant parts) | $25–$55 |
| Edelbrock | 1405/1406 | Edelbrock 1481 (includes ethanol-safe needle & seat) | $30–$45 |
| Weber | 32/36 DGV | Redline Weber 32/36 Rebuild Kit (includes jets, gaskets, O-rings) | $40–$60 |
| Reproduction | Quadrajet | Classic Performance QJ-100 (OEM-spec gaskets, Viton seals) | $35–$50 |
Pro tip: If you run ethanol-blended fuel (E10 or higher), insist on kits with **Viton or nitrile rubber** components. Standard rubber swells and disintegrates in ethanol. Holley’s “Premium” kits and Edelbrock’s current offerings already include these—but cheap eBay kits often don’t.
Tools & Materials List
Must-Have Tools
- Socket set (¼” drive, including 7/16″, ½”, 9/16″)
- Screwdrivers (flathead #2, Phillips #2, and a small jewelers’ set for air bleeds)
- Needle-nose pliers (for float pin removal)
- Carb cleaner spray (CRC Gunk or Berryman B-12)
- Compressed air (or canned air) for blowing out passages
- Torque wrench (¼” drive, 20–100 in-lbs range)
- Small containers (for organizing screws and jets)
Nice-to-Have (But Not Essential)
- Ultrasonic cleaner ($80–$150 on Amazon – worth it if you do this often)
- Float level gauge (many kits include a template)
- Digital calipers (to verify float drop)
Estimated tool investment: $0 if you already have basics; $50–$100 if buying new. Most items are available at AutoZone, O’Reilly, or Amazon Prime.
Safety First: Critical Warnings
Step-by-Step Carburetor Rebuild Guide
Note: This guide covers a generic 4-barrel square-bore carb (e.g., Holley 4150 or Edelbrock 1406). Weber sidedrafts and Rochester Quadrajets have unique steps—always consult your service manual.
Remove the Carburetor Safely
Time: 20–30 minutes
Tools: Socket set, drip pan, rags
Disconnect the battery. Remove the air cleaner. Label and disconnect all linkages (throttle, choke, kickdown), vacuum lines, and fuel line. Place a drip pan under the fuel inlet. Unbolt the carb from the intake manifold (usually 4 bolts, ½” head). Lift straight off—don’t twist.
[Photo: Labeled carburetor with arrows pointing to throttle linkage, vacuum ports, and fuel inlet]
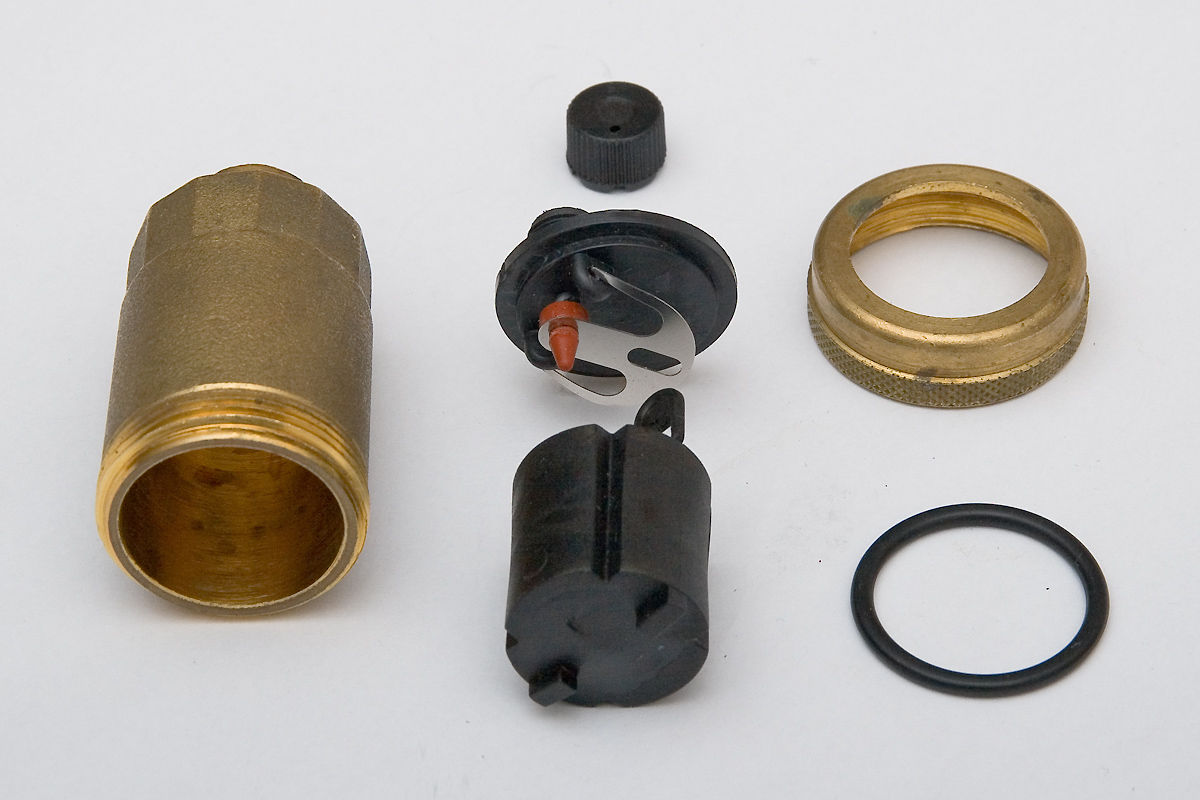
Disassemble Methodically
Time: 30–45 minutes
Pro Tip: Take phone photos at each stage. Lay parts on a clean towel in assembly order.
- Remove the fuel bowl(s) – usually 4–6 screws per side.
- Extract the float, needle, and seat. Note float orientation.
- Remove metering block(s) and accelerator pump assembly.
- Unscrew idle mixture screws (count turns to bottom—usually 1.5–2.5 turns out).
- Remove all jets, air bleeds, and check balls. Keep them in labeled containers.
Never force stuck parts. Soak in cleaner first.
Clean Every Component
Time: 45–60 minutes
Spray all metal parts with carb cleaner. Use a soft brass brush on castings—never steel wool (it leaves conductive particles). Blow out every passage with compressed air: main wells, idle circuits, accelerator pump channels. Pay special attention to the tiny idle feed restrictors—they clog easily.
Soak gasket surfaces in cleaner, then wipe with a plastic scraper. Never use a metal scraper—you’ll gouge the sealing surface and cause vacuum leaks.
For stubborn deposits, submerge in Berryman Chem-Dip for 20–30 minutes. Rinse with hot water, then dry thoroughly with compressed air.
Install New Components from Your Kit
Time: 30–45 minutes
Follow the kit instructions, but general rules apply:
- Replace all gaskets and O-rings—even if they look okay.
- Install the new needle-and-seat finger-tight, then snug with a wrench (do not overtighten—brass strips easily).
- Lubricate the accelerator pump diaphragm with a drop of clean engine oil before installation.
- Set float level per spec (e.g., Holley: 15/32″ dry; Edelbrock: 7/16″). Use the gauge provided or a drill bit of correct size.
[Diagram: Float level measurement showing distance from gasket surface to top of float]
Reassemble and Torque Properly
Time: 20–30 minutes
Reinstall jets, metering blocks, and accelerator pump. Tighten fuel bowl screws in a criss-cross pattern to **35–45 in-lbs** (not ft-lbs!). Overtightening cracks the aluminum bowls. I’ve seen it happen more times than I can count.
Reset idle mixture screws to factory baseline (e.g., Holley: 1.5 turns out; Edelbrock: 1.25 turns). You’ll fine-tune later using our carb tuning guide.
Reinstall and Test
Time: 20 minutes
Bolt carb to intake (torque to **25–30 in-lbs**). Reconnect fuel line, linkages, and vacuum lines. Prime the system by pumping the throttle 3–4 times (activates accelerator pump). Start the engine and check for leaks. Let it warm up, then adjust idle speed and mixture.
If the engine floods, the float is likely set too high. If it hesitates on acceleration, the accelerator pump may be misadjusted or the shooter size wrong.
Troubleshooting Common Post-Rebuild Issues
Even with a perfect rebuild, things can go sideways. Here’s what I see most often in the shop:
- Problem: Engine floods immediately after startup.
Check: Float level too high, or needle-and-seat not sealing. Verify float isn’t gas-logged (shake it—if it sloshes, replace it). - Problem: Hesitation or flat spot when accelerating.
Check: Accelerator pump diaphragm torn, or pump cam installed incorrectly. Ensure pump arm has zero preload at idle. - Problem: Rough idle or vacuum leak.
Check: Base gasket missing or misaligned. Spray carb cleaner around base—if RPM changes, you’ve got a leak. - Problem: Fuel dripping from boosters.
Check: Float level way too high, or power valve blown (common after backfires). Replace power valve if damaged.
If you’re chasing ghosts, revisit our fuel system restoration checklist—bad fuel pressure or a clogged filter can mimic carb issues.
Cost Analysis: DIY vs. Professional
| Option | Parts Cost | Labor Cost | Total |
|---|---|---|---|
| DIY (with basic tools) | $25–$60 (kit) | $0 | $25–$60 |
| Professional Shop | $30–$70 | $180–$300 (2–3 hours @ $90–$120/hr) | $210–$370 |
| Specialty Carb Shop (bench rebuild) | $75–$150 | $100–$200 | $175–$350 |
Long-term savings: A properly rebuilt carb lasts 50,000+ miles. At $250 saved per rebuild, that’s real money—especially if you own multiple classics.
Money-saving tip from the bay: Buy kits in bulk if you work on several cars. Summit Racing and Jegs often have combo deals on Holley or Edelbrock kits. Also, keep spare needle-and-seats and power valves in your toolbox—they’re the first to fail.
Best Carburetor Rebuild Kits Reviewed
Holley 37-1540 Premium Rebuild Kit
Designed for 4150/4160 carbs. Includes ethanol-resistant Viton needle-and-seat, power valve, gaskets, and detailed instructions. Fits most Holley performance carbs from 1957–present. Price: $52. I’ve used this on everything from a ’69 Mustang to a ’78 Trans Am—zero failures in 5 years.
Edelbrock 1481 Performer Series Kit
Exact match for 1405/1406 carbs. Comes with calibrated jets, step-up piston springs, and ethanol-safe components. OEM-quality gaskets. Price: $38. If you’ve got an Edelbrock, don’t cheap out—this is the only kit I recommend.
Redline Weber 32/36 DGV Kit
Complete with emulsion tubes, jets, O-rings, and gaskets. Made in Italy, fits European and universal Weber carbs. Price: $55. Avoid Chinese knockoffs—they use incorrect jet tolerances.
FAQ: Real Questions from My Customers
How much does a carburetor rebuild kit cost?
Most quality kits run $25–$60. Cheap kits under $20 often omit critical parts or use inferior rubber that fails in ethanol fuel. Spend the extra $10—it’s cheaper than a tow truck.
Can I rebuild a carburetor without removing it?
Technically yes, but I don’t recommend it. You can’t properly clean internal passages or inspect the main body for warpage. Plus, you risk dropping screws into the intake manifold. Removal takes 30 minutes—just do it right.
How often should I rebuild my carburetor?
If you drive the car regularly (1,000+ miles/year), every 3–5 years. If it sits (like many classic car care projects), rebuild before long-term storage or after sitting more than 6 months. Ethanol fuel degrades seals fast.
Do I need to rejet after a rebuild?
Only if you changed engine specs (cam, heads, exhaust) or live at high altitude. A standard rebuild uses the same jets. If performance feels off, refer to our carb tuning guide before swapping jets.
What’s the difference between a “basic” and “premium” Holley rebuild kit?
Premium kits include ethanol-resistant Viton parts, a new power valve, and sometimes upgraded accelerator pump cams. Basic kits use standard rubber and may skip the power valve. For any street-driven car, always choose premium.
My carb still leaks after rebuild—what’s wrong?
90% of the time, it’s warped fuel bowls or over-torqued screws. Check bowl flatness with a straightedge. If light passes under, replace the bowl. Also, ensure you’re using the correct gasket—some kits include multiple thicknesses for different models.
Final Thoughts: Is It Worth It?
A carburetor rebuild kit is one of the best investments a DIYer can make. For less than $50 and half a Saturday, you’ll eliminate drivability issues, improve fuel economy, and gain confidence in your mechanical skills. Difficulty level? Moderate—anyone who’s changed oil can do this with patience.
Total estimated cost: $35–$60. Total time: 2.5–4 hours. Total satisfaction: priceless.
From my bay to your garage—don’t fear the carb. It’s just brass, aluminum, and physics. Treat it with respect, use the right kit, and it’ll reward you with smooth starts and that throaty idle we all love. And if you get stuck? Drop a comment below. I read every one.