
⚡ Quick Answer: How to Adjust a Carburetor
- Warm the engine to full operating temperature — never adjust a cold carburetor.
- Set idle speed to 600–900 RPM with the idle speed screw (check your service manual for exact spec).
- Baseline mixture screws at 1.5–2.5 turns out from lightly seated.
- Fine-tune mixture — turn each screw slowly to find highest, smoothest RPM.
- Reset idle speed after mixture adjustment, then verify with a tachometer.
- Test accelerator pump — open throttle with engine off, confirm a clear fuel stream in the throat.
Jump to full step-by-step guide ↓ | troubleshooting ↓ | FAQs ↓
A Cold Morning, a Classic Camaro, and a Carburetor Nightmare
It was 7:15 AM on a crisp Tuesday in November when Mark rolled into my shop in his ’68 Camaro. Temperature hovering around 38°F, breath visible in the air. He’d just bought the car at auction the previous weekend — excitement giving way to frustration on his first cold-morning start.
“She just won’t stay running. I pump the gas, she fires up, then dies immediately. If I keep feathering the throttle I can keep her going, but the second I let off, she quits.”
I’ve seen this scenario hundreds of times in 15 years as an ASE-certified technician. Quick diagnostic: the previous owner had adjusted the carburetor without understanding the relationship between the idle circuit, main circuit, and choke system. Mixture screws were at wildly different positions, float level was off, and the choke pull-off was disconnected.
Two hours later, with proper carburetor adjustment completed, Mark’s Camaro was running cleanly at 750 RPM even in the cold air. That’s the difference between a carburetor that’s adjusted and one that’s correctly adjusted.
📌 In This Guide
How a Carburetor Works
A carburetor mixes air and fuel in the correct ratio for combustion using the Venturi effect — as intake air accelerates through a narrowed passage, pressure drops, drawing fuel from the float bowl into the airstream. It’s entirely mechanical: no sensors, no ECU, no injector drivers. That simplicity is what makes carburetors repairable with basic tools and what makes incorrect adjustment so common.
Carburetors remain in wide use on:
- Classic cars and trucks (most pre-1990 American vehicles)
- Motorcycles — particularly cruisers, dual-sports, and older Japanese imports
- Small engines: lawnmowers, generators, chainsaws, ATVs, go-karts
- Racing and performance applications where carburetor simplicity and tunability are preferred
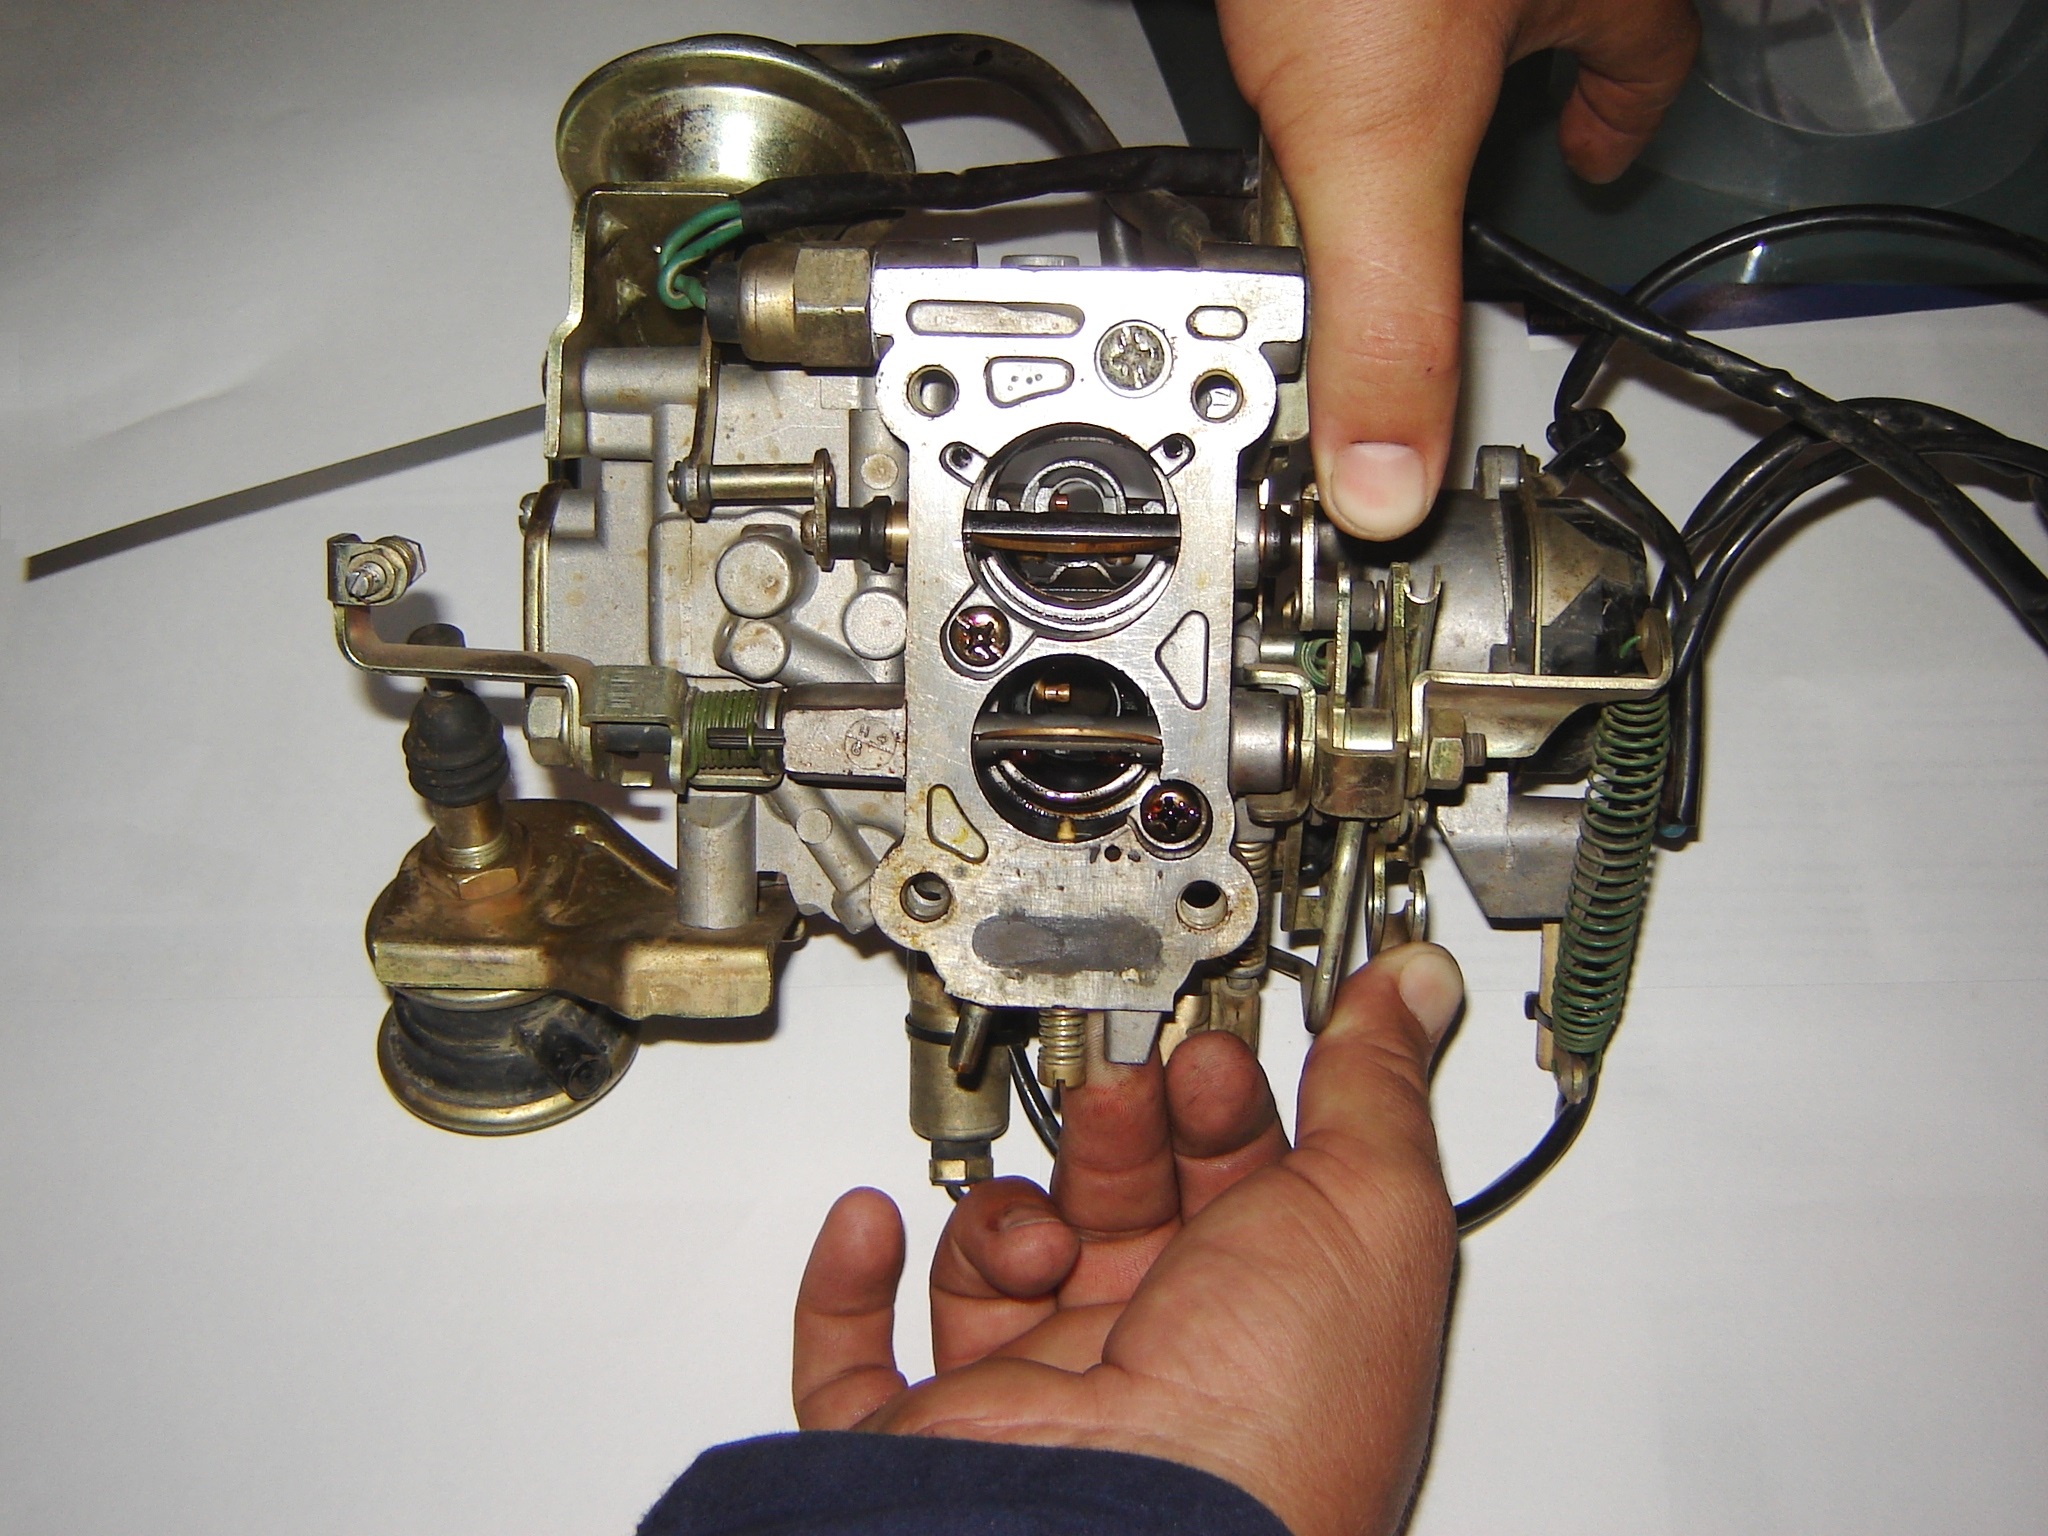
Key Carburetor Components You Need to Understand
- Float Bowl: Holds the fuel reservoir; the float and needle valve maintain a consistent fuel level. Float level directly affects mixture richness across all circuits.
- Venturi: Narrow passage where airspeed increases, creating the pressure drop that draws fuel. Venturi size determines maximum airflow capacity.
- Throttle Plate: Controls airflow into the engine at all speeds above idle. Operated by the throttle cable/linkage.
- Idle Circuit: Handles fuel delivery at closed or near-closed throttle — this is what mixture screws directly control.
- Main Circuit: Takes over fuel delivery as throttle opens past ~20% — controlled by jet size.
- Power Circuit / Power Valve: Enriches the mixture under heavy load (low manifold vacuum). Power valve spring rating determines the vacuum threshold where enrichment activates.
- Choke System: Restricts air intake to enrich the mixture for cold starts. Must fully open as the engine reaches operating temperature.
- Accelerator Pump: Squirts a measured shot of fuel when the throttle opens quickly, preventing the lean stumble that would otherwise occur.
Signs Your Carburetor Needs Adjustment
| Symptom | Likely Cause | Rich or Lean? |
|---|---|---|
| Black, sooty spark plugs; black exhaust smoke | Mixture too rich, float level too high, choke not opening | Rich |
| White or chalky spark plug insulators | Mixture too lean, vacuum leak, insufficient fuel delivery | Lean |
| Engine stalls when coming to a stop | Idle speed too low, mixture screws too lean, idle circuit clogged | Typically lean |
| Hesitation / stumble on acceleration | Weak or failed accelerator pump, pump circuit clogged | Momentarily lean |
| Backfire through the carburetor (intake backfire) | Excessively lean mixture at idle or cruise | Lean |
| Backfire through the exhaust on decel | Lean mixture or ignition timing issue | Lean |
| Hard cold starts; won’t fire without extensive cranking | Choke not closing fully, failed choke pull-off, low float level | Lean |
| Pinging / detonation under load | Lean mixture or ignition timing too advanced | Lean — critical, address immediately |
💡 Pro Tip: Always Check Mechanicals First
Before touching the carburetor, verify: no vacuum leaks (spray carburetor cleaner around intake manifold gaskets — idle change = leak), correct ignition timing, healthy spark plugs and wires, and no compression issues. A properly tuned carburetor cannot compensate for a vacuum leak or 10° of retarded timing. Fix mechanical issues first; adjust the carburetor last.
Tools & Materials for Carburetor Adjustment
Required:
- Flathead screwdrivers — multiple sizes including small jeweler’s screwdrivers for mixture screws
- Tachometer — essential for accurate idle speed setting; clip-on inductive type works on any spark plug wire
- Vacuum gauge — for precise mixture optimization (more accurate than listening)
- Carburetor adjustment tool — some Holley, Edelbrock, and Rochester carbs have tamper-resistant mixture screws requiring a proprietary tool
- Carburetor cleaner spray
- Shop rags, safety glasses, nitrile gloves
Helpful to have:
- Feeler gauges — for setting choke plate clearance
- Spark plug socket and ratchet — reading plug color is your best air-fuel ratio diagnostic
- Wideband oxygen sensor — provides real-time AFR readings for serious tuning (target 14.7:1 at idle)
- Fuel line clamp — prevents spillage when working on the float bowl
💰 Tool Budget
Basic carburetor adjustment toolkit: $100–$200 total (tachometer $40–$80, vacuum gauge $25–$50, screwdriver set $20–$40). This pays for itself after one avoided shop visit — professional carburetor adjustment runs $100–$200 in labor alone.
Preparation: Before You Touch the Carburetor
Pre-Adjustment Checklist
⚠ Fire Safety
Carburetor cleaner is highly flammable. Keep a dry chemical fire extinguisher within reach, work in a well-ventilated area away from open flames, use only short bursts, and never spray near the exhaust manifold. Wear safety glasses — carburetor cleaner causes serious eye injury on contact.
Carburetor Adjustment: Step-by-Step Guide
Step 1: Set Base Idle Speed
The idle speed screw contacts the throttle linkage and physically holds the throttle plate slightly open at idle. This is your starting point — set idle speed before adjusting mixture.
Locate the idle speed screw — typically a large, knurled screw or spring-loaded screw that contacts the throttle lever or cam. On Holley carbs it’s on the secondary side of the throttle linkage; on Edelbrock carbs it’s on the driver’s side of the metering block.
Connect your tachometer per its instructions. Inductive clip-on type attaches to any spark plug wire; digital units may use the ignition coil negative terminal.
With the engine at operating temperature, turn the idle speed screw clockwise to raise RPM, counterclockwise to lower it.
Set to manufacturer spec — typically 600–750 RPM for automatic transmission vehicles, 700–900 RPM for manual transmission. Always verify your specific application in the factory service manual.
⚠ Don’t Mask Problems With High Idle
Resist the urge to set idle above 1,000 RPM to make a stumbling engine feel smooth. A high idle on an automatic transmission causes hard engagement, accelerated torque converter wear, and masks underlying issues. Set the idle to spec and fix the root cause.
Step 2: Adjust the Air-Fuel Mixture Screws
The mixture screws (also called pilot screws or idle mixture screws) control fuel delivery through the idle circuit — the circuit that operates from closed throttle up to approximately 20% throttle opening. This is the most important and most commonly misadjusted aspect of carburetor tuning.
Locate the mixture screws. On most Holley carbs: two screws on the front face of the metering block. On Edelbrock: two screws on each side. On Rochester Quadrajets: two screws on the front of the airhorn. Some have tamper-resistant caps that must be carefully removed with pliers.
Gently turn each mixture screw clockwise until it lightly seats — finger pressure only. These screws have a soft brass or aluminum tip that crushes easily. Overtightening destroys the seat and requires carburetor rebuilding to repair.
Back each screw out 1.5 to 2 turns counterclockwise from lightly seated. This is the baseline starting point for most carburetors.
With the engine running at operating temperature, turn one mixture screw counterclockwise (richer) in 1/8-turn increments, pausing 10–15 seconds between adjustments to let the engine respond. RPM should rise as you approach the optimal setting.
Continue until RPM peaks then begins to drop slightly — this point of maximum RPM is the correct mixture. Turn the screw back clockwise (leaner) just until RPM starts to drop, then back out 1/8 turn. The engine should run its smoothest here.
Repeat for the second mixture screw. On twin-screw carburetors (most Holleys), adjust both screws equally.
After mixture adjustment, re-check and reset idle speed — mixture changes affect idle RPM.
💡 Use a Vacuum Gauge for Precision
The “highest RPM” method works well, but a vacuum gauge is more accurate. Connect it to a manifold vacuum port. Adjust each mixture screw to achieve the highest, steadiest vacuum reading. Typical target: 17–21 inches Hg at idle for a healthy engine. A fluctuating needle indicates a misfire or mechanical issue — no amount of mixture adjustment fixes an engine with compression problems.
Step 3: Tune the Accelerator Pump
The accelerator pump prevents the lean stumble that occurs when the throttle opens quickly — the main circuit can’t respond instantly, so the pump provides a transitional fuel shot. If your engine hesitates off-idle, this is the first place to look.
With the engine off, remove the air cleaner and look down the carburetor throat while quickly opening the throttle by hand.
You should see a clear, solid stream of fuel from the pump discharge nozzle. The stream should be immediate and strong — not a dribble or delayed squirt.
If the stream is weak, delayed, or absent: check the pump diaphragm or plunger for cracks, inspect the inlet and discharge check balls for dirt, and verify the pump spring is intact.
Most carburetors offer multiple pump linkage holes that change the pump timing and stroke volume. Moving the linkage to a different hole on the pump arm adjusts how much fuel is delivered and when — outer holes increase pump shot volume, inner holes decrease it.
Road test: accelerate firmly from a stop. Any stumble, bog, or hesitation in the first 1–3 seconds of acceleration indicates insufficient pump shot. Adjust linkage position or install a larger pump shooter nozzle (Holley offers 0.025″, 0.028″, 0.031″, 0.037″ nozzle sizes).
Step 4: Adjust the Choke
Proper choke operation is critical for reliable cold starts without rich running once the engine warms. A choke that stays partially closed costs fuel economy and fouls spark plugs.
With the engine completely cold (overnight), remove the air cleaner and observe the choke plate. It should be fully closed (horizontal, blocking the bore).
Start the engine cold. The choke should crack open slightly within 30–60 seconds via the choke pull-off (a vacuum-operated diaphragm that prevents immediate stalling from an over-rich mixture).
As the engine warms, the choke plate should fully open within 5–8 minutes of running. On automatic chokes, the thermostatic spring opens the plate as it absorbs heat.
If the choke opens too slowly (rich cold running, poor economy after warm-up): loosen the choke housing and rotate it slightly toward the lean direction. If it opens too quickly (poor cold idle, hard hot restarts after sitting): rotate toward rich.
Verify the choke pull-off diaphragm isn’t cracked — disconnect the vacuum hose and apply vacuum with a hand pump. It should hold vacuum. A leaking pull-off causes the choke to not open properly, resulting in black smoke and a rich condition that persists past warm-up.
Advanced Carburetor Tuning: Altitude, Performance, and Ethanol Fuel
Altitude Tuning
Air density decreases at elevation — thinner air with the same jet size delivers a richer mixture. If you drive regularly at high altitude or have relocated from sea level:
- For every 1,000 feet above sea level, reduce jet size by approximately 2–3%. At 5,000 feet, a #72 main jet would step down to approximately a #66–68.
- Turn mixture screws in (clockwise) by approximately 1/8 turn per 2,000 feet above sea level.
- For vehicles frequently traveling between varying altitudes (mountain passes), consider a carburetor with an altitude compensator or switch to a vacuum secondary carb where the secondaries open only when airflow demands them.
Performance Tuning
For engine performance upgrades on classic vehicles, carburetor tuning goes beyond idle adjustment:
- Jet sizing: Larger main jets enrich the mixture at wide-open throttle. Start conservatively — go up one jet size at a time and read spark plugs after a full-throttle pull. Target: light tan or gray on the ground strap, no black sooting.
- Power valve selection: The power valve enriches the mixture when manifold vacuum drops below its rated threshold. A 6.5″ power valve opens at 6.5 in Hg — appropriate for most street engines. High-compression or radical cam engines with low idle vacuum need a lower-rated valve (3.5″ or 4.5″).
- Accelerator pump cam: On Holley carbs, the pump cam profile controls when and how quickly the pump delivers its shot. A more aggressive cam profile suits high-revving applications; a softer cam works better for street drivability.
- Venturi size: Larger primary venturis increase peak airflow but reduce low-speed throttle response. Match venturi size to your engine’s actual airflow requirements — a 650 CFM carb on a mildly built 350 ci engine will outperform a 750 CFM on the same engine for street driving.
Ethanol Fuel Considerations (E10, E15, E85)
Modern pump gasoline contains 10–15% ethanol (E10/E15). Ethanol burns leaner than pure gasoline — the stoichiometric ratio for ethanol is 9.0:1 vs. 14.7:1 for gasoline. On a carbureted engine:
- E10 typically requires mixture screws turned out an additional 1/4 turn vs. pure gasoline to compensate.
- E85 requires a completely different jet kit — approximately 30–35% larger main jets and richer power valve.
- Ethanol is hygroscopic — it absorbs moisture from the air. Vehicles stored for months on E10 fuel develop varnish deposits faster than on non-ethanol fuel. Use a fuel stabilizer like STA-BIL for storage and consider draining the float bowl before extended storage.
⚠ Wideband O2 for Performance Tuning
If you’re tuning for performance beyond basic street adjustments — jets, power valves, cam upgrades — a wideband oxygen sensor system ($150–$250) is the only accurate way to read air-fuel ratio in real time. Reading spark plug color gives a snapshot of the last operating condition; a wideband shows what’s happening across the entire RPM and load range. Tuning by plugs alone on a modified engine risks lean conditions that cause undetected detonation and engine damage.
Troubleshooting Common Carburetor Problems
Engine Stalls at Idle (Stalls Coming to a Stop)
Most likely causes: idle speed set too low, mixture screws too lean, clogged idle passages, failed idle solenoid, vacuum leak.
- Raise idle speed first — if the stalling stops with idle at 900 RPM but not 700 RPM, the idle circuit is lean or restricted.
- Turn mixture screws out 1/4 turn each and recheck. If the engine responds positively, continue out in 1/8-turn increments to optimal.
- If mixture adjustment doesn’t help, the idle passages are likely clogged with varnish. Remove the mixture screws completely and spray carburetor cleaner into the passages — you should see it emerge from the idle discharge ports in the throttle bore. If not, the carb needs to be removed and cleaned or rebuilt.
- Test the idle solenoid (if equipped) — with the engine running, unplug the solenoid. If the engine immediately stalls, the solenoid is functioning as the primary idle fuel source. Replace it if it’s not responding to voltage.
Poor Fuel Economy / Rich Running
Symptoms: Worse MPG than normal, black sooty exhaust, black spark plugs, fuel smell from exhaust.
- Verify the choke fully opens after warm-up — a partially closed choke is the single most common cause of chronic rich running on classic carbureted engines.
- Check float level — if the float is set too high or the needle valve is leaking, fuel floods the bowl and richens the mixture. Remove the air horn and measure float height against spec (typically 7/16″ to 1/2″ below the mating surface on most Holleys).
- Turn mixture screws clockwise 1/8 turn at a time — if economy improves without losing idle quality, the mixture was over-rich.
- Check for a stuck-open power valve — vacuum-test it by disconnecting the power valve passage and plugging it temporarily. If fuel economy immediately improves at cruise, the power valve is opening too early or stuck open. Replace with the correct vacuum rating for your engine.
Acceleration Hesitation / Bog Off Idle
Symptoms: Engine stumbles, bogs, or hesitates for 1–3 seconds when accelerator is pressed from a stop or steady cruise.
- Test accelerator pump function with engine off — you need a strong, immediate fuel stream. No stream or weak stream: check pump diaphragm for cracks, pump check balls for debris, and pump spring for adequate tension.
- If pump is functioning but hesitation persists: increase pump shot volume by moving the pump linkage to an outer hole (more stroke) or installing a larger pump shooter nozzle.
- On Holley carbs, try the next cam profile up (30-shot vs. 50-shot cam) for improved off-idle response in street applications.
- Hesitation that occurs at steady-throttle cruise (not just tip-in) usually indicates a lean main circuit — go up one jet size and retest.
Hard Cold Starting
Symptoms: Engine cranks extensively before firing when cold; starts only with heavy pumping of the gas pedal.
- Verify the choke plate closes fully when cold — even a slight gap allows too much air and creates a lean condition on cold startup.
- Check the choke pull-off diaphragm for cracks using a hand vacuum pump. A leaking pull-off keeps the choke partially open immediately on startup.
- Check float bowl level after an overnight sit — if fuel drains back to the tank through a leaking inlet needle, the engine starts lean. This is also the cause of the “hard first-start of the day but easy after that” symptom.
- In cold climates (below 20°F), the choke spring may need adjustment to fully close — rotate the choke housing toward the rich (closed) direction one index mark at a time.
Cost Analysis: DIY vs. Professional Carburetor Service
| Service | DIY Cost | Professional Cost | Time |
|---|---|---|---|
| Basic adjustment (idle + mixture) | $0 (your time) + $100–$200 tool investment | $100–$200 | 30–60 min DIY / 1 hr shop |
| Carburetor cleaning (on-vehicle) | $8–$15 (cleaner + rags) | $75–$150 | 30–45 min DIY / 1 hr shop |
| Carburetor rebuild | $30–$80 (rebuild kit) | $300–$500 | 2–4 hrs DIY / 3–5 hrs shop |
| Performance jet & tuning kit | $60–$150 (jets + power valve + pump parts) | $400–$800 | Half-day DIY / specialty shop |
5-Year DIY Savings Example
Carburetor Adjustment FAQs
How do you adjust a carburetor properly?
Warm the engine fully, then: set base idle speed to spec (600–900 RPM) with the idle speed screw. Lightly seat the mixture screws and back them out 1.5–2 turns as a baseline. With the engine running, turn each mixture screw slowly to find the highest, smoothest RPM — that position is optimal mixture. Reset idle speed after mixture adjustment. Test the accelerator pump with the engine off — you need a strong, immediate fuel stream. Finally, verify the choke fully opens after 5–8 minutes of running. All adjustments must be performed at full operating temperature.
How many turns out should mixture screws be?
Start at 1.5 to 2.5 turns out from lightly seated — this is the correct baseline for most carburetors including Holley, Edelbrock, and Rochester designs. Fine-tune from there in 1/8-turn increments while monitoring idle RPM. Never force the mixture screw tight against the seat — the soft brass tip damages easily and an overtightened seat requires carburetor rebuilding to repair.
How often should a carburetor be adjusted?
A correctly tuned carburetor holds adjustment for 6,000–12,000 miles under normal conditions. Adjust whenever you notice performance symptoms, after any carburetor cleaning or rebuild, when changing fuel grades (especially switching to ethanol blends), when moving between significantly different altitudes, and at least once per year on seasonally-driven vehicles or those stored over winter.
Can carburetor adjustment improve fuel economy?
Yes — a carburetor running rich from over-set mixture screws, a high float level, or a stuck choke wastes fuel through incomplete combustion. Proper adjustment can improve fuel economy by 10–15% on a significantly out-of-tune carburetor. The choke fully opening after warm-up is the single most overlooked cause of poor fuel economy on classic carbureted engines.
How do I know if my carburetor is running rich or lean?
Read your spark plugs after a highway drive: tan or light gray on the ground strap and porcelain = correct mixture. Black and sooty = rich — mixture screws too far out, float level too high, or choke not opening. White or chalky = lean — mixture screws too far in, vacuum leak, or insufficient fuel delivery. For real-time AFR monitoring, a wideband O2 sensor shows the exact air-fuel ratio (target 14.7:1 stoichiometric at idle on gasoline).
Can a badly adjusted carburetor damage the engine?
Yes — and lean is significantly more dangerous than rich. A lean mixture causes detonation (pinging under load), overheating, and burned pistons — damage that can happen in minutes of hard driving. A rich mixture causes carbon buildup, washed cylinder walls (oil film removed by excess fuel, accelerating ring and cylinder wear), fouled spark plugs, and catalytic converter damage from unburned hydrocarbons. Address any detonation symptoms immediately; lean damage is fast and catastrophic.
Why does my carbureted car run differently in hot vs. cold weather?
Air density changes with temperature. Cold air is denser — more oxygen molecules per cubic foot — which effectively leans the mixture (same amount of fuel, more oxygen). Hot air is less dense, making the mixture richer with the same fuel delivery. This is why carbureted engines often run rougher on very hot days and need slightly richer settings in winter. It’s also why altitude adjustment is necessary — thin air at elevation has the same effect as hot air at sea level.
Is carburetor adjustment difficult for beginners?
Basic adjustment is moderately challenging but achievable with patience. Idle speed adjustment is straightforward — anyone comfortable with a screwdriver can do it. Mixture screw adjustment requires more attention to engine response and the discipline to make small changes and wait for results. The key mistakes beginners make: adjusting a cold engine, making large adjustments instead of 1/8-turn increments, and not fixing vacuum leaks first. Start with idle speed, then mixture, and document every change you make.
Conclusion: The Carburetor Adjustment Mindset
Carburetor adjustment is methodical troubleshooting, not guesswork. Every screw controls a specific circuit; every symptom points to a specific cause. The mechanics who get it wrong are the ones who make random adjustments and hope something improves. The ones who get it right are the ones who understand what each circuit does, diagnose the symptom to its root cause, and make deliberate, measured changes.
Mark’s ’68 Camaro wasn’t fixed by turning screws until it sounded better. It was fixed by identifying that the mixture screws were mismatched (one was at 1 turn, the other at 3.5 turns), the float level was 1/8″ high, and the choke pull-off diaphragm was cracked. Each of those was a specific, diagnosable problem with a specific fix.
The summary: Warm the engine fully. Check for vacuum leaks first. Set idle speed to spec. Baseline mixture screws at 1.5–2 turns out. Fine-tune to highest smooth RPM. Verify accelerator pump delivers a strong stream. Confirm the choke opens completely. Read spark plugs to validate your work. That’s it.
A properly adjusted carburetor on a mechanically sound engine should idle smoothly at spec RPM, accelerate cleanly without stumbling, start readily in cold weather, and deliver fuel economy close to factory figures. If yours doesn’t, the guide above has your diagnosis path.