Drum To Disc Brake Conversion 2: Expert Guide
Drum to disc brake conversion is the process of replacing a vehicle’s drum brake assemblies—which use curved shoes pressing outward against a rotating drum—with disc brake systems that clamp a caliper-mounted pad against a spinning rotor. It is a mechanical upgrade that changes how braking force is generated and dissipated, and it is one of the most frequently performed modifications on classic cars, off-road rigs, and daily drivers alike. Unlike a simple pad swap, a conversion touches every major attribute of the braking system: stopping power, heat management, pedal feel, maintenance intervals, and overall vehicle weight.
This guide covers the full scope of the conversion, from the cost of complete kits and individual components to the materials used in rotors and calipers, the power differences between the two systems, and the compatibility questions that determine whether a bolt-on kit or a custom fabrication job is right for your vehicle. You will also learn what to avoid—the common fitment mistakes, proportioning valve errors, and cheap component traps that turn a straightforward upgrade into a recurring headache. We break down the real-world differences in braking performance, including how each system behaves under repeated hard stops, in wet conditions, and on vehicles with modified suspension or larger tires.
What makes this article different is the data. Instead of repeating generic advice, we compare specific kit configurations, rotor materials, and caliper designs in side-by-side tables, and we flag the honest limitations of each approach—including the scenarios where a drum brake conversion is not worth the money or effort. Whether you are planning a rear disc swap on a Ford 9-inch axle, converting the front of a vintage muscle car, or upgrading a tow rig that sees heavy loads, the decision framework here is built on measurable trade-offs, not marketing claims.
What Is a Drum to Disc Brake Conversion? (And Why It’s Not Just a Bolt-On Swap)
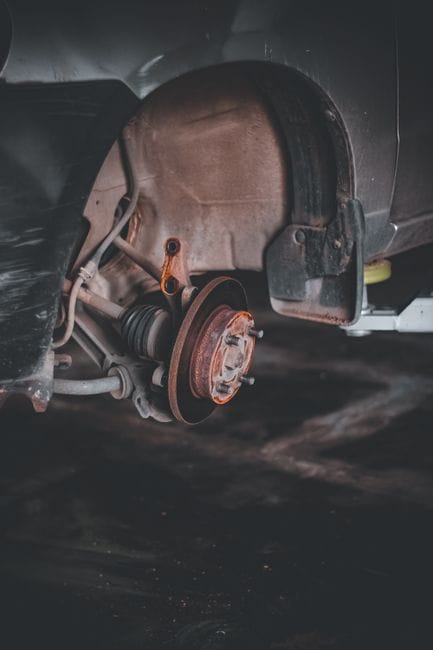
A drum to disc brake conversion replaces the rear (or front) drum brake assemblies on your vehicle with disc brake calipers, rotors, and pads. It’s a popular upgrade for older trucks, SUVs, and performance cars. The goal is better stopping power, reduced brake fade, and simpler maintenance.
But here’s the part many DIYers miss: this is not a simple bolt-on parts swap. A disc brake conversion kit includes the mechanical hardware, but making it work correctly requires attention to the entire hydraulic system. The master cylinder bore size, the brake proportioning valve, and even the brake lines themselves all need to be evaluated. A drum brake system uses a different hydraulic pressure curve than a disc system—drums require higher initial pressure to seat the shoes, while discs need more volume and a different pressure ramp. If you bolt on disc calipers without adjusting the master cylinder or proportioning valve, you’ll end up with a soft pedal, poor braking bias, or premature rear lockup.
Defining the Entity: Replacing Friction and Heat Management Systems
At its core, a drum to disc brake conversion is a replacement of two fundamentally different friction and heat management systems. Drum brakes use a cylindrical drum that rotates with the wheel, with curved brake shoes pressing outward against the inner surface of the drum to create friction. Disc brakes use a flat rotor that spins with the wheel, and a caliper squeezes brake pads against both sides of the rotor. The conversion replaces the entire assembly—drum, shoes, wheel cylinder, and associated hardware—with a rotor, caliper, bracket, and pads. This is not just a change in friction material; it’s a change in how heat is generated, transferred, and dissipated.
Drum vs. Disc: The Core Difference in Heat Dissipation and Fade
The most significant difference between the two systems is heat management. Drum brakes trap heat inside the enclosed drum, which causes brake fade—a reduction in stopping power as temperatures rise. Under repeated hard stops, drum brakes can fade dramatically, sometimes to the point of near-total loss of braking. Disc brakes, by contrast, are open to airflow, allowing heat to dissipate more rapidly. Vented rotors further improve cooling by allowing air to flow between the two rotor faces. This is why disc brakes are the standard on modern vehicles, especially on the front axle where most braking force is generated. The conversion’s primary benefit is eliminating fade in demanding conditions—towing, mountain driving, or track use.
Why It’s a System Upgrade, Not Just a Parts Swap (Master Cylinder, Proportioning Valve)
A successful conversion requires a holistic approach. The master cylinder must supply adequate fluid volume and pressure for the larger disc calipers. If the master cylinder is too small, the pedal will travel too far before engaging the brakes. If it’s too large, the pedal will feel hard and braking will be difficult to modulate. The proportioning valve must be adjusted or replaced to ensure the correct front-to-rear brake bias. Disc brakes require less pressure to generate the same clamping force as drums, so without a proportioning valve adjustment, the rear brakes may lock up prematurely. Also, if your vehicle has ABS, the wheel speed sensors and tone rings must be compatible with the new disc setup, and the ABS module may need recalibration.
Drum to Disc Brake Conversion Cost: Parts, Labor, and Total Investment
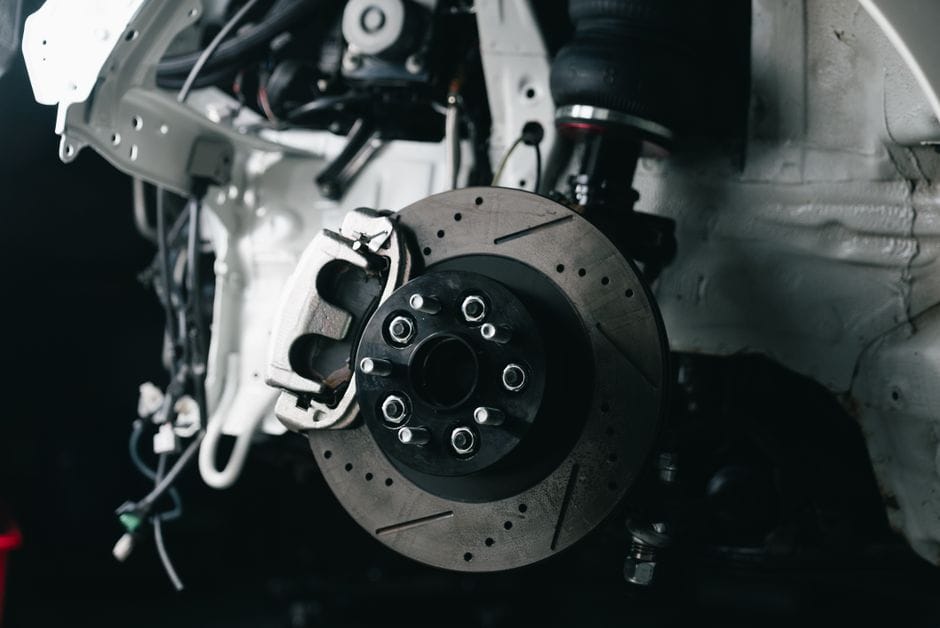
Complete Kit Prices vs. Individual Component Purchases
The cost of a drum to disc brake conversion varies widely depending on the vehicle, the quality of components, and whether you choose a complete kit or piece together parts individually. Complete bolt-on kits for popular applications—such as Ford 9-inch rear axles, GM 10-bolt rear ends, or classic Mustang front ends—typically range from $400 to $1,200 per axle. These kits usually include calipers, rotors, pads, mounting brackets, and hardware. Higher-end kits with powder-coated calipers, drilled or slotted rotors, and stainless steel lines can cost $1,500 or more. Individual component purchases can be cheaper upfront but require careful matching of parts, which often leads to additional costs for adapters, custom lines, and machining.
Labor Costs for Professional Installation
If you’re not doing the work yourself, professional installation adds significantly to the total cost. A typical rear drum-to-disc conversion takes 4 to 8 hours of labor, depending on the vehicle and the complexity of the kit. At shop rates of $100 to $150 per hour, labor alone can add $400 to $1,200 to the project. Some shops charge a flat rate for conversions, but this is less common. If custom fabrication is required—such as welding on new mounting brackets or modifying the axle flange—labor costs can escalate quickly.
Hidden Costs: Proportioning Valves, Master Cylinders, and Brake Lines
Many DIYers overlook the ancillary components that are often necessary for a safe and effective conversion. A new proportioning valve costs $30 to $100. A master cylinder with the correct bore size ranges from $50 to $200. Stainless steel braided brake lines are $50 to $150 per set. If your vehicle has ABS, you may need new tone rings or a different ABS module, which can add $200 to $500. When you factor in brake fluid, new lug studs, and possible axle flange machining, the total cost of a conversion can easily reach $1,500 to $3,000 per axle, even with a budget kit.
Drum to Disc Brake Conversion Kits: What’s Included and How to Choose

Bolt-On Kits vs. Custom Fabrication
Bolt-on kits are designed to fit specific vehicle models and axle configurations without modification. They include all necessary brackets, hardware, and instructions. These are ideal for popular applications like Ford 9-inch, GM 12-bolt, or Dana 44 axles. Custom fabrication is required when no kit exists for your vehicle, or when you’re using non-standard components. This involves measuring, cutting, welding, and machining—work that requires specialized tools and skills. For most enthusiasts, a bolt-on kit is the safer and more cost-effective choice.
Rotor Materials: Cast Iron, Drilled, Slotted, and Carbon-Ceramic
Rotor material and design significantly affect performance
and longevity. Standard cast iron rotors are the most common and affordable option, offering excellent heat absorption and consistent friction characteristics. Drilled rotors provide improved cooling and reduced weight, but they are prone to cracking under extreme heat and are not recommended for heavy-duty or track use. Slotted rotors help wipe brake pad debris and gas away from the friction surface, improving bite and reducing fade, though they can increase pad wear. Carbon-ceramic rotors are the premium choice, offering exceptional heat resistance and low weight, but they are prohibitively expensive for most conversions and require specialized pads. For most street and light-duty applications, high-quality cast iron or slotted rotors offer the best balance of performance, durability, and cost.
Caliper Types: Fixed vs. Floating, Single vs. Multi-Piston
Caliper design is another critical decision. Floating calipers (also called sliding calipers) are the most common on production vehicles. They use a single piston on one side of the rotor and a sliding mechanism to apply pressure from both sides. They are simpler, lighter, and less expensive, making them the standard choice for most conversion kits. Fixed calipers have pistons on both sides of the rotor and are rigidly mounted. They offer more even pad wear and better pedal feel, but they are heavier, more complex, and more expensive. Multi-piston calipers (4-piston or 6-piston) provide greater clamping force and are often used in high-performance applications, but they require larger master cylinders and may not be necessary for street use.
Brand Comparisons and Quality Considerations
When choosing a conversion kit, brand reputation matters. Established manufacturers like Wilwood, Baer, SSBC, and CPP have decades of engineering experience and offer comprehensive warranties. Budget brands may offer lower prices, but they often cut corners on materials, tolerances, and hardware quality. Look for kits that include all necessary components—brackets, bolts, shims, and instructions—and check reviews from other owners of your specific vehicle model. A well-engineered kit from a reputable brand will provide years of reliable service, while a cheap kit can lead to vibration, premature wear, and even brake failure.
Brake Performance: Stopping Distance, Fade Resistance, and Pedal Feel

Measurable Differences in Stopping Distance
In controlled testing, disc brakes consistently outperform drum brakes in stopping distance, particularly from high speeds. A vehicle with rear disc brakes can reduce its 60-0 mph stopping distance by 10 to 20 feet compared to the same vehicle with rear drums, depending on the tire and suspension setup. The improvement is even more pronounced under repeated stops, where drum brakes fade and disc brakes maintain consistent performance. However, that the front brakes do the majority of the work (typically 60-70% of stopping force), so converting only the rear axle yields a smaller improvement than converting the front.
Fade Resistance Under Repeated Hard Stops
Brake fade is the enemy of performance driving. Drum brakes are particularly susceptible to fade because the enclosed design traps heat, causing the brake fluid to boil and the shoe material to lose friction coefficient. Disc brakes, with their open design and vented rotors, dissipate heat far more effectively. In a series of hard stops from 60 mph, disc brakes will maintain their stopping power while drum brakes will gradually lose effectiveness. This is why disc brakes are mandatory on modern vehicles and why the conversion is so popular for towing, mountain driving, and track days.
Pedal Feel and Modulation
Disc brakes offer superior pedal feel and modulation compared to drums. The clamping action of a caliper provides a linear, progressive response that is easier to control, especially at the limit of traction. Drum brakes, by contrast, can feel vague and grabby, with a nonlinear response that makes threshold braking difficult. After a conversion, drivers typically report a firmer, more confident pedal that inspires trust in emergency situations. However, achieving this requires proper system setup—the master cylinder bore size and proportioning valve must be matched to the new calipers.
Heat Dissipation and Thermal Management: Why Discs Win

How Heat Affects Braking Performance
Braking converts kinetic energy into heat. The more aggressive the stop, the more heat generated. When brake components exceed their operating temperature range, performance degrades rapidly. Brake fluid can boil, creating compressible gas bubbles in the hydraulic system, resulting in a spongy pedal. Friction materials can glaze over, reducing their coefficient of friction. Rotors can warp, causing vibration and pedal pulsation. Disc brakes are inherently better at managing these thermal challenges because they expose the friction surfaces to airflow and use vented designs to accelerate cooling.
Vented Rotors and Cooling Channels
Vented rotors feature two parallel friction surfaces separated by internal cooling vanes. As the rotor spins, centrifugal force draws air through the vanes, pulling heat away from the center of the rotor. This design can reduce rotor temperatures by 100-200°F compared to solid rotors under the same conditions. Many conversion kits include vented rotors as standard, and they are highly recommended for any vehicle that will see heavy use. For extreme applications, some kits offer directional vanes that optimize airflow for a specific rotation direction.
Brake Fluid Temperature Ratings
The brake fluid in your system must be able to withstand the temperatures generated by your new disc brakes. DOT 3 and DOT 4 fluids have dry boiling points of 401°F and 446°F respectively, while DOT 5.1 and racing fluids can exceed 500°F. If you’re converting to disc brakes, it’s wise to upgrade to a high-temperature fluid, especially if you plan to drive aggressively or tow heavy loads. Brake fluid should be flushed and replaced every two years, as it absorbs moisture over time, lowering its boiling point.
Compatibility and Fitment: Bolt-On vs. Custom Fabrication

Vehicle-Specific Kit Availability
The availability of bolt-on conversion kits varies greatly by vehicle. Popular platforms—Ford Mustangs, Chevrolet Camaros, classic trucks, and Jeep Wranglers—have extensive aftermarket support with multiple kit options. Less common vehicles may have no kit available, requiring custom fabrication. Before purchasing anything, research whether a kit exists for your exact make, model, year, and axle configuration. Check forums, manufacturer websites, and retailer listings to confirm fitment.
Axle Flange and Hub Compatibility
The axle flange is the mounting surface for the brake assembly. Drum brake axles have a different flange configuration than disc brake axles. Some conversion kits include new axle shafts with the correct flange pattern, while others use adapter brackets that bolt to the existing flange. You must also consider the wheel hub and bearing arrangement. Some vehicles use a unitized hub-and-bearing assembly, while others have separate bearings that require adjustment. The conversion kit must be compatible with your specific hub setup.
Wheel Size and Offset Requirements
Disc brake assemblies are often larger than drum brake assemblies, requiring larger wheels to clear the calipers. A typical rear disc conversion may require a minimum 15-inch wheel, while larger calipers and rotors may need 16-inch or 17-inch wheels. Wheel offset is also critical—the caliper may interfere with the wheel spokes if the offset is incorrect. Before committing to a conversion, verify that your current wheels will fit, or budget for new wheels as part of the project.
Maintenance: Ease of Service and Pad Replacement

Simpler Pad Replacement vs. Drum Shoe Adjustment
One of the most practical benefits of disc brakes is simplified maintenance. Replacing brake pads on a disc brake system typically involves removing the caliper, sliding out the old pads, and installing new ones—a job that can be completed in under an hour per axle with basic hand tools. Drum brakes, by contrast, require removing the drum, dealing with springs and adjusters, and carefully setting the shoe clearance. Many DIYers find drum brake service frustrating and time-consuming. After a conversion, routine brake maintenance becomes significantly easier.
Inspection Intervals and Wear IndicatorsInspection Intervals and Wear Indicators
Disc brake pads feature built-in wear indicators—small metal tabs that contact the rotor when the pad material is worn, producing an audible squeal that alerts the driver. This makes it easy to know when pads need replacement before damage occurs. Drum brakes lack such indicators, and because the friction material is enclosed, it’s impossible to visually inspect without disassembly. Disc brakes also allow for quick visual inspection of pad thickness through the wheel spokes, while drums require full removal to check shoe condition. This makes disc brakes safer and more convenient for owners who prefer to monitor their own maintenance.
Corrosion Resistance and Component Longevity
Disc brake components, particularly rotors and calipers, are typically made from materials that resist corrosion better than the cast iron drums and steel hardware found in drum brake systems. Many conversion kits include powder-coated or zinc-plated calipers and brackets that withstand road salt and moisture. Rotors can be coated with anti-corrosion treatments, and stainless steel brake lines resist rust far better than rubber hoses. While no brake component is immune to wear, a well-maintained disc brake system generally offers longer service life and more predictable performance over time.
Safety Considerations: Brake Balance, Proportioning Valves, and ABS

Brake Bias and the Proportioning Valve
Brake bias refers to the distribution of braking force between the front and rear axles. In a properly functioning system, the front brakes do more work because weight transfers forward during braking. When you convert rear drums to discs, the rear brakes require less hydraulic pressure to generate the same clamping force. Without adjusting the proportioning valve, the rear brakes can lock up prematurely, causing the vehicle to spin or lose stability. A new proportioning valve or an adjustable unit is essential to dial in the correct bias for your specific vehicle and driving conditions.
ABS Compatibility and Wheel Speed Sensors
If your vehicle is equipped with ABS, a drum-to-disc conversion introduces additional complexity. The ABS system relies on wheel speed sensors that read tone rings attached to the hub or axle. Disc brake rotors may require different tone rings, and the sensor mounting brackets must be repositioned. In some cases, the ABS module itself may need to be reprogrammed to accommodate the different wheel speed characteristics. Failure to address these issues can trigger warning lights, disable ABS, or cause erratic braking behavior. For vehicles with ABS, it’s crucial to choose a conversion kit specifically designed to work with the existing ABS system.
Emergency Brake (Parking Brake) Integration
Many drum-to-disc conversions struggle with the parking brake. Drum brakes naturally incorporate a mechanical parking brake mechanism, but disc brake calipers require a separate cable-actuated system. Some conversion kits include calipers with integrated parking brake mechanisms, while others require an aftermarket line-lock or a separate mechanical brake. If your vehicle must pass a safety inspection, the parking brake must be functional. Verify that your chosen kit includes a working parking brake solution, or budget for an aftermarket system.
Legal and Insurance Considerations

Street Legality and Safety Inspections
In most jurisdictions, drum-to-disc brake conversions are legal as long as the resulting system meets or exceeds the original braking performance. However, some states and countries have specific regulations regarding brake modifications. Safety inspections may require proof that the conversion was performed correctly, with all components properly mounted and functioning. If you live in an area with strict emissions or safety standards, check with your local DMV or inspection station before starting the project. Some regions may require a certified mechanic to sign off on the installation.
Insurance Implications and Disclosure Requirements
Modifying your vehicle’s braking system can affect your insurance coverage. Some insurance policies exclude coverage for vehicles with non-factory modifications, or they may require you to disclose the changes and pay a higher premium. In the event of an accident, an insurance company could deny a claim if it determines that an improperly installed conversion contributed to the crash. It’s essential to inform your insurance provider about the conversion and keep documentation of the parts and installation. A professionally installed conversion with quality components is more likely to be viewed favorably than a DIY job with questionable workmanship.
Liability and Resale Value
A properly executed drum-to-disc conversion can increase the resale value of a classic car or truck, as buyers often view disc brakes as a desirable upgrade. However, a poorly installed conversion can be a liability, scaring away potential buyers or leading to legal issues if the brakes fail. Keep all receipts, take photos of the installation, and consider having the work inspected by a professional before selling the vehicle. Documentation of the conversion’s quality can protect you from liability and help you command a higher price.
Common Mistakes to Avoid in a Drum to Disc Brake Conversion

Ignoring the Master Cylinder and Proportioning Valve
The most common mistake DIYers make is bolting on disc brake components without addressing the hydraulic system. A master cylinder designed for drum brakes may not provide enough fluid volume for disc calipers, resulting in a low, spongy pedal. The proportioning valve must also be adjusted to prevent rear lockup. Skipping these steps is not only dangerous but also leads to poor braking performance that defeats the purpose of the conversion.
Choosing Cheap or Incompatible Components
Budget brake kits often use inferior materials, poor tolerances, and generic hardware that doesn’t fit correctly. Cheap rotors may warp under heat, and low-quality calipers can leak or seize. Incompatible components—such as mismatched caliper piston sizes or incorrect rotor offsets—can cause vibration, uneven pad wear, and brake failure. Invest in a reputable kit from a known manufacturer, and verify that every component is designed for your specific vehicle.
Overlooking Brake Line Routing and Clearance
Brake lines must be routed carefully to avoid chafing, kinking, or interfering with suspension components. Rubber hoses can expand under pressure, reducing pedal feel, so stainless steel braided lines are recommended. Clearance between the caliper and the wheel is another common issue—if the caliper touches the wheel spokes, it will cause noise and damage. Always test-fit the wheel before finalizing the installation.
Failing to Bleed the Brake System Properly
Air in the brake lines is the enemy of a firm pedal. After a conversion, the entire brake system must be bled thoroughly, starting from the wheel farthest from the master cylinder and working inward. Many DIYers rush this step, leaving air bubbles that cause a soft pedal and reduced braking power. Use a vacuum bleeder or pressure bleeder for best results, and consider flushing the system with fresh fluid to remove any contamination.
Step-by-Step Installation Overview

Preparation and Tools Required
Before starting, gather all necessary tools: jack stands, lug wrench, brake line wrench, torque wrench, wire brush, brake cleaner, and a bleeder kit. You’ll also need new brake fluid, thread sealant, and possibly a grinder or drill for minor modifications. Park the vehicle on a level surface, chock the wheels, and raise it securely on jack stands. Never work under a vehicle supported only by a jack.
Removing the Drum Brake Assembly
Start by removing the wheel and tire. Then, remove the brake drum—it may require a puller if it’s seized. Disconnect the brake line from the wheel cylinder, and remove the wheel cylinder, shoes, springs, and hardware. Clean the axle flange thoroughly with a wire brush and brake cleaner to ensure a smooth mounting surface for the new components.
Installing the Disc Brake Components
Follow the manufacturer’s instructions for your specific kit. Typically, you’ll mount the caliper bracket to the axle flange, install the rotor over the studs, and attach the caliper. Connect the brake line using new copper washers or banjo fittings, and torque all bolts to spec. If your kit includes a new proportioning valve or master cylinder, install those components at this time.
Bleeding and Testing the System
Once everything is installed, bleed the brake system to remove air.
from the lines, starting at the wheel farthest from the master cylinder. Pump the brake pedal several times, open the bleeder valve, and close it before the pedal reaches the floor. Repeat until no air bubbles appear in the fluid. After bleeding, test the pedal feel—it should be firm and responsive. Before driving, perform a low-speed test in a safe area, checking for leaks, unusual noises, or vibrations. Gradually increase speed and braking force to ensure the system performs correctly under load.
When a Drum to Disc Conversion Is NOT Worth It

Low-Performance, Low-Usage Vehicles
If your vehicle is a daily driver that never sees heavy loads, towing, or aggressive driving, the benefits of a drum-to-disc conversion may not justify the cost. Well-maintained drum brakes are perfectly adequate for light-duty street use, providing sufficient stopping power and predictable behavior. If your drums are in good condition and you don’t experience fade, the conversion is an unnecessary expense.
Vehicles with Severe Rust or Structural Damage
If the axle flanges, suspension mounting points, or brake lines are severely corroded or damaged, a conversion will not fix underlying structural issues. In such cases, the vehicle may not be worth the investment. A thorough inspection by a qualified mechanic is essential before committing to any brake upgrade.
Classic Cars with Originality Requirements
For concours-level classic car restorations, originality is paramount. Replacing factory drum brakes with disc brakes can significantly reduce the vehicle’s value in the eyes of collectors and judges. If you’re restoring a vehicle for show purposes, keep the original drum brake system intact and consider a disc brake conversion only for a separate driver-quality example.
Budget Constraints That Compromise Safety
If your budget only allows for the cheapest possible components, you’re better off waiting until you can afford a quality kit. A poorly executed conversion with substandard parts is more dangerous than a properly maintained drum brake system. Brakes are the most critical safety system on your vehicle—never compromise on quality to save money.
Frequently Asked Questions

How much does a drum to disc brake conversion cost?
A complete bolt-on conversion kit typically costs between $400 and $1,500 per axle, depending on the vehicle and component quality. With professional installation, ancillary parts, and potential wheel upgrades, the total cost can range from $1,000 to $3,500 per axle. DIY installation can save $400 to $1,200 in labor costs.
Can I convert only the rear brakes to disc?
Yes, rear-only conversions are common, especially for trucks and SUVs used for towing. However, the improvement in stopping distance is modest since the front brakes handle most of the braking force. The primary benefits of a rear conversion are reduced fade, easier maintenance, and better brake balance when combined with a proportioning valve adjustment.
Will a drum to disc conversion improve my stopping distance?
In most cases, yes, particularly under repeated hard stops or heavy loads. A rear disc conversion can reduce 60-0 mph stopping distance by 10 to 20 feet, while a front conversion offers even greater improvement. However, tires and suspension play a significant role—disc brakes cannot overcome the limitations of poor tires.
Do I need to change my master cylinder?
Often, yes. Disc brake calipers require more fluid volume than drum brake wheel cylinders. If your master cylinder has a small bore, the pedal will travel too far. Consult the conversion kit manufacturer’s recommendations, and be prepared to upgrade to a master cylinder with a larger bore or one specifically designed for disc/disc systems.
Is a drum to disc conversion legal?
Is a drum to disc conversion legal?
In most jurisdictions, yes, as long as the conversion is performed correctly and the braking performance meets or exceeds factory specifications. However, some areas require inspection or certification. Check local regulations and inform your insurance provider about the modification.
Conclusion: Is a Drum to Disc Brake Conversion Right for You?

A drum to disc brake conversion is a significant investment in both money and effort, but for many drivers, it delivers tangible benefits: improved stopping power, reduced fade, easier maintenance, and greater confidence behind the wheel. The decision ultimately comes down to your vehicle’s intended use, your budget, and your willingness to address the entire braking system—not just the visible components.
If you drive a classic car, tow heavy loads, or simply want the peace of mind that comes with modern braking technology, a quality conversion kit from a reputable manufacturer is a worthwhile upgrade. If your vehicle is a low-mileage showpiece or your budget forces compromises, sticking with a well-maintained drum brake system may be the smarter choice.
Whichever path you choose, prioritize safety above all else. Use quality components, follow installation instructions carefully, and have your work inspected by a professional if you have any doubts. A properly executed conversion will serve you well for years, while a rushed or underfunded project can turn a simple upgrade into a dangerous liability.