
⚡ Quick Answer:
Most Acura models require timing belt replacement at 60,000–105,000 miles or 7–10 years, whichever comes first.
Cost: $500–$1,200 (parts + labor).
Why It Matters: Ignoring this service can lead to $4,500+ in engine damage if the belt snaps.
Newer Acuras (2014+): Most use timing chains and don’t require replacement.
The Day a $850 Timing Belt Job Saved a $4,500 Engine
It was a humid Tuesday morning in July when a customer rolled in with her 2008 Acura MDX—105,000 miles on the clock, immaculate interior, and zero service records. “I just need an oil change,” she said.
I popped the hood and immediately saw the original factory timing belt staring back at me through the inspection window. That belt was 45,000 miles overdue for replacement. I explained to her that she was driving around with a ticking time bomb, and if that belt snapped on the highway, she’d be looking at $4,500 in engine damage instead of an $850 timing belt job.
She nearly fainted when I showed her the cracked, glazed rubber. We replaced it that afternoon, and I found three teeth on the belt that were showing cords underneath. She’d been maybe 5,000 miles away from catastrophic engine failure.
That’s the thing about Acura timing belt replacement—it’s not optional maintenance, it’s engine survival.
📌 In This Guide:
- Which Acura Models Have Timing Belts (and Which Don’t)
- Understanding Acura Timing Belt Intervals: Why Honda Changed Their Mind
- Signs Your Acura Timing Belt Needs Replacement (Before It’s Too Late)
- The Complete Acura Timing Belt Replacement Procedure
- Acura Timing Belt Replacement Cost Breakdown (DIY vs. Professional)
- OEM vs. Aftermarket: What Parts Should You Actually Buy?
- Common Mistakes and How to Avoid Them
- Timing Belt vs. Timing Chain: Why Acura Made the Switch
- Frequently Asked Questions About Acura Timing Belt Replacement
🚗 Which Acura Models Have Timing Belts (and Which Don’t)
Here’s what trips people up: Not all Acuras have timing belts. Honda started phasing them out around 2013–2014 in favor of timing chains, which are designed to last the life of the engine. If you’ve got a newer Acura, you might be off the hook entirely.
✅ Acura Models WITH Timing Belts (Require Replacement)
| Model | Years with Timing Belt | Replacement Interval | Engine Type |
|---|---|---|---|
| MDX | 2001–2013 (1st & 2nd gen) | 105,000 miles / 7 years | 3.5L V6 & 3.7L V6 |
| TL | 1999–2014 | 105,000 miles / 7 years | 3.2L V6 & 3.5L V6 |
| RL | 1996–2012 | 105,000 miles / 7 years | 3.5L V6 & 3.7L V6 |
| TSX | 2004–2008 (1st gen only) | 105,000 miles / 7 years | 2.4L I4 |
| CL | 1997–2003 | 105,000 miles / 7 years | 3.0L V6 & 3.2L V6 |
| Integra | 1986–2001 | 60,000–90,000 miles | Various I4 engines |
| Legend | 1986–1995 | 90,000 miles | Various V6 engines |
| RDX | 2007–2012 (1st gen only) | 105,000 miles / 7 years | 2.3L Turbo I4 |
❌ Acura Models WITHOUT Timing Belts (Timing Chains – No Replacement Needed)
- MDX: 2014–present (3rd & 4th gen)
- TLX: All years (2015–present)
- RDX: 2013–present (2nd & 3rd gen)
- ILX: All years (2013–present)
- NSX: All generations
- TSX: 2009–2014 (2nd gen with 2.4L and 3.5L V6)
💡 Pro Tip: If you’re wondering about the Acura TLX timing belt, here’s the good news—there isn’t one. The TLX launched in 2015 and has always used a maintenance-free timing chain. Same goes for all model years of the RLX. You’ll want to focus on oil changes and valve adjustments instead.
I get asked about the Acura MDX timing belt constantly. The cutoff is crystal clear: 2013 and older have belts, 2014 and newer have chains. If you bought a used 2013 MDX, that belt better be fresh or you need to budget for it immediately.
⏳ Understanding Acura Timing Belt Intervals: Why Honda Changed Their Mind
Here’s something interesting: Honda (and therefore Acura) actually extended their timing belt replacement interval partway through. Early 2000s Acuras called for replacement at 90,000 miles. Starting around 2006, they bumped it to 105,000 miles. This wasn’t because they were cutting corners—the belt materials and manufacturing processes genuinely improved.
But here’s what the service manual won’t tell you: that 105,000-mile interval assumes you’re driving in ideal conditions. If you’re in Arizona where it hits 120°F, or Minnesota where it drops to -30°F, or you do a lot of short trips where the engine never reaches full operating temperature, I’d knock 15,000 miles off that interval. Heat and cold degrade rubber, period.
The Real-World Timing Belt Replacement Schedule
🚨 Critical Timing Belt Service Intervals:
- Older Acuras (pre-2006): Replace at 90,000 miles or 7 years
- Newer Acuras (2006–2014): Replace at 105,000 miles or 7 years
- Harsh climates or severe duty: Consider replacement at 75,000–90,000 miles
That 7-year time interval is just as important as the mileage. I’ve seen low-mileage garage queens with 40,000 miles and 12-year-old belts fail catastrophically. Rubber oxidizes and hardens with age whether you drive it or not. The oldest timing belt I’d ever trust is 10 years, and that’s pushing it.
What About Honda’s Official Position?
Acura’s current recommendation for their timing belt-equipped models is 105,000 miles or 7 years—whichever comes first. This applies to the MDX, TL, RL, and first-gen TSX.
But I’ll tell you what I tell my own family: replace it at 90,000 miles if you plan to keep the car past 150,000 miles. That extra 15,000-mile cushion has saved more engines than I can count. If you’re the type who trades cars every few years, you can probably ride it to 105,000. But if this is your forever car? Don’t gamble.
🚨 Signs Your Acura Timing Belt Needs Replacement (Before It’s Too Late)
The cruel reality about timing belts is they rarely give you much warning. Unlike a serpentine belt that might squeal or an alternator that might dim your lights, a timing belt usually just snaps without ceremony. But there are a few warning signs if you know what to look for.
🔍 Visual Inspection Through the Timing Cover Window
Most Acura V6 engines have a small inspection window in the timing cover. Remove the plastic engine cover (usually just clips or 10mm bolts), and you can see a section of the belt. Shine a flashlight on it and look for:
- Cracking on the belt surface: Small cracks perpendicular to the belt’s length are the kiss of death.
- Glazing: The belt looks shiny and smooth instead of matte rubber.
- Fraying edges: The belt edges look fuzzy or worn.
- Oil contamination: If the belt is soaked in oil, your front crankshaft seal is leaking and you need both replaced immediately.
- Missing chunks: If pieces are gone, you’re already lucky the engine is still running.
⚠️ SAFETY WARNING: Never inspect the timing belt with the engine running. Even a momentary contact with the spinning belt can pull your hand into the engine bay and cause severe injury. Always check with the engine off and cool.
🔊 Audible Warning Signs (Rare but Critical)
If you hear a slapping or ticking noise from the front of the engine that changes with RPM, that could be a timing belt that’s stretched or jumped a tooth. This is rare—usually the belt just snaps—but if you hear it, park the car immediately and call a tow truck. Running the engine could bend valves even if the belt hasn’t completely failed yet.
I had an Acura TL come in last month with a ticking noise. The owner ignored it for three days because it “wasn’t that loud.” When I pulled the timing cover, the belt had stretched so much it was hitting the cover. We replaced it before catastrophic failure, but he was maybe 100 miles away from a $3,800 engine rebuild.
📏 Mileage is Your Best Indicator
Forget the warning signs—if you’re at 90,000+ miles on the original belt, replace it. Period. I don’t care if it looks perfect through the inspection window. The internal rubber compounds are breaking down in ways you can’t see. Every additional mile you drive is borrowed time.
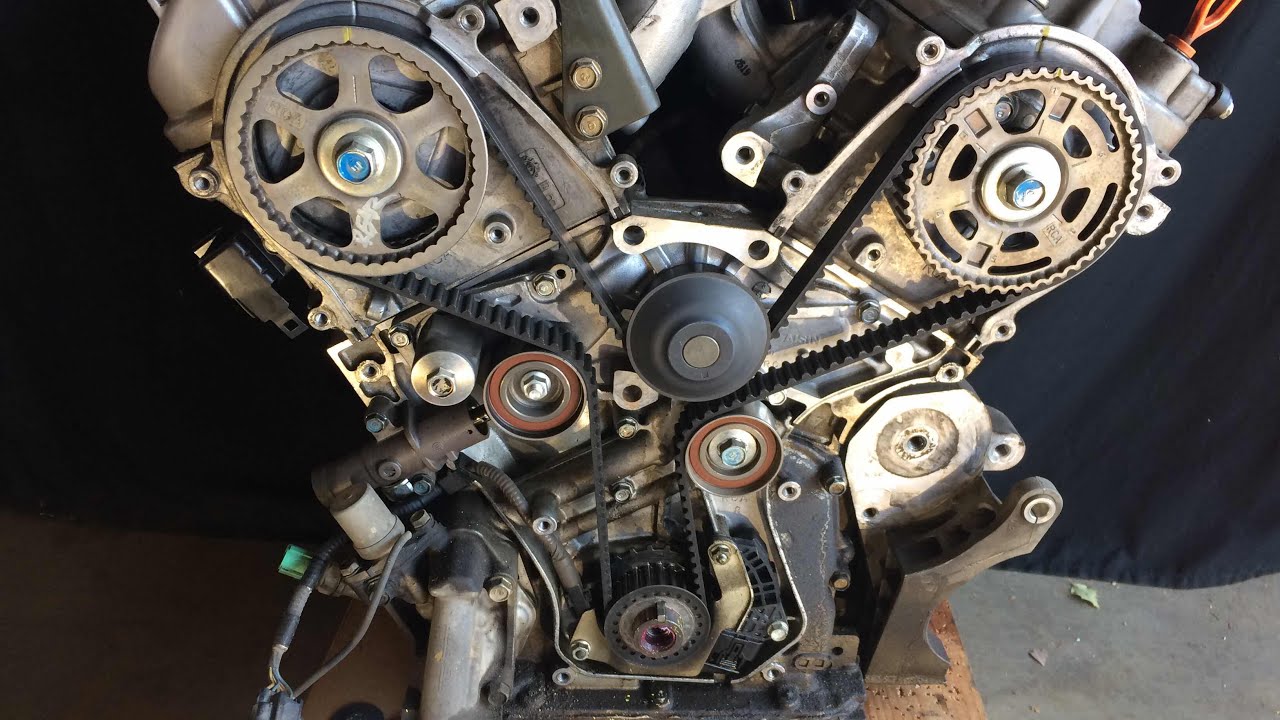
🛠️ The Complete Acura Timing Belt Replacement Procedure
I’m going to walk you through the actual replacement process so you understand what you’re paying for if you hire it out, or what you’re getting into if you’re brave enough to DIY it. Fair warning: this is an advanced job that requires special tools and absolute precision. If you’ve never done internal engine work before, this isn’t the place to start.
The Difficulty Assessment
On a scale of 1–10 where changing oil is a 1 and rebuilding an engine is a 10, I’d rate an Acura timing belt replacement as a:
- 7/10 for V6 models (requires removing the intake manifold)
- 6/10 for four-cylinder models (simpler, no intake manifold removal)
You need confidence, patience, and the right tools.
🔧 Required Tools and Materials
Essential Tools:
- 19mm socket (for crankshaft pulley bolt, deep socket, 6-point)
- Breaker bar (minimum 24″ long—crankshaft bolt is torqued to 181 ft-lbs)
- Torque wrench (capable of 200 ft-lbs)
- Full metric socket set (8mm–19mm)
- Timing belt tool kit (with pulley holders and tensioner tools—around $45 on Amazon)
- Jack and jack stands (rated for your vehicle’s weight)
- Harmonic balancer puller (some models require this)
- White-out or paint pen (for marking alignment)
- Digital camera or phone (for documenting each step)
Nice to Have:
- Impact wrench (makes removing the crankshaft bolt way easier)
- Magnetic parts tray (so you don’t lose bolts)
- Work light (that you can position hands-free)
- Mechanic’s mirror (for checking alignment marks)
Required Parts (2007–2013 MDX 3.7L V6 example):
- Timing belt: Gates T328 or Aisin OEM equivalent ($75–$120)
- Water pump: Aisin or OEM Honda/Acura ($95–$165)
- Tensioner and idler pulleys: OEM set ($120–$180)
- Front crankshaft seal: OEM Honda 91212-RCA-A01 ($12)
- Engine coolant: Honda Blue Type 2 coolant, 1 gallon ($28)
- Drive belts: If showing wear ($35–$60)
- Valve cover gaskets: If seeping oil ($55 per side)
Total Parts Cost: $450–$700 depending on what you include
🔧 Mechanic’s Insider Tip: Always replace the water pump when you do the timing belt. The water pump is driven by the timing belt on most Acuras, and if it fails 20,000 miles after your belt service, you get to pay for all that labor again. An extra $120 in parts now saves you $600 in labor later. I’ve seen customers skip this to save money, then call me crying six months later when their water pump grenades. Don’t be that person.
Step-by-Step Replacement Process (3.7L V6 Example)
This is the procedure for the 2007–2013 Acura MDX with the 3.7L V6, which is representative of most Acura V6 timing belt jobs. Four-cylinder models are similar but simpler since you don’t have to remove the intake manifold.
1Preparation and Safety (15 minutes)Disconnect the negative battery terminal. Let the engine cool completely—you’ll be draining coolant and touching hot components otherwise. Position your jack stands and secure the vehicle. Never work under a car supported only by a jack.
2Remove Engine Covers and Accessories (30 minutes)Remove the plastic engine cover and the intake air box. On V6 models, you’ll need to remove the upper intake manifold. This requires disconnecting multiple vacuum hoses, electrical connectors, and PCV lines. Take pictures of every connector before you remove it. Label everything with masking tape. I’ve seen guys spend hours trying to remember where a random vacuum line goes.
3Remove Drive Belts and Accessories (20 minutes)Remove the serpentine belt and any accessories blocking access to the timing covers. This typically includes the power steering pump (unbolt and set aside—don’t disconnect the lines) and sometimes the alternator on certain models. The accessory drive belt typically uses a spring-loaded tensioner with a 14mm or 15mm bolt.
4Remove the Crankshaft Pulley (20 minutes)This is where people get stuck. The crankshaft bolt is torqued to 181 ft-lbs on most Acura V6s. You’ll need a long breaker bar, and you might need to use the starter motor trick: put the socket and breaker bar on the bolt, let the breaker bar rest against the frame, then bump the starter for a split second. The engine will spin and break the bolt loose. Make sure the car is in gear with the parking brake on.
⚠️ Warning: If you’re not comfortable with the starter motor trick, use an impact wrench. Do NOT try to hold the crankshaft with a strap wrench while breaking this bolt loose—you’ll round off the bolt head or damage the crank. This bolt is serious business.
5Remove Timing Covers (20 minutes)Remove the upper and lower timing covers. There are usually 8–12 bolts of varying lengths—keep them organized. Some bolts are hidden behind wiring harnesses. The lower cover might have a rubber gasket that likes to tear—have RTV silicone ready if it does.
6Align Timing Marks to TDC (10 minutes)Rotate the crankshaft clockwise (using the 19mm bolt) until the white timing marks on the camshaft gears align with the marks on the timing cover. The crankshaft should have its mark at the top. Take photos. Mark everything with white-out. This is the most critical step—if you mess up the timing, the engine won’t run or will destroy itself on startup.
7Remove Old Belt and Components (15 minutes)Release the tensioner (specific procedure varies by model), then slide the old timing belt off. Remove the tensioner, idler pulleys, and water pump. Inspect everything for wear, leaks, or damage. Clean the mating surfaces thoroughly with brake cleaner.
8Install New Water Pump (20 minutes)Install the new water pump with a fresh gasket or RTV as specified. Torque bolts to 8.7 ft-lbs (105 in-lbs) in a crisscross pattern. Don’t overtighten—these are going into aluminum. Install the new front crankshaft seal using a seal driver or a socket that matches the seal diameter.
9Install New Tensioner and Idler Pulleys (15 minutes)Install the new idler pulleys finger-tight. Install the new tensioner but keep it compressed and pinned (most come with a pin installed). The tensioner should be reset in a vise before installation if it wasn’t already.
10Install New Timing Belt (30 minutes)This is where precision matters. Start at the crankshaft, then route the belt counterclockwise around the water pump, up to the front camshaft, around to the rear camshaft, around the tensioner, and back to the crankshaft. Keep tension on the non-tensioner side as you install it. Make sure all timing marks still align perfectly. Double-check. Triple-check.
11Tension the Belt (15 minutes)Release the tensioner pin. The tensioner will apply pressure automatically. Torque the idler pulley bolts to spec (typically around 33 ft-lbs). Rotate the crankshaft two complete revolutions clockwise by hand. Check that all timing marks realign perfectly. If they don’t, you’ve made a mistake—remove the belt and start over.
12Reassembly (90 minutes)Reinstall the timing covers with new gaskets or RTV. Reinstall the crankshaft pulley and torque the bolt to 181 ft-lbs using a torque wrench. Reinstall all accessories, drive belts, intake manifold, and engine covers. Refill the cooling system with Honda Blue coolant mixed 50/50 with distilled water. Reconnect the battery.
13First Start and Bleeding (30 minutes)Start the engine and listen for any abnormal noises. Let it idle while you bleed the cooling system. Watch for leaks around the water pump and front seal. If the engine runs smoothly, let it warm up to operating temperature and recheck the coolant level. Test drive and recheck everything afterward.
Total Time Estimate: 6–8 hours for an experienced DIYer, 10–12 hours for your first time. A professional shop will quote 4–6 hours of labor.
💰 Acura Timing Belt Replacement Cost Breakdown
Let’s talk money. This is where I see people make bad decisions because they don’t understand what they’re actually paying for. The timing belt replacement cost varies wildly depending on your model, your location, and what components you include.
🔧 Professional Shop Pricing
Basic Timing Belt Service (Belt Only):
- Labor: 4–6 hours × $125–$175/hour = $500–$1,050
- Timing Belt: $120–$180
- Shop supplies: $25–$40
- Total: $1,125–$2,170
Model-Specific Cost Examples:
- 2003–2008 Acura TL 3.2L V6: $850–$1,400
- 2007–2013 Acura MDX 3.7L V6: $1,000–$1,600
- 2004–2008 Acura TSX 2.4L I4: $650–$1,100
- 2007–2012 Acura RDX 2.3L Turbo: $750–$1,250
Dealership vs. Independent Shop: Expect dealership prices to be 20–30% higher than independent shops. A job that costs $1,000 at your local mechanic might run $1,300 at the dealer. You’re paying for OEM parts and dealer overhead, but the quality of work should be comparable if you find a good independent shop.
🛠️ DIY Cost Analysis
If you’re mechanically inclined and have the tools, you can save $600–$1,200 in labor. But you need to be honest about your skill level. I’ve seen botched DIY timing belt jobs that turned into $4,000 engine rebuilds. If you’ve never done internal engine work, pay the professional.
DIY Total Cost:
- Timing belt kit: $75–$120
- Water pump: $95–$165
- Tensioner/idler kit: $120–$180
- Front crank seal: $12
- Coolant: $28
- Timing belt tool kit (if needed): $45
- Harmonic balancer puller (if needed): $30
- Total Parts: $405–$580
Total Savings: $540–$1,590 compared to professional service
💰 Money-Saving Pro Tip: If you’re at 90,000 miles and need a timing belt, also do the valve adjustment at the same time. The intake manifold is already off on V6 models, so you’re 60% of the way there. Doing both jobs together saves you from paying for that labor twice. A valve adjustment costs $300–$450 by itself, but only adds $150–$200 when combined with timing belt work.
💥 What Happens If You Skip It? The Real Cost of Belt Failure
I need to paint you a picture of what a snapped timing belt costs because it’s not pretty. Last year, a guy brought in his 2009 Acura TL on a flatbed. The belt snapped at 118,000 miles on the highway. Here’s what we found:
- 12 bent intake valves
- 6 bent exhaust valves
- 3 damaged pistons with valve impact marks
- Scored cylinder walls requiring a bore and hone
- Damaged camshafts from the sudden stop
The bill for a complete top-end rebuild with machine work? $4,850. He could have bought a used engine for $3,200 and had it installed for another $1,200. Or he could have spent $950 on the timing belt service 28,000 miles earlier.
Most Acuras have interference engines, which means when the timing belt breaks, the valves and pistons occupy the same space at the same time. Physics doesn’t care about your budget—something breaks. If you’re extremely lucky and catch it immediately, you might get away with just bent valves at $1,800–$2,500. If you’re unlucky, you’re looking at $4,000–$6,000 for a full rebuild or engine replacement.
🔍 OEM vs. Aftermarket: What Parts Should You Actually Buy?
Walk into any parts store and you’ll see timing belts ranging from $45 to $180. The cheap ones are garbage, period. I’ve seen $50 timing belts fail at 30,000 miles. Here’s what actually matters when choosing parts.
🏆 Timing Belt Brands That Won’t Let You Down
Tier 1 (Best):
- Aisin: This is the OEM supplier for Honda/Acura. Part numbers like TKH-003 or TKH-004 depending on your model. Cost: $95–$140. This is what comes in the Honda box from the dealer, just without the markup.
- OEM Honda/Acura: Same as Aisin, but with a 200% markup. Only buy this if you’re doing warranty work or want the Honda box for resale value.
Tier 2 (Good Enough):
- Gates Racing: Part number T328RB for most V6 models. Cost: $75–$100. Gates supplies belts to multiple OEMs. Their racing belts use better compounds than their standard belts. I’ve installed hundreds with zero failures.
- Mitsuboshi: Another OEM supplier, though harder to find. Similar quality to Aisin.
❌ Avoid:
- Any timing belt under $60
- Brands you’ve never heard of
- Kits from eBay with no brand name
- “Economy” or “value” belts from parts stores
⚠️ Critical Warning: Never reuse old tensioners or idler pulleys to save money. I’ve seen brand-new Gates belts destroyed in 15,000 miles because someone reused a worn tensioner. The tensioner provides the proper belt tension—if it’s weak, the belt slips, overheats, and fails. A $45 tensioner protects your $800 repair. Don’t be penny-wise and pound-foolish.
💧 Water Pump Recommendations
The water pump matters just as much as the belt. If it fails after your belt service, you’re doing the whole job again. I’ve seen exactly three water pump brands that last:
- Aisin: OEM supplier, part numbers like WPH-076 for various models ($95–$165)
- OEM Honda/Acura: Same pump, higher price
- GMB: Decent alternative, but I’ve had better luck with Aisin
Avoid cheap water pumps like your engine depends on it—because it does. A $45 water pump from AutoZone will grenade the bearings at 40,000 miles, leak coolant into your timing belt area, and contaminate your brand-new belt. Then you get to do it all over again.
⚠️ Common Mistakes and How to Avoid Them
I’ve fixed dozens of botched timing belt jobs over the years. Here are the mistakes that cost people thousands of dollars.
🔹 Mistake #1: Off By One Tooth
This is the most common error. The engine starts and runs, but runs terribly—rough idle, no power, check engine light with misfire codes. What happened? The belt was installed one tooth off on one of the camshaft gears. The camshaft timing is off by 10–15 degrees, which throws everything out of whack.
How to avoid it: After installing the belt, rotate the crankshaft two full revolutions by hand and verify that ALL timing marks realign perfectly. If even one mark is slightly off, remove the belt and reinstall it. Don’t guess, don’t eyeball it, don’t convince yourself it’s “close enough.” Close enough bends valves.
🔹 Mistake #2: Overtightening the Crankshaft Bolt
The crankshaft bolt requires exactly 181 ft-lbs on most Acura V6s. I’ve seen DIYers with a 1/2″ breaker bar reef on it until they strip the threads in the crankshaft. Then you need a thread repair kit or a new crankshaft, which means pulling the engine. Use a torque wrench. Spend the $40 if you don’t have one.
🔹 Mistake #3: Forcing the Belt Over the Gears
If the belt doesn’t slide on easily, something is wrong. Don’t force it. Either the belt is the wrong size, you’ve lost tension on one side, or a timing mark isn’t aligned. Forcing it can stretch the belt or damage the teeth. I’ve seen brand-new belts with three missing teeth because someone forced them over a misaligned gear.
🔹 Mistake #4: Skipping the Cooling System Bleeding
Acuras have tricky cooling systems that trap air if you don’t bleed them properly. Air pockets cause overheating, which kills head gaskets. After refilling the coolant, run the engine with the radiator cap off until the thermostat opens, burp the system, add more coolant, and repeat until the level stabilizes. This takes 30 minutes but prevents a $1,500 head gasket repair.
🔹 Mistake #5: Losing Track of Bolts
There are literally 60+ bolts involved in this job, and many are different lengths. If you put a long bolt where a short one goes, it can crack the timing cover or bottom out in a blind hole. Use a cardboard template, take pictures, or use an egg carton to organize bolts by location. I’m not kidding about the egg carton—I’ve used that trick for 17 years.
🔄 Timing Belt vs. Timing Chain: Why Acura Made the Switch
People always ask me why Acura switched from timing belts to timing chains. The answer is simple: customer satisfaction and warranty costs. Timing belts are a major maintenance expense that customers hate. Timing chains cost more upfront but virtually eliminate the need for replacement.
A timing chain runs in an oil bath inside the engine and can last 300,000+ miles with proper oil changes. No $1,000 service at 105,000 miles. No catastrophic failure if you forget to change it. It’s a better engineering solution in every way except initial cost.
If you’re shopping for a used Acura and torn between a 2013 and 2014 MDX, that’s the difference—the 2013 needs a $1,000 service within the first year of ownership if the belt hasn’t been done. The 2014 doesn’t. Factor that into your purchase price.
For more information about timing belt replacement intervals across different makes and models, including interval variations based on driving conditions, check out our comprehensive guide. Understanding these intervals helps you plan maintenance budgets and avoid surprise repairs.
❓ Frequently Asked Questions About Acura Timing Belt Replacement
🔹 Can I just replace the timing belt and skip the water pump to save money?
Technically yes, but it’s a terrible idea. The water pump is hidden behind the timing belt and driven by it. If the water pump fails six months after your belt service, you pay for all that labor again—another $600–$800 just to access the pump.
I’ve done probably 800 timing belt jobs in my career, and I’ve never seen an original water pump last significantly longer than the timing belt interval. The bearings wear out, the seals leak, or the impeller corrodes. Spending an extra $120 now saves you from doing this entire job twice.
The only exception is if you’re selling the car immediately after the timing belt service. Then you can justify skipping the pump because it’s the next owner’s problem, not yours. But if you’re keeping the car? Replace the pump.
🔹 How much does Acura timing belt replacement cost at the dealership vs. an independent shop?
Dealerships typically charge 20–30% more than independent shops for the same work. A complete timing belt service (belt, water pump, tensioners, seals) runs $1,300–$2,000 at a dealer and $900–$1,500 at a good independent shop. You’re paying for OEM parts and dealer overhead at the dealer, but the quality should be similar if you find a competent independent mechanic.
My advice: Get quotes from both. Some dealers run specials on timing belt services and actually beat independent shops. I’ve seen dealerships offer a complete package for $1,099, which is competitive with independent pricing. Shop around and make sure you’re comparing apples to apples—some quotes include the water pump and some don’t.
🔹 What happens if my Acura timing belt breaks while driving?
Nothing good. Most Acura engines are interference designs, meaning the valves and pistons can occupy the same space when the timing is off. When the belt snaps, the camshafts stop turning but the crankshaft and pistons keep going. Pistons smash into valves, bending them. You’ll need a head rebuild minimum ($1,800–$2,500) and potentially a full engine rebuild if pistons crack ($4,000–$6,000).
The engine will die immediately. Don’t try to restart it. Call a tow truck. The more you try to start it, the more damage you do. I’ve seen people turn a $2,000 valve job into a $5,000 disaster by cranking the engine repeatedly after a belt failure.
🔹 Does the Acura TLX have a timing belt?
No. The TLX launched in 2015 as a replacement for the TL and TSX, and it uses a timing chain on all engine options—both the 2.4L four-cylinder and the 3.5L V6. Timing chains don’t require scheduled replacement and should last the life of the engine with proper oil changes.
If someone tells you your TLX needs a timing belt, they’re either confused or trying to rip you off. The TLX has never used a timing belt in any model year. Same goes for the 2009+ TSX—second-generation TSX models switched to timing chains.
🔹 Can I do an Acura timing belt replacement myself, or should I hire a professional?
If you have to ask, hire a professional. This isn’t a beginner job. You need experience with internal engine work, special tools, and absolute precision. One mistake—installing the belt one tooth off—can bend valves and turn your $600 DIY job into a $4,000 engine rebuild.
That said, if you’ve done timing belts before on other vehicles, have the right tools, and follow the procedure exactly, it’s doable. Plan on 8–12 hours for your first Acura timing belt. Take pictures of everything, mark all timing marks, and rotate the engine two full revolutions by hand to verify timing before buttoning it up.
My rule: If you’ve successfully done 2–3 timing belts on other vehicles and understand how interference engines work, you can attempt it. If this is your first timing belt job ever, pay the $900 and watch the mechanic work if they’ll let you. Learn on someone else’s dime, not your engine.
🔹 How do I know if my Acura timing belt has been replaced?
Check your service records first. Look for receipts or stamps in the service book showing timing belt replacement. If you bought the car used without records, you have a few options:
- Call the previous owner if you have their contact info
- Contact Acura dealers where the car was serviced—they might have records in their system if you provide the VIN
- Remove the upper timing cover and inspect the belt for a date code (molded into the belt, usually looks like “3/21” for March 2021)
- Look for aftermarket belt brands through the inspection window (Gates, Aisin, etc. vs. factory Honda/Acura)
If you can’t verify the belt was replaced and you’re over 90,000 miles or seven years old, assume it’s original and replace it. A $1,000 timing belt service is cheaper than a $4,500 engine rebuild if you’re wrong.
🔹 Should I replace my Acura MDX timing belt at 90,000 miles or wait until 105,000 miles?
Honda’s official interval for the MDX is 105,000 miles or seven years—whichever comes first. But I recommend 90,000 miles if you plan to keep the vehicle past 150,000 miles. That 15,000-mile buffer has saved countless engines in my shop.
Here’s my logic: timing belts don’t fail gradually—they fail catastrophically. The difference between a belt that’s 90% worn and 100% worn isn’t visible to the naked eye. Running it to 105,000 miles means you’re trusting that belt for every additional mile with zero margin for error. If the belt is slightly defective, if your climate is harsh, if your tensioner is weak, you’re gambling with a $4,000 engine rebuild.
For $900 at 90,000 miles, you buy complete peace of mind until 195,000 miles when the next service is due. For most people, that’s the life of the vehicle. The extra $900 now saves you from ever worrying about timing belt failure again.
🔹 What other maintenance should I do at the same time as the timing belt?
Smart question. Since the front of the engine is already apart, you should consider:
- Water pump (absolute must—adds $150 in parts, saves $700 in labor later)
- Drive belts if showing cracks ($35–$60 in parts, saves separate service)
- Valve adjustment (intake manifold is already off on V6 models, adds $150–$200 vs. $400 separately)
- Spark plugs (easy access with intake manifold removed, $60–$100 in parts)
- Front crankshaft seal (included in most belt kits, prevents oil leaks)
- Thermostat if original (prevents overheating, $45 part)
- Coolant flush (already draining coolant anyway, $30 worth of fluid)
The goal is to tackle every service that requires removing the same components. You pay once for labor that covers multiple jobs. A timing belt with water pump, valve adjustment, and spark plugs might cost $1,400 total, but doing those three jobs separately would cost $2,000+.
🎯 Final Thoughts From a Mechanic Who’s Seen It All
Look, I’m not going to sugarcoat this—timing belt replacement isn’t cheap. But it’s mandatory maintenance on any Acura built before 2013–2014. The belt doesn’t care about your budget, your vacation plans, or whether you think it looks fine. When it fails, you’re looking at engine damage that costs 3–5 times more than the preventive service.
I’ve watched customers try to stretch timing belts to 120,000 miles to save money, only to spend $4,500 on a head rebuild when the inevitable happens. I’ve seen people skip the water pump to save $150, then pay another $800 in labor when it fails six months later. I’ve diagnosed dozens of engines with bent valves because someone installed the belt one tooth off and didn’t bother to verify the timing.
The best timing belt job is the one that happens before it’s an emergency. At 90,000–105,000 miles, depending on your comfort level, budget for this service. Get quotes from multiple shops, make sure they’re including the water pump, and don’t cheap out on parts. An Aisin or Gates timing belt with OEM-quality components will last another 100,000+ miles without drama.
If you’re shopping for a used Acura with high mileage, ask for timing belt service records. If they can’t provide them, assume it hasn’t been done and knock $1,000–$1,500 off your offer price. That’s money you’ll spend immediately after purchase.
And if you’re the DIY type with the skills and tools, this job is absolutely doable. Take your time, follow the procedure exactly, verify your timing marks multiple times, and don’t cut corners on parts. The satisfaction of doing your own timing belt is worth the effort—plus you’ll save enough money to buy a really nice torque wrench for your next project.
🚗 Stay safe out there, and remember: timing belts are scheduled maintenance, not optional maintenance. Your engine is counting on you.