Quick Answer
For most Subaru models with the 2.5L engine (1996-2012/2014 for non-turbo), the subaru timing belt replacement interval is every 105,000 miles or 10 years. Because Subaru 2.5L engines are interference engines, a snapped belt will cause catastrophic engine damage, bending valves instantly. Professional replacement typically costs between $900 and $1,500, while a DIY parts kit runs $200–$400.
The Tuesday Morning Nightmare: Why This Matters
It was a rainy Tuesday morning in the shop—classic Pacific Northwest drizzle. A flatbed rolled up with a 2008 *Subaru Outback* that looked pristine from the outside. The owner, a guy named Dave, looked like he hadn’t slept in two days. He’d been driving on the highway when he heard a “pop,” and the car just died. Coasted to the shoulder. Wouldn’t restart.
I hooked up the scan tool—no codes, just a crank sensor error. I pulled the timing cover. The belt was snapped in two, clean as a whistle. I broke the news to Dave gently: his engine was an interference engine. His valves were likely sitting in the pistons.
Don’t be Dave. I’ve seen too many *Subaru Forester* and *Outback* owners gamble on the subaru timing belt interval, pushing past 120k or 130k miles because the car “runs fine.” The belt doesn’t give you a warning light before it snaps. I’m writing this guide so you can fix this in your driveway with a six-pack and a weekend, rather than on the side of the highway with a tow truck bill.
Warning: The EJ25 (2.5L) and EJ20 (2.0L) engines used in Subarus of this era are INTERFERENCE engines. If the timing belt fails, the pistons will violently collide with the valves. This requires a full engine rebuild or replacement. Do not skip this maintenance.
Technical Specifications & Application
Before we get greasy, we need to be sure we are talking about the right car. This guide primarily covers the 2.5L SOHC and DOHC engines (EJ25 series) found in the most popular models:
- Subaru Outback: 2000–2012 (2.5L) / 2013–2014 (Limited 2.5L)
- Subaru Forester: 1999–2012 (2.5L) / 2013–2014 (2.5L)
- Subaru Legacy: 2000–2012 (2.5L)
- Subaru Impreza: 2002–2011 (2.5L RS/WRX/STI – Note: WRX/STI have specific turbo requirements)
If you have a 2012+ Impreza 2.0L or a 2019+ Forester, you likely have a Timing Chain, not a belt. You do not need this service. For the rest of you, here are the numbers you need.
Critical Specifications
| Specification | Value / Detail |
|---|---|
| Replacement Interval | 105,000 Miles or 105 Months (Subaru official update) |
| Engine Type | Interference (Catastrophic failure on break) |
| Crank Pulley Bolt Torque | 132 ft-lbs (180 Nm) Use thread locker! |
| Cam Sprocket Bolt Torque | 35 ft-lbs (47 Nm) (10mm head) |
| Idler Bolt Torque | 33 ft-lbs (45 Nm) (12mm head) |
| Tensioner Mounting Bolts | 33 ft-lbs (45 Nm) |
| Tensioner Rod Pin | 1.5mm drill bit or special pin for release |
Parts Strategy: OEM vs. Aftermarket
I’ve torn down engines with 200,000 miles on the original belt, and I’ve seen aftermarket belts fail at 40,000. Here is my professional recommendation:
OEM Option: The Subaru belt is high quality, but the “kit” is usually sold piecemeal. Buying a full OEM kit (belt, tensioner, 3 idlers) usually runs $400+.
Aftermarket Option (Recommended): The Gates Timing Belt Component Kit (TCKWP285) or the Aisin Kit (TKF-011). These include the belt, tensioner, and idler pulleys. Aisin is an OEM supplier for Toyota and Subaru, so you are getting OEM quality for half the price. I personally use Aisin or Gates in my own vehicles.
You might want to learn about [timing belt replacement costs, general replacement guide, Subaru head gasket issues](timing-belt-replacement-cost, timing-belt-replacement-guide, subaru-head-gasket) before making your final purchasing decision, especially since head gasket labor often overlaps with timing belt labor on these cars.
Pro Tip: While you are in there, replace the water pump and cam/crank seals. The labor is already paid for. The water pump is driven by the timing belt. If it fails 10k miles later, you have to do this entire job all over again.
Tools & Materials List
You can’t do this with a pair of pliers and a hammer. Precision is key here. Here is exactly what you need.
- Socket Set: 10mm, 12mm, 14mm, 17mm, 19mm (Deep and shallow 6-point sockets preferred).
- Breaker Bar: 1/2″ drive. At least 18 inches long. You will need this for the crank pulley bolt.
- Torque Wrench: Absolutely mandatory. Do not guess the 132 ft-lbs.
- Subaru Crank Pulley Holding Tool: (Special Tool 499987500). “Nice to have.”
- Alternative to Holder Tool: A chain vice grip or a heavy-duty strap wrench to hold the pulley while breaking the bolt loose.
- Jack & Jackstands: You need to lift the right front of the car to access the crank pulley through the wheel well (easier method) or from top (harder method).
- Drill Bit: 1.5mm or a paperclip (to hold the tensioner pin).
- Permanent Marker / Paint: For marking belt direction and pulley positions.
- RTV Silicone: For the oil pump seal if you’re resealing it (common leak point).
Step-by-Step Replacement Procedure
Expect this job to take a first-timer about 4 to 6 hours. It’s not hard, but it is tedious.
Phase 1: Access & Disassembly
Safety First: Disconnect the negative battery terminal. Ensure the engine is cold. If you just drove it, let it sit for an hour. Burnt skin smells bad.
Take out the air intake tube and the airbox. Remove the battery. This gives you massive amounts of room to work on the passenger side of the engine bay.
This is the hardest part of the whole job. The crank bolt is tight—usually rusted tight.Option A: Use the special Subaru holding tool.
Option B: Use a breaker bar against the ground and “bump” the starter motor (I don’t recommend this on newer cars, it can break teeth).
Option C: Wedge a screwdriver in the flexplate teeth through the starter hole (requires removing starter).
Once the bolt is out, the pulley usually slides right off. Sometimes it sticks; tap it gently with a rubber mallet.
There are three plastic covers: top, bottom, and the passenger-side cam cover. Remove the 10mm bolts and the plastic pop-clips. Be gentle; these plastic covers get brittle with age and heat.
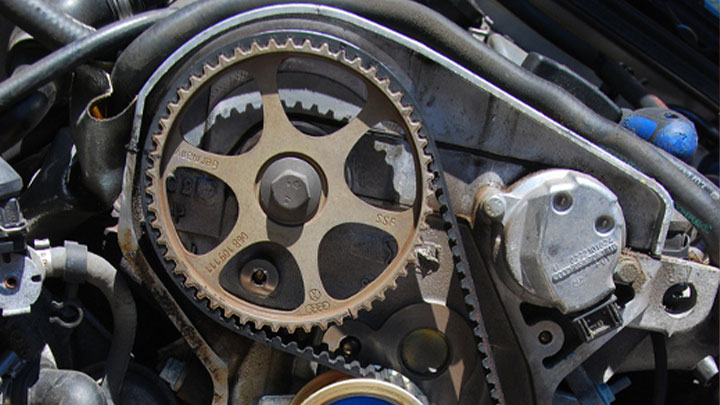
Phase 2: Timing & Removal
Rotate the crankshaft pulley bolt (you can put the bolt back in loosely to turn it) clockwise until the timing marks align.[Diagram: The crank sprocket has a line that must align with a notch on the oil pump behind it. The cam sprockets have marks that point inward toward each other, aligning with the horizontal surface of the head.]
This is crucial. If you are off by a tooth, the car will run poorly or not at all.
Before you remove the belt, look at how it is routed. Take a picture. Loosen the tensioner mounting bolts. Compress the tensioner rod slowly in a vise and insert the 1.5mm pin/hold pin to lock it retracted.Remove the tensioner. Slide the belt off the sprockets.
Now is the time to swap the idler pulleys, tensioner, and water pump.Note: The idlers usually have a specific torque. Don’t overtighten the 12mm bolts or you’ll crack the aluminum mounting ears on the engine block. **33 ft-lbs.**
Phase 3: Installation & Tension
Route the new belt exactly as the old one came off. Start at the crank, go around the idlers, then up to the cams.Ensure the slack is on the tensioner side. Double, triple check your alignment marks. If the marks moved while you were messing with the belt, rotate the cams slightly (do not rotate past TDC alignment without the belt on if possible) to realign.
Install the tensioner (but don’t torque it down fully yet). Pull the pin. The tensioner rod will extend, applying tension to the belt.Once tension is applied, torque the tensioner mounting bolts to spec.
This is the make-or-break moment. Manually rotate the engine (using the crank pulley bolt) clockwise **two full revolutions**. Bring it back to TDC.Check the marks. Are they perfect? Yes? Proceed. No? loosen the belt, adjust, and repeat.
Put the covers back on. Reinstall the crank pulley. Torque that crank bolt to **132 ft-lbs**. Put the intake and battery back in.
Cost Analysis: DIY vs. Professional
I know what you’re thinking: “That’s a lot of work.” But look at the numbers.
| Category | DIY Cost | Professional Shop Cost |
|---|---|---|
| Timing Belt Kit (Belt, Tensioner, 3 Idlers) | $180 – $300 (Aisin/Gates) | $300 – $450 (Parts Markup) |
| Water Pump | $45 – $80 | $90 – $150 |
| Seals (Cam/Crank) | $20 | $100 (Labor usually included) |
| Labor | Free (Your time) | $500 – $900 (4-5 hours labor) |
| TOTAL | $245 – $400 | $900 – $1,600 |
As you can see, doing this yourself saves you the price of a set of tires. If you own a *Subaru Outback*, this is one of the most valuable DIY skills you can acquire. It’s purely a labor-intensive job; it doesn’t require a lift or a diagnostic computer, just patience and torque wrenches.
Troubleshooting Common Issues
Even with a guide, things happen in the garage. Here are the calls I get from DIYers stuck halfway through.
Issue: Can’t get the crank pulley bolt loose.
The Fix: Heat. Use a propane or MAP gas torch to heat the center of the bolt for 60 seconds. This breaks the threadlocker lock. Use a breaker bar with a cheater pipe (a piece of pipe over the handle). Ensure you are turning counter-clockwise (lefty-loosey).
Issue: Car misfires or has low power after the job.
The Fix: You are likely one tooth off on a cam sprocket. The marks looked close, but “close” doesn’t cut it. Pull the covers and re-align. Did you gap the new spark plugs correctly?
Issue: Oil leaking from the timing cover area.
The Fix: Common on 2.5Ls. You likely disturbed the cam seals or the crank seal. Or, the oil pump o-ring (behind the crank pulley) started leaking because you touched it. It’s annoying, but it requires disassembly again.
Frequently Asked Questions
Catastrophic failure. The 2.5L engine is an interference engine. The pistons will hit the valves, bending them. You will be looking at a $2,500-$4,000 repair bill for a head rebuild or replacement engine. This is strictly preventative maintenance.
Yes. Always. The water pump sits behind the timing belt. To replace the water pump later, you have to do the entire timing belt job again. The pump is $50. Don’t be “penny wise and pound foolish.”
Looking at a timing belt tells you nothing about the internal integrity of the rubber or the grease inside the sealed tensioner bearings. I have pulled belts off at 110k that looked new but the tensioner was seized. Stick to the subaru timing belt interval of 105,000 miles.
It is an intermediate job. You need to be comfortable rotating the engine by hand, using a torque wrench, and understanding engine geometry. If you’ve changed your own oil and brakes, you can likely handle this, but set aside a full weekend.
Dealers use OEM parts exclusively (which are pricier) and charge “book time” labor rates. Sometimes the book allows 4.5 hours for a job that a master tech can do in 2.5. Local shops often use high-quality aftermarket parts (Aisin/Gates) which saves parts cost.
Conclusion
Replacing the timing belt on your *Subaru Outback* or *Forester* is the single most important maintenance item you will face on these cars. The difference between a $300 weekend project and a $3,000 engine swap is simply a rubber band and a bit of time.
It’s a difficult job, rated a 7/10 on the difficulty scale, mostly due to the cramped space and the crank pulley bolt. However, if you take your time, verify your timing marks twice, and use a quality kit (Aisin or Gates), you can knock this out in your driveway. Trust me, the peace of mind knowing your valves are safe is worth the sore back and scraped knuckles. Just remember to torque that crank bolt to 132 ft-lbs.