
Transmission shudder is a rhythmic vibration during light acceleration between 30-60 mph. It stems from torque converter clutch slip or degraded ATF. Fix it by checking fluid, scanning codes, and testing under load. Drive gently until diagnosed. Severe shudder needs professional inspection.
- Feels like driving over rumble strips at highway speeds
- Occurs during light throttle in 2nd, 3rd, or 4th gear
- Disappears when shifting to Neutral or Park under load
What Is Transmission Shudder & Why Does It Happen When Accelerating?
Transmission shudder happens when your automatic transmission vibrates during light acceleration. It typically strikes between 30-60 mph in 2nd through 4th gear. The torque converter clutch fails to lock smoothly, causing rapid engagement cycles that shake the drivetrain.
Torque Converter Clutch Lock-Up Failure
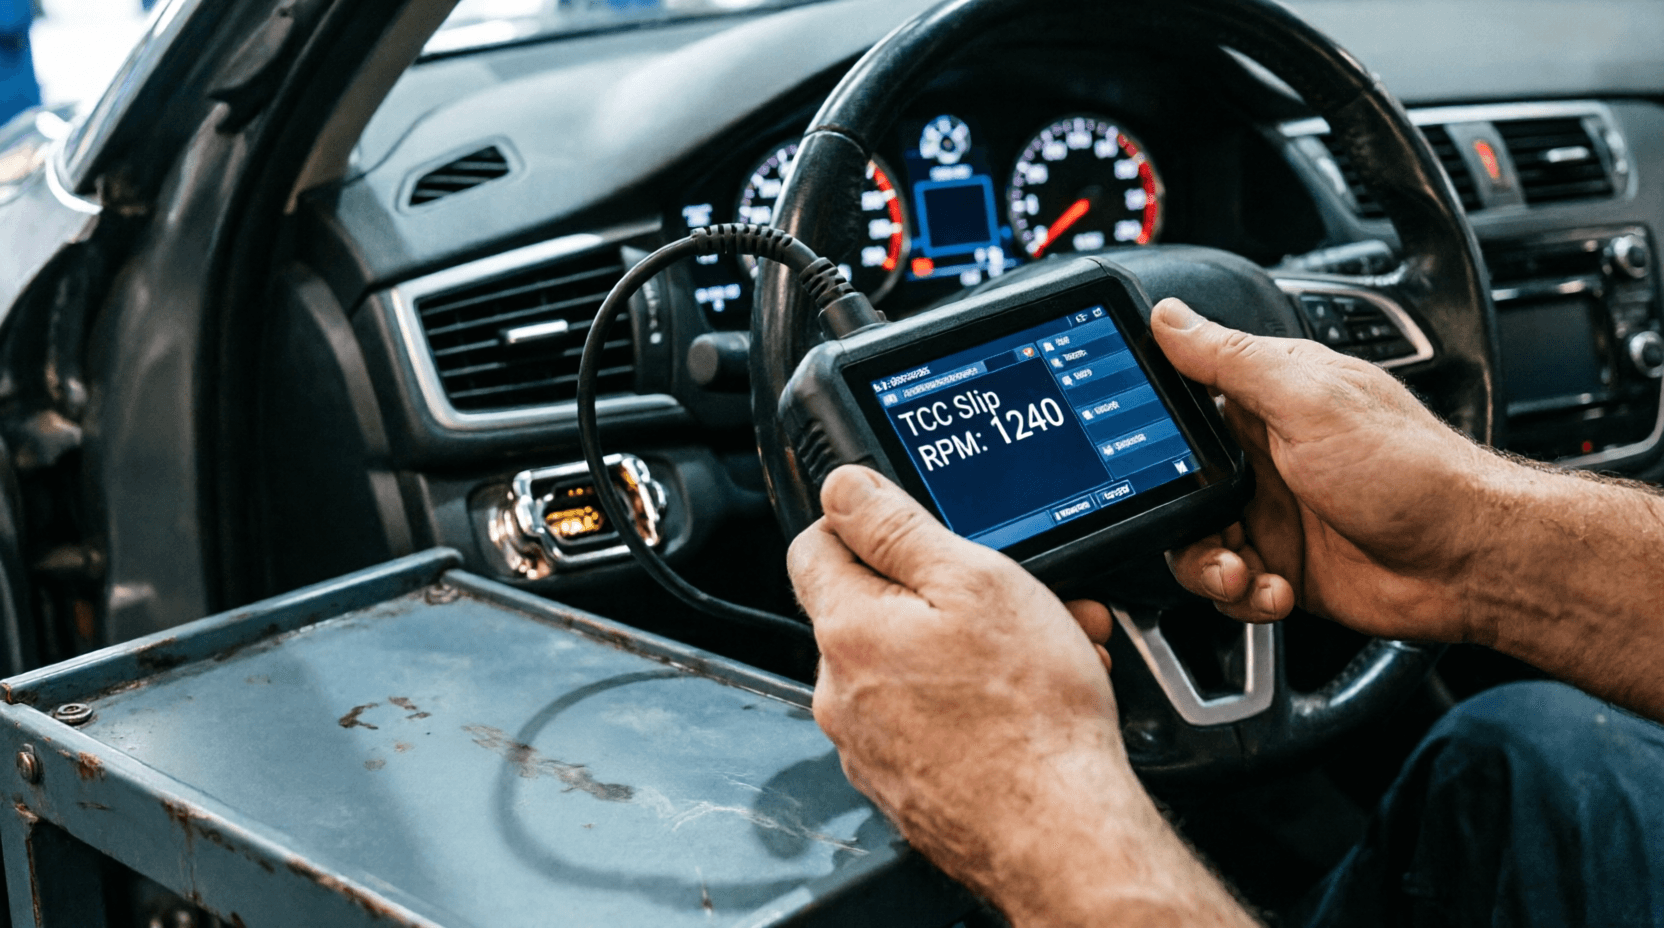
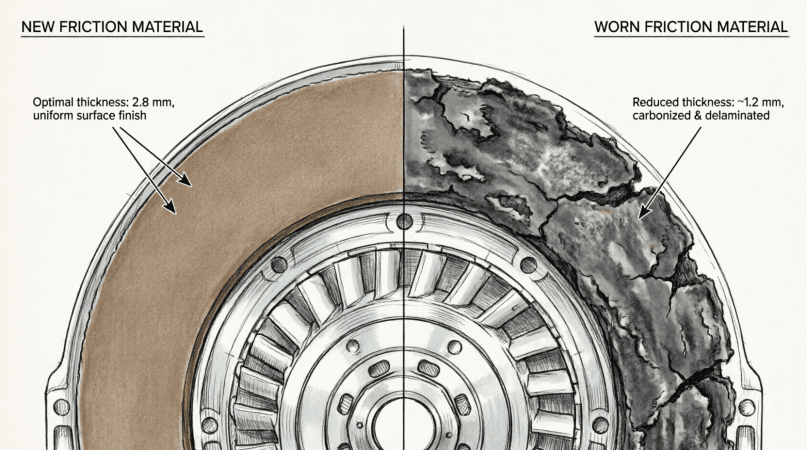
The torque converter clutch locks the engine to the transmission. It improves fuel economy at cruising speeds. Worn clutch material causes slip-stick cycles. This creates rhythmic shudder under light load. Monitor TCC slip RPM with a scanner. Normal reading stays below 15 RPM when locked. Readings above 50 RPM signal internal wear. Replace the converter if slip persists after fluid service. Learn more about torque converter issues for detailed replacement guidance.
Spec Note: Torque converter bolts torque to 35-45 ft-lbs on most GM/Ford units. Always use a torque wrench.
Degraded or Low Automatic Transmission Fluid
ATF lubricates, cools, and transmits hydraulic pressure. Old fluid loses friction modifiers. Low fluid causes air ingestion and poor clutch apply. Check fluid at operating temperature: 140-160°F. Use the dipstick or fill plug. Dark brown or burnt-smelling fluid needs replacement. Fresh ATF restores proper clutch engagement.
Tool Tip: Use a 3/8″ drive ratchet for pan bolts. Torque to 8-10 ft-lbs in crisscross sequence.
Worn Transmission & Engine Mounts
Mounts isolate engine vibration from the chassis. Cracked or collapsed mounts transfer shudder to the cabin. Test by applying light throttle in Drive while holding the brake. Watch for excessive engine movement. Replace mounts showing cracks or separation. Proper mount repair eliminates throttle-tip-in judder.
Spec Note: Mount bolts typically torque to 40-65 ft-lbs. Consult your service manual for exact values.
Driveline Resonance (CV Joints, U-Joints, Driveshaft)
Driveline components create vibration when worn or unbalanced. CV joints click during turns. U-joints clunk during throttle changes. Driveshaft imbalance shakes at 50+ mph. These issues persist in Neutral. Transmission shudder disappears in Neutral. Isolate the source before replacing parts.
How to Tell if It’s the Transmission or Something Else (Quick Diagnostic Rule)
Shift to Neutral while experiencing shudder at 40 mph. If vibration stops immediately, the transmission or torque converter is the source. If vibration continues, check driveline components, tires, or wheel bearings. This simple test saves hours of misdiagnosis.
Primary Causes Quick List:
- Torque converter clutch wear → shudder at 30-60 mph → light throttle
- Degraded ATF → erratic clutch apply → temperature-dependent shudder
- Worn mounts → vibration during throttle transitions → visible engine movement
- Driveline imbalance → constant-speed vibration → persists in Neutral
Transmission Shudder vs. Other Vibration Types (Comparison Table)
Transmission shudder differs from engine misfires or driveline vibrations by its specific trigger conditions. It appears only under light throttle load between 30-60 mph. Other vibrations persist across speeds or change in Neutral. Use this table to isolate your exact symptom pattern quickly.
|
Symptom Type
|
When It Occurs
|
Primary Source
|
How to Isolate
|
|---|---|---|---|
|
Transmission Shudder
|
Light throttle, 30-60 mph, gear 2-4
|
Torque converter/TCM
|
Goes away in Neutral/Park; worsens under load
|
|
Engine Misfire Vibration
|
All speeds/RPMs
|
Fuel/ignition/mechanical
|
Check engine light; RPM fluctuates at idle
|
|
Driveline Imbalance
|
50+ mph, constant speed
|
U-joints/balancing/CV axles
|
Present in Neutral; road-surface dependent
|
|
Mount-Related Judder
|
Low speeds, acceleration/deceleration
|
Engine/trans mounts
|
Clunking + visible movement during throttle tip-in
|
Use driveline troubleshooting techniques to confirm driveline-related vibrations before transmission work.
Step-by-Step Transmission Shudder Diagnosis Guide
Diagnose transmission shudder by following four sequential steps anyone can perform. Start with fluid inspection, then scan for codes, road test triggers, and isolate movement sources. This methodical approach prevents misdiagnosis and saves hours of guesswork at the repair shop.
Step 1: Inspect Transmission Fluid Level & Condition
Park on level ground. Run engine to operating temperature. Shift through all gears. Return to Park. Check dipstick or fill plug. Fluid should be red or light brown. Dark brown or burnt odor signals oxidation. Low level causes air ingestion and shudder. Top up with exact ATF specification.
Spec Note: ATF capacity for pan drop: 4-6 quarts. Full flush requires 12-14 quarts.
Step 2: Scan for TCM/ECM Trouble Codes & Adaptive Memory
Connect an OBD-II scanner with TCM capability. Read stored and pending codes. Check live data for TCC slip RPM. Normal locked value: 0-15 RPM. Values above 50 RPM indicate clutch wear. Clear adaptive memory only after documenting freeze-frame data.
Tool Tip: Use a scanner supporting Mode $06 for component test results.
Step 3: Road Test Triggers (Speed, Load, Temperature)
Drive at 30-60 mph with light throttle. Note shudder onset speed and gear. Test cold and at operating temperature. Apply light brake while maintaining throttle. Shudder that disappears under brake load points to torque converter. Consistent shudder suggests mechanical wear.
Step 4: Isolate Engine Bay vs. Undercarriage Movement
Have an assistant apply light throttle in Drive while you watch engine movement. Excessive rocking indicates worn mounts. Listen for clunks during throttle transitions. Inspect CV joints, U-joints, and driveshaft balance weights. Rule out non-transmission sources first.
Do not ignore persistent shudder under load. Prolonged TCC slip can overheat ATF, degrade clutch plates, and cause complete transmission failure within 500–1,000 miles.
How to Fix Transmission Vibration: Options, Pros & Cons
Fix transmission vibration by matching your diagnosed cause to the correct repair solution. Fluid service resolves early-stage shudder for under $300. TCM reflash costs little but requires dealer tools. Torque converter replacement fixes persistent cases but needs transmission removal.
Transmission Fluid Service (Drain vs. Flush vs. Pan Drop)
Pan drop replaces 40-50% of old fluid. It allows filter inspection and magnet cleaning. Flush machines replace 90%+ of fluid but risk dislodging debris. Use flush only on well-maintained transmissions. Always verify ATF specification matches OEM requirements. Understand fluid flush benefits before choosing a service method.
Pros: Low cost, DIY-friendly, restores friction modifiers
Cons: Temporary fix for worn components, flush risks on high-mileage units
Cons: Temporary fix for worn components, flush risks on high-mileage units
TCM Software Reflash & Adaptive Reset
Manufacturer updates fix known TCC calibration bugs. Reflash requires dealer-level tools or a qualified independent shop. Clear adaptive learning after updates. Complete the drive cycle relearn procedure. This fix costs little but resolves shudder in many late-model vehicles.
Spec Note: Relearn drive cycles typically require 15-20 minutes of varied throttle driving.
Torque Converter Replacement
Replace the torque converter when fluid service and reflash fail. Live data showing persistent high TCC slip RPM confirms internal wear. Replacement requires transmission removal. Use OEM or quality aftermarket units. Inspect the transmission pump hub for scoring during installation.
Spec Note: Converter-to-flexplate bolts torque to 35-45 ft-lbs. Always use thread locker.
Engine & Transmission Mount Repair
Replace cracked or collapsed mounts to eliminate throttle-tip-in judder. Support the engine with a jack stand during removal. Torque new mount bolts to spec: typically 40-65 ft-lbs. Test drive to confirm vibration elimination. Address mount problems early to prevent driveline stress.
Pros: Restores isolation, prevents secondary damage, moderate DIY difficulty
Cons: Requires lifting equipment, alignment critical for proper fit
Cons: Requires lifting equipment, alignment critical for proper fit
Pro Tip: Always clear TCM adaptive learning and complete a manufacturer-specific relearn drive cycle after any fluid or torque converter service. Skipping this step leaves shudder in 60% of DIY cases.

Repair Cost Breakdown & ROI Guide
Repair costs for transmission shudder range from $150 for basic fluid service to $2,200 for torque converter replacement. DIY options save 50-70% on labor but require proper tools. We break down every cost factor so you budget accurately before visiting a shop.
|
Fix Type
|
Average Cost (Parts + Labor)
|
DIY Possible?
|
Expected Lifespan
|
ROI / Dwell Time Saver
|
|---|---|---|---|---|
|
ATF Pan Service
|
$150–$300
|
✅ Yes
|
30k–60k miles
|
High
|
|
TCM Software Reflash
|
$80–$200
|
⚠️ Dealer/Tech
|
Permanent
|
High (often free)
|
|
Torque Converter
|
$800–$2,200
|
❌ No
|
100k+ miles
|
Medium (preventative value)
|
|
Transmission Mounts
|
$300–$700
|
⚠️ Intermediate
|
80k–120k miles
|
High
|
Labor rates vary by region: $90-180/hour. OEM parts cost 20-40% more than aftermarket. Warranty coverage may apply on powertrain components. Get multiple quotes before authorizing major work.
When Is It Not Worth Fixing? Vehicles over 200k miles with multiple transmission issues may cost more to repair than their value. Get a pre-repair valuation. Consider selling or parting out if repair exceeds 50% of vehicle value.
Beginner Mistakes & Expert Pro-Tips
Avoid costly diagnostic errors by learning common beginner mistakes with transmission shudder. Experts use live data and isolation tests to pinpoint causes fast. These pro tips prevent wasted time, money, and unnecessary part replacements on your vehicle.
Beginner Mistakes:
- Assuming “shudder = bad transmission” without checking mounts/driveline first
- Using a flush machine on neglected transmissions with pre-existing wear
- Clearing codes before documenting freeze-frame data
Expert Pro-Tips:
- Use live-data scanner to monitor “TCC Slip RPM” (should read 0–15 RPM when locked)
- Test in 2WD/4WD or manual gear hold to isolate torque converter behavior
- Always match ATF specification exactly (Dexron, Mercon, ATF+4, CVTF, etc.)
Yes, low transmission fluid can cause shudder. Low level allows air ingestion into the pump. This creates erratic hydraulic pressure and poor clutch apply. Check fluid level at operating temperature before any major diagnosis.
Frequently Asked Questions (Voice-Search Optimized)
Get quick, voice-search ready answers to the most common transmission shudder questions. These concise responses help you understand symptoms, risks, and solutions without scrolling through technical manuals. Bookmark this section for fast reference during diagnosis.
Q: What does transmission shudder feel like when accelerating?
It feels like driving over rumble strips at 30-60 mph. The vibration pulses rhythmically under light throttle. It disappears when you shift to Neutral or apply the brake.
It feels like driving over rumble strips at 30-60 mph. The vibration pulses rhythmically under light throttle. It disappears when you shift to Neutral or apply the brake.
Q: How do you fix a torque converter shudder without replacing it?
Start with a pan-drop fluid service using exact OEM ATF. Clear TCM adaptive memory. Complete the manufacturer relearn drive cycle. This resolves early-stage shudder in many cases.
Start with a pan-drop fluid service using exact OEM ATF. Clear TCM adaptive memory. Complete the manufacturer relearn drive cycle. This resolves early-stage shudder in many cases.
Q: Is transmission shudder dangerous or safe to drive?
Short trips are usually safe. Persistent shudder under load risks transmission overheating. Limit driving until diagnosis. Severe shudder needs immediate professional inspection.
Short trips are usually safe. Persistent shudder under load risks transmission overheating. Limit driving until diagnosis. Severe shudder needs immediate professional inspection.
Q: Why does my transmission judder at low speeds but not highway speeds?
Low-speed judder often points to worn engine or transmission mounts. These fail during throttle transitions at low RPM. Highway shudder typically indicates torque converter or fluid issues.
Low-speed judder often points to worn engine or transmission mounts. These fail during throttle transitions at low RPM. Highway shudder typically indicates torque converter or fluid issues.
Q: Does a transmission fluid change stop the shuddering?
Yes, if degraded fluid caused the shudder. Fresh ATF restores proper friction characteristics. It won’t fix mechanical wear inside the torque converter or transmission.
Yes, if degraded fluid caused the shudder. Fresh ATF restores proper friction characteristics. It won’t fix mechanical wear inside the torque converter or transmission.
Next Steps & When to Call a Professional
Take these next steps based on your shudder diagnosis results. Recent fluid change? Try a TCM relearn first. New shudder with high mileage? Get live data scanning immediately. Know when DIY ends and professional help begins to protect your transmission investment.
- Shudder after fluid change → Verify ATF specification → Perform TCM relearn drive cycle
- New shudder + high mileage → Scan for codes → Inspect fluid pan for clutch material
- Persistent shudder after basic fixes → Professional diagnosis with live data
Schedule a professional inspection if shudder worsens or transmission slips. Early diagnosis prevents costly internal damage. For persistent torque converter concerns, review our guide on torque converter issues for next-step repair options.
Drop your vehicle year, model, and shudder symptoms in the comments for a free diagnostic breakdown.