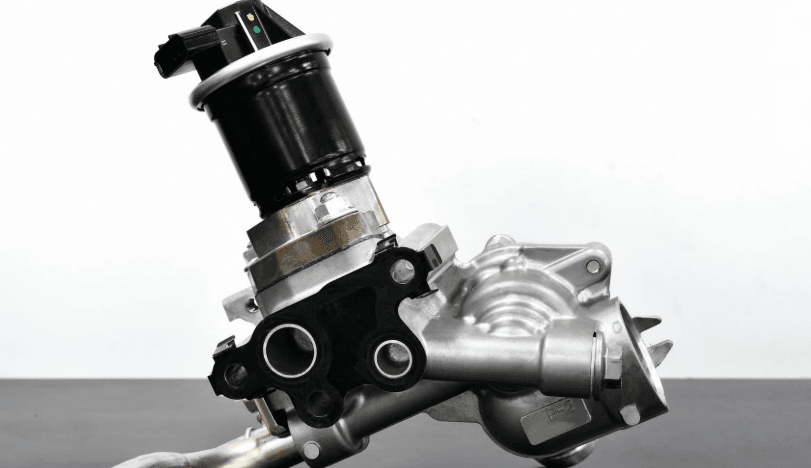
How to Clean an EGR Valve: Step-by-Step Guide for P0401 &…
The Accord That Saved $800 With a $12 Can of Cleaner
A 2012 Honda Accord rolled into my bay with a P0401 code and a rough idle. The owner had a quote from another shop for $850. New EGR valve, new intake manifold gasket, four hours of labor. I popped the hood and pulled the valve in 20 minutes. The pintle was buried in carbon so thick it looked like charcoal. The intake ports were half-blocked.
I soaked the valve in carb cleaner for 15 minutes. Scrubbed it with a brass brush. Ran pipe cleaners through the ports until they came out clean. Reinstalled everything with a new $8 gasket. Cleared the code. The idle smoothed out immediately. Total cost to the customer: $47.
That is not unusual. I have cleaned hundreds of EGR valves. Maybe 15 percent actually needed replacement. The rest just needed the carbon scraped out. This guide will save you the same money.
Why EGR Valves Clog and What Carbon Looks Like
Exhaust gas is dirty. It carries carbon soot, unburned hydrocarbons, and oil vapor from the crankcase ventilation system. Every time the EGR valve opens, that junk passes through the pintle and into the intake ports.
Over 50,000 to 100,000 miles, the carbon layers up like plaque in an artery. The pintle sticks in the closed position. That triggers P0401, insufficient EGR flow. Sometimes it sticks open. Then the engine gets too much exhaust at idle and runs rough or stalls.
Short-trip driving makes it worse. The engine never gets hot enough to burn off the deposits. Stop-and-go traffic, cold starts, and idling for long periods all accelerate buildup. Diesels are especially prone because they run cooler and produce more soot.
Fresh carbon is soft and black. Old carbon bakes into hard, glassy chunks that look like obsidian. That baked-on stuff takes more work to remove. But it still comes off with the right approach.
Signs Your EGR Valve Needs Cleaning
- Check engine light with P0401: The computer sees insufficient EGR flow. Carbon blockage is the most common cause.
- Rough idle: The engine shakes at stoplights. RPMs hunt up and down. Especially bad when cold.
- Poor acceleration: The engine hesitates when you step on the gas. It feels like the car is holding back.
- Engine pinging or knocking: Higher combustion temps from no EGR flow cause detonation under load.
- Failed emissions test: NOx readings spike when the EGR system is not working.
- Worse fuel economy: The engine works harder without exhaust gas recirculation to cool combustion.
If you have any of these symptoms, grab a scanner. Check for common check engine light codes before you start wrenching. P0401 is the big one. P0400 and P0404 can also point to carbon issues.
Tools and Materials You Need
Must-Have Items:
- Socket set (10mm and 12mm most common)
- Ratchet with extensions
- Torque wrench (for reinstall)
- Carb cleaner or dedicated EGR cleaner ($8 to $15)
- Wire brush or brass brush
- Old toothbrush or nylon brush
- Pipe cleaners (craft store, $3)
- Shop rags or paper towels
- Gloves (nitrile, not latex)
- Safety glasses
- New EGR gasket ($5 to $15)
Nice to Have:
- Plastic scraper (old credit card works)
- Ultrasonic cleaner (for deep cleaning)
- Borescope (to inspect intake ports)
- Compressed air or shop vac
- Penetrating oil (for stuck bolts)
Total cost for a first-timer: under $50. Compare that to a $400 to $900 shop bill.
- Let the engine cool completely. Exhaust parts stay hot for hours after shutdown.
- Work in a well-ventilated area. Carb cleaner fumes are toxic and flammable.
- Wear nitrile gloves and safety glasses. Carbon soot stains skin and cleaner burns eyes.
- Disconnect the battery negative terminal before working on electronic EGR valves.
- Never smoke or use open flame near carb cleaner. The vapors ignite easily.
- If you smell raw exhaust inside the car, stop driving. A stuck-open valve can be dangerous.

Wynn’s Diesel EGR System Cleaner Aerosol
Powerful jet spray dissolves carbon, tar, and varnish from EGR valves and intake passages. Restores engine performance and prevents starting issues. 150ml can covers one thorough cleaning. Safe for both gas and diesel EGR systems.
Step-by-Step: How to Clean Your EGR Valve
Time estimate: 1 to 3 hours depending on access and carbon severity.
- Prepare the vehicle.
Park on level ground. Engage the parking brake. Let the engine cool for at least two hours. Disconnect the battery negative terminal to prevent shorts on electronic EGR valves. - Locate the EGR valve.
The valve sits on or near the intake manifold. Look for a metal body with a vacuum hose or electrical connector. Most engines have it mounted on the passenger side. Some V6 and V8 engines hide it behind the throttle body. - Document everything.
Take photos of the valve, hoses, and wiring before you touch anything. Label vacuum lines with masking tape. Note bolt locations. Reassembly is much easier with a visual reference. - Remove electrical and vacuum connections.
Unplug the electrical connector by squeezing the release tab. Pull straight out, do not wiggle. For vacuum lines, grip the hose near the fitting and twist while pulling. Never pull from the middle of the hose. - Unbolt the valve.
Most EGR valves use two to four bolts, usually 10mm or 12mm. Use a ratchet with an extension for tight spaces. If a bolt is stuck, spray penetrating oil and wait 10 minutes. Forced bolts strip threads in aluminum intakes. - Remove the valve carefully.
Gently pry the valve away from the intake. The old gasket may stick. Do not let carbon chunks fall into the intake manifold. Stuff a clean rag into the port if needed. Set the valve on a shop rag. - Inspect the valve and passages.
Look at the pintle. Is it coated in black carbon? Can you see the metal underneath? Shine a flashlight into the intake ports. Are they clogged? On Honda and Toyota 4-cylinders, the ports often clog completely solid. - Soak the valve in cleaner.
Place the valve in a parts cleaning tray or disposable aluminum pan. Spray carb cleaner or EGR cleaner liberally over the pintle, body, and ports. Let it soak for 10 to 15 minutes. The carbon needs time to soften. For heavy buildup, soak for 30 minutes. - Scrub the carbon off.
Use a brass wire brush on the metal body. Use an old toothbrush or nylon brush on the pintle and delicate parts. Scrape hard deposits with a plastic scraper. Never use a steel wire brush on aluminum parts. Steel scratches aluminum and creates new places for carbon to stick. - Clean the intake ports.
Spray cleaner into the intake ports. Use pipe cleaners to scrub the passages. A shop vac with a narrow nozzle sucks out loosened carbon. Work slowly. Do not push carbon deeper into the manifold. Repeat until the pipe cleaners come out clean. - Clean the mounting surface.
Scrape the old gasket material off the intake manifold with a plastic scraper. Be thorough. Any leftover gasket material will cause an exhaust leak. Wipe the surface with carb cleaner and a rag. It should be smooth and bare metal. - Rinse and dry the valve.
Rinse the valve with fresh carb cleaner. Shake out excess liquid. Blow out passages with compressed air if available. Let it air dry for 10 minutes. The valve must be completely dry before reinstall. Residual cleaner can damage the new gasket. - Test valve movement.
On pneumatic valves, apply vacuum with a hand pump. The diaphragm should move smoothly and hold vacuum. On electronic valves, manually rotate the pintle. It should turn freely with no binding. Any sticking means more carbon is hiding inside. - Install the new gasket.
Place the new EGR gasket on the intake manifold. Most gaskets are directional. Look for markings that say “top” or “up.” Align the bolt holes. Do not reuse the old gasket. It will leak. - Reinstall the valve.
Set the valve onto the gasket. Start all bolts by hand before tightening any of them. This prevents cross-threading. Torque the bolts to factory spec, usually 15 to 20 foot-pounds. Check your service manual. Overtightening strips aluminum threads. - Reconnect everything.
Plug in the electrical connector until it clicks. Reattach vacuum hoses. Double-check your photos from step 3. Make sure every hose and wire goes back to the right place. - Clear codes and test drive.
Reconnect the battery. Start the engine. Let it idle for two minutes. Use your scanner to clear the P0401 code. Take a 15-minute test drive with mixed city and highway driving. Monitor for the check engine light. The computer needs a few drive cycles to relearn EGR flow.
Drive 50 to 100 miles after cleaning before you declare victory. The computer needs time to run its EGR monitor tests. Some vehicles require three consecutive drive cycles with no fault before the readiness monitor sets. Patience pays off.
Cleaning Clogged Intake Ports (The Hidden Problem)
The EGR valve is only half the battle. The intake ports are where most of the carbon hides. On Honda K-series and Toyota 2AZ-FE engines, the ports can clog so solid you need a drill to open them.
Here is how I handle severe port buildup.
Remove the intake manifold if the ports are completely blocked. This adds two to four hours but is the only way to do the job right. On some engines, the EGR port is a separate passage that can be accessed without full manifold removal. Check your factory manual.
Use a plastic scraper or wooden dowel to break up the carbon. Work gently. Aluminum intake manifolds are soft. Metal tools gouge the walls and create rough spots where carbon sticks faster.
Soak the ports with carb cleaner. Let it sit for 20 minutes. Scrub with a long-handled brush. A rifle cleaning brush works great for deep ports. Suck out the debris with a shop vac.
For extreme cases, I use an ultrasonic cleaner. Remove the intake manifold and submerge it in an ultrasonic bath with degreaser solution. The cavitation breaks up carbon that no brush can reach. This is overkill for most DIYers but it works.
Some shops offer walnut shell blasting for intake valves and ports. The process blasts crushed walnut shells into the ports at high pressure. It removes carbon without damaging aluminum. Cost is $300 to $500. Worth it for severe buildup on direct-injection engines.
Cleaning Electronic vs Pneumatic EGR Valves
Pneumatic EGR valves have a simple diaphragm and a vacuum port. They are forgiving. You can soak the whole valve in cleaner. Just keep solvent out of the vacuum port if possible. The diaphragm can handle some exposure but prolonged soaking weakens the rubber.
Electronic EGR valves have a motor, position sensor, and circuit board inside. Never submerge an electronic valve in liquid cleaner. The solvent will destroy the motor windings and sensor tracks.
For electronic valves, spray cleaner on the pintle and body only. Keep the electrical connector dry. Use a brush to work the solvent into the carbon. Wipe excess with a rag. Let it dry completely before reinstalling.
Some electronic valves have a removable cover over the motor. If yours does, remove the cover and clean the gear mechanism. Carbon works its way into the gears and causes binding. A drop of light oil on the gears after cleaning helps prevent future sticking.

Vevor 6L Ultrasonic Parts Cleaner with Heater
180W ultrasonic power with digital timer and heated tank. Removes carbon deposits from EGR valves, intake manifolds, and throttle bodies that brushes cannot reach. Stainless steel tank, degreaser-compatible. A shop-grade tool at a DIY price.
When Cleaning Is Not Enough
Sometimes the valve is too far gone. Here is how I know it is time to replace instead of clean.
The diaphragm is torn. Apply vacuum to a pneumatic valve. If it will not hold 15 inches of mercury, the diaphragm has a hole. No amount of cleaning fixes a torn diaphragm.
The motor coil is burned. Measure resistance across the motor terminals on an electronic valve. Open circuit or zero ohms means the winding is destroyed. Replacement is the only fix.
The pintle is worn. The pintle and seat mate together to seal exhaust flow. If the pintle is grooved, chipped, or worn conical, it will leak even when clean. A leaking pintle causes P0402, excessive EGR flow.
The position sensor is dead. If the sensor voltage does not change when you move the pintle, the internal track is worn. Some valves have replaceable sensors. Most do not.
The valve has been cleaned before and the code returned. Repeated cleaning means the underlying issue is mechanical wear, not just carbon. Time for a new valve.
Cost Comparison: Cleaning vs Replacement in 2026
| Service | Parts Cost | Labor | Total |
|---|---|---|---|
| DIY Cleaning | $20–$50 | 1–3 hours | $20–$50 |
| DIY Replacement (aftermarket) | $100–$250 | 1–3 hours | $100–$250 |
| DIY Replacement (OEM) | $200–$400 | 1–3 hours | $200–$400 |
| Shop Cleaning Service | $50–$100 | $150–$250 | $200–$350 |
| Shop Replacement | $200–$500 | $200–$400 | $400–$900 |
Clean first. Replace second. I have turned $800 shop quotes into $30 cleaner jobs more times than I can count. A clogged EGR valve does not always need replacement. Carbon is the enemy, not the valve.
Preventive Maintenance to Keep Carbon Away
Cleaning the EGR valve fixes the problem. But carbon comes back. Here is how to slow it down.
Drive highway miles regularly. Sustained high RPM and load burn off carbon deposits. Short trips and idling let carbon build up. Take the highway at least once a week.
Use top-tier gasoline. Better detergents in premium fuels keep intake valves and ports cleaner. The difference is noticeable over 50,000 miles.
Change your oil on time. Worn oil produces more blow-by. That oil vapor gets sucked into the intake and bakes into carbon. Use the correct viscosity and change it every 5,000 to 7,500 miles.
Check your PCV system. A clogged PCV valve increases crankcase pressure. That forces more oil vapor into the intake. A $10 PCV valve prevents a $400 carbon cleaning job.
Use an intake valve cleaner every 15,000 miles. Products like Sea Foam or CRC Intake Valve Cleaner sprayed into the intake while the engine runs help dissolve early carbon deposits. Do this before build-up gets severe.

CRC GDI IVD Intake Valve & Turbo Cleaner
Spray through the intake every 15,000 miles to dissolve early carbon deposits before they harden. Specifically formulated for direct-injection and turbocharged engines. Prevents intake valve sticking and EGR port clogging.
Common EGR Cleaning Mistakes to Avoid
I have seen DIYers and even shops make these errors. Avoid them and your repair will last.
Using a steel brush on aluminium. Steel bristles scratch aluminium intake manifolds. Those scratches become carbon magnets. Use brass or nylon brushes only.
Forcing stuck bolts. Stripped threads in an aluminium intake cost $500 to repair. Spray penetrating oil. Wait. Use the correct socket size. Apply steady pressure, not impact force.
Reusing the old gasket. EGR gaskets crush to seal. Once compressed, they do not seal again. A leaking gasket causes an exhaust leak, rough idle, and a check engine light. Always use a new gasket.
Not cleaning the intake ports. A clean valve on clogged ports will still throw P0401. The passages must be clear for exhaust to reach the intake. Do not skip this step.
Rushing the soak time. Carbon needs time to soften. A 2-minute spray and wipe does nothing. Let the cleaner soak for at least 10 minutes. For baked-on carbon, soak for 30 minutes and reapply.
Getting cleaner inside electronic valves. Carb cleaner destroys motor windings and sensor circuits. Keep solvent away from the electrical side of electronic EGR valves. Wipe, do not soak.
Not torquing bolts to spec. Overtightened bolts strip Aluminum threads. Under tightened bolts leak exhaust. Use a torque wrench. 15 to 20 foot-pounds is typical. Check your manual.
FAQ: Real Questions from the Shop
-
Can I clean an EGR valve without removing it?
You can spray cleaner into the intake while the engine runs. This is called an induction service. It helps dissolve light carbon on the valve and intake valves. But it will not remove heavy buildup. For a stuck pintle or clogged passages, removal and manual cleaning is the only way. -
What is the best cleaner for EGR valves?
Carburetor cleaner works well for most carbon. Dedicated EGR cleaners like Wynn’s or Liqui Moly are formulated specifically for exhaust deposits and work faster. For extreme buildup, an ultrasonic cleaner with degreaser solution is the most effective method. -
How long does it take to clean an EGR valve?
Removal and basic cleaning takes 1 to 2 hours for most vehicles. Severe carbon buildup adds another hour for soaking and scrubbing. If you need to remove the intake manifold to clean the ports, plan on 3 to 4 hours total. -
Will cleaning the EGR valve fix P0401?
In about 80 percent of cases, yes. P0401 means insufficient EGR flow. Carbon blocking the valve or passages is the most common cause. If the valve diaphragm is torn or the motor is burned, cleaning will not help. Test the valve after cleaning to confirm it moves freely. -
Can I use brake cleaner instead of carb cleaner?
Brake cleaner is too aggressive for some EGR valve seals and diaphragms. It can swell rubber and dissolve certain plastics. Carb cleaner or dedicated EGR cleaner is safer and designed for this exact job. Stick with the right product. -
How often should I clean my EGR valve?
Every 50,000 miles as preventive maintenance. Or whenever symptoms appear. Short-trip drivers and diesel owners should clean more often, around every 30,000 miles. Highway drivers can stretch it to 75,000 miles. -
What happens if I do not clean the EGR valve?
Carbon buildup gets worse over time. The valve sticks completely. P0401 becomes permanent. Combustion temps rise and cause engine pinging. Emissions tests fail. In extreme cases, high temps can damage pistons, valves, or the head gasket. Cleaning early prevents expensive damage. -
Can a clogged EGR valve cause rough idle?
Yes. A stuck-closed valve raises combustion temperatures and can cause pinging at idle. A stuck-open valve dumps exhaust into the intake and dilutes the mixture. Both cause rough idle, hesitation, and poor performance. Cleaning usually fixes both problems.
A Mechanic’s Take
EGR valve cleaning is one of the most satisfying jobs in the shop. The customer comes in worried about an $800 bill. Two hours later they drive away with a smooth-running engine and $750 still in their pocket. The fix is not glamorous. It is just elbow grease and patience.
The key is doing the job completely. Clean the valve. Clean the ports. Use a new gasket. Torque the bolts right. Test the valve before you button everything up. Skip any of those steps and the code comes back.
From my side of the toolbox, the rule is simple: clean before replacing. Carbon is the enemy. The valve itself is usually fine. A $12 can of cleaner and an afternoon in the garage beats a $400 shop bill every time.
You might also like: EGR Valve Diagnosis – What you Need to Know, EGR Valve Problems: Symptoms Causes and Fixes, Black Smoke from Exhaust: Common Causes