
⚡ Brake Pad Installation Guide — Quick Answer
- Difficulty: 5/10 — moderate, beginner-friendly with the right tools
- Time: 45–90 minutes per axle
- DIY cost: $40–$120 per axle in parts
- Shop cost: $180–$300 (independent) | $250–$450 (dealer)
- Replace when: Pad thickness below 3mm, or squealing begins at speeds above 20 mph
- Always replace: Both pads on the same axle — never just one side
Jump to step-by-step instructions ↓ | pad material guide ↓ | cost comparison ↓
The Day a $50 DIY Brake Job Saved a $1,200 Repair
It was a busy Saturday when Mark pulled in with his 2015 Toyota Camry. The car was pulling left and the brakes were squealing badly. He’d been to a chain shop the day before. Their quote: $800 for pads, rotors, and calipers.
I lifted the car and found the problem in about 30 seconds. The inner pad on the left front had worn completely to metal. The rotor had a scoring groove. But the rotor was still above minimum spec, and the caliper was fine.
Two hours later: new pads, resurfaced rotors, $120 in parts. Mark’s total with labor came to $150. Not $800.
That’s the point of this guide. Brake pad replacement is one of the most cost-effective DIY jobs you can do. The parts are cheap. The tools are basic. The process is straightforward if someone walks you through it honestly.
Here’s that honest walkthrough.
📌 In This Guide
- Tools & Parts You’ll Need
- Ceramic vs. Semi-Metallic vs. Organic: Which Pad Is Right?
- When to Replace Brake Pads
- How to Safely Lift Your Car
- Step-by-Step Brake Pad Replacement
- Caliper Piston Retraction: Why It Matters
- Replace or Resurface Rotors?
- How to Bed In New Brake Pads
- Mistakes That Cause Premature Pad Failure
- Cost: DIY vs. Shop vs. Dealer
- FAQs
Tools & Parts You’ll Need
Get everything together before you start. A half-assembled car in the driveway with a missing tool is how a one-hour job turns into a three-hour ordeal.
Required Tools
- 21mm socket — lug nuts on most passenger cars
- 13mm socket — caliper slide bolt removal on most platforms
- 2-ton floor jack — not a bottle jack, not a scissor jack
- Jack stands (3-ton rating) — mandatory; never work under a car on a jack alone
- Torque wrench — must reach 100 ft-lbs for lug nuts
- 6-inch C-clamp or caliper piston tool — for pushing the piston back
- Brake cleaner spray — clean rotors and caliper bracket before installation
- High-temperature brake grease — for caliper slide pins and pad contact points only
- Wire brush — clean the caliper bracket slide channels of rust and debris
Helpful additions: A bungee cord or wire to hang the caliper from the spring (prevents brake hose stress), a rubber mallet for stuck rotors, and a drain pan for any fluid drips.
ℹ Tool Loaner Programs
AutoZone, O’Reilly Auto Parts, and Advance Auto all offer free tool loaner programs. You can borrow a caliper piston wind-back tool kit, a torque wrench, and other specialty brake tools at no cost with a refundable deposit. Use the loaner program for tools you won’t need regularly.
Recommended Products

⭐ 4.5/5
Wagner ThermoQuiet Brake Pad Set

⭐ 4.5/5
Lisle Caliper Piston Tool

⭐ 4.3/5
Permatex Brake Grease
⭐ 4.8/5
CRC Brakleen Brake Parts Cleaner
Brake Pad Installation for Daily Driving Vehicles: Which Pad Type Is Right for You?
The most common question I get from daily drivers is simple: which pad should I buy? The answer depends on how you use the car — not the brand, not the price. Here’s the breakdown.
| Material | Temp Range | Dust | Noise | Lifespan | Best For |
|---|---|---|---|---|---|
| Ceramic | 0–650°F | Low | Low | 50,000–70,000 mi | Daily driving, luxury vehicles |
| Semi-Metallic | 50–800°F | High | Medium | 30,000–50,000 mi | Trucks, towing, performance |
| Organic (NAO) | 0–500°F | Medium | Low | 20,000–30,000 mi | Vintage vehicles, light-duty |
Ceramic Brake Pads — The Right Choice for Most Daily Drivers
For the typical daily driver — school runs, highway commuting, occasional spirited driving — ceramic pads are the clear answer. They’re quiet. They barely dust your wheels. And they last a long time.
The one limitation: extreme cold reduces initial bite slightly. If you regularly drive in sub-zero temperatures, the semi-metallic pads below may grip more confidently on the first few stops of the day.
✓ Ceramic Pros
- Quietest operation of any pad type
- Minimal brake dust on wheels
- 50,000–70,000 mile lifespan
- Good heat dissipation for street use
✗ Ceramic Cons
- Higher cost ($40–$80 per axle)
- Slightly reduced initial bite in extreme cold
- Not ideal for heavy towing or track use
Semi-Metallic Brake Pads — For Trucks, Towing, and Heavy-Duty Use
Semi-metallic pads contain 30–65% metal content. They handle heat much better than ceramic — up to 800°F vs. 650°F. If you tow a trailer regularly, drive a heavy truck, or live somewhere with steep mountain roads, the extra thermal capacity matters.
The tradeoff: they’re louder, they dust more heavily, and they wear rotors faster than ceramic. For a commuter sedan they’re overkill. For a half-ton pickup that hauls every weekend, they’re the right call.
Organic (NAO) Brake Pads — For Vintage and Light-Duty Applications
Non-asbestos organic pads are soft on rotors and quiet. They were the standard before ceramics became common. Today they make sense for vintage vehicles that need gentle rotor wear, or very light-duty applications like small economy cars driven conservatively.
The limitation is heat resistance — 500°F maximum. They fade faster under heavy or repeated braking. Not appropriate for any performance or towing application.
When Should Brake Pads Be Replaced?
There are two reliable ways to know your pads need replacing: measurement and sound.
Measurement: Friction material below 3mm is the replacement threshold. New pads are typically 10–12mm thick. At 3mm, braking performance begins to degrade noticeably. At 2mm, rotor temperature increases by up to 150°F under hard braking — accelerating rotor warping. At 1mm or less, metal-to-metal contact destroys the rotor face rapidly.
Sound: The wear indicator — a small metal tab on the pad — contacts the rotor at speeds above 20 mph when the pad reaches minimum thickness. That high-pitched squeal is deliberate. It’s telling you to act. Grinding, by contrast, means the pad material is already gone and metal is contacting metal.
⚠ Inspect Every 20,000–25,000 Miles
Don’t wait for noise. Inspect pad thickness at every tire rotation. You can see the pads through most wheel spokes without removing the wheel. Look for a consistent layer of friction material — if the outer edge appears as a thin line against the rotor, they’re likely at or near minimum thickness. A brake dust-covered rotor with a bright ring worn clean by the pad is a normal sign; a rotor with scoring grooves means the metal backing plate has been contacting it.
How to Safely Lift a Car for Brake Work
This step kills people when done wrong. Take it seriously every single time.
- Loosen lug nuts before lifting. With the wheel still on the ground, break the lug nuts loose — about a half turn, no more. Doing this with the car in the air causes the wheel to spin and the vehicle to rock.
- Find the factory jack points. These are reinforced metal points stamped on the rocker panels, typically with a small triangle or notch. Placing the jack anywhere else risks bending the sill or punching through the floor.
- Lift with a 2-ton floor jack. Bottle jacks and scissor jacks are for emergency roadside use. For brake work in a driveway or garage, a low-profile floor jack gives you stability and control.
- Place jack stands under the vehicle. Slide 3-ton jack stands under the vehicle at designated support points — usually the subframe or reinforced areas near the control arm mounts. Lower the vehicle onto the stands. The jack alone is not a safety device.
- Test stability before going under. Push on the vehicle from multiple directions. If it rocks, reposition the stands before proceeding.
🚨 Never Work Under a Car on a Jack Alone
Hydraulic jacks can fail. Bottle jack seals crack. The vehicle shifts when you apply force to components. Jack stands are a $30 purchase that prevents a fatality. If you don’t own jack stands, buy them before doing this job.
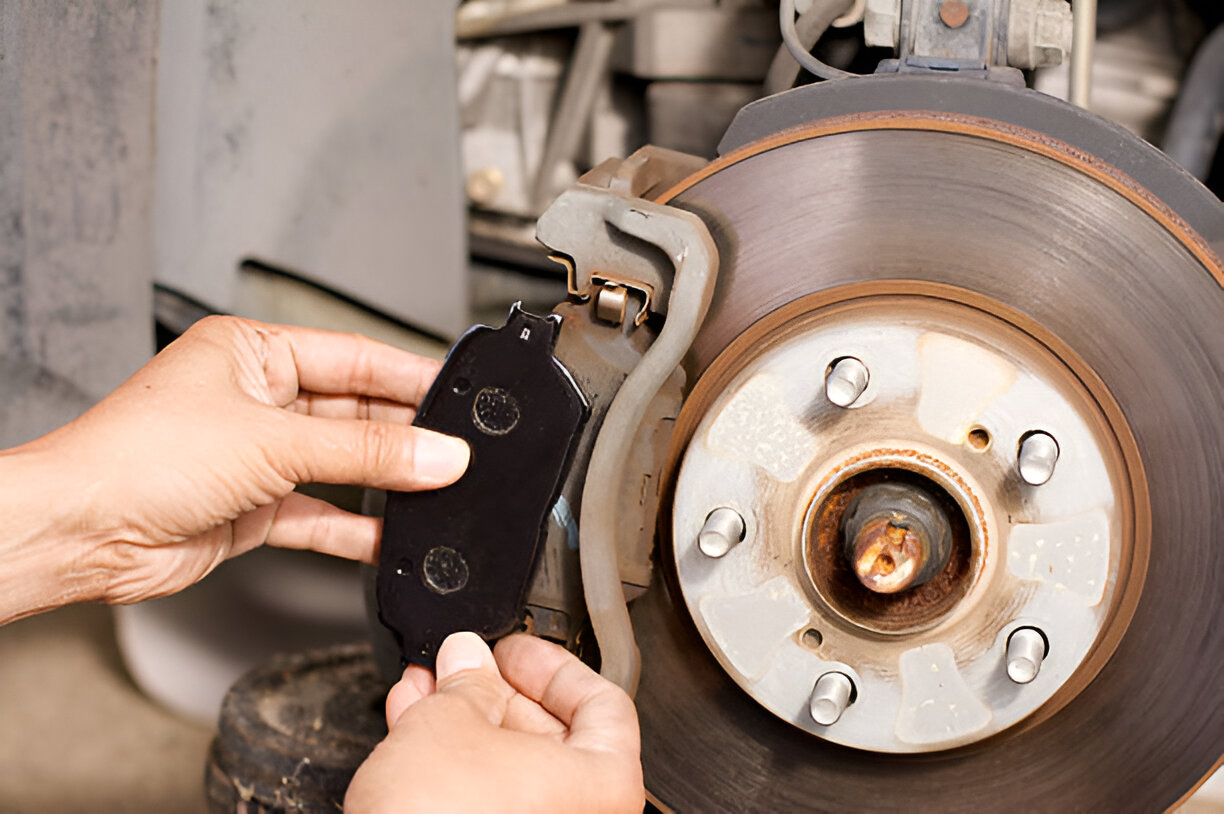
Step-by-Step Brake Pad Replacement
These steps cover single-piston floating caliper disc brakes — the standard on virtually every passenger car and light truck sold in the last 30 years. Work one axle at a time: complete both sides of the front or both sides of the rear before driving.
Important: Hang the caliper from the coil spring or upper suspension using a wire hook or bungee cord. Never let it hang by the brake hose — even briefly. Brake hose damage requires hose replacement and brake fluid work.
Inspect the slide pins by pulling them out of their rubber boots. They should slide smoothly and feel slippery with grease. Stiff, dry, or corroded pins cause uneven braking and rapid inner pad wear. Clean them, apply fresh brake-rated grease, and reinstall.
Check the fluid level: if it’s unusually low, that indicated the pads were worn far down. If it’s at or near maximum, removing some fluid now (turkey baster into a disposable container) prevents overflow.
Rear calipers on vehicles with integrated parking brakes typically use a wind-back piston that must be turned clockwise as it retracts, not simply pushed in. A dedicated caliper wind-back tool (available as a loaner) handles this. Forcing a wind-back piston with a C-clamp damages the internal thread.
Clip or slide the new pads into position. They should sit flush and move slightly when pressed — a pad that’s tight with no play may bind and cause drag or squealing.
💡 Pro Tip: Recheck Lug Nut Torque After 25 Miles
Lug nuts settle slightly after the first few heat cycles. Retorque them after 25 miles using a torque wrench — not by feel. This is especially important on aluminum wheels, where the nut seats compress slightly under initial load.
Caliper Piston Retraction: Why It Matters
New brake pads are 10–12mm thick. Worn pads are typically 2–4mm. The caliper piston has extended that difference over the life of the old pads. To install new pads, you need to push the piston fully back into the caliper bore.
Two things to know:
1. Retract slowly. Pushing too quickly — or using excessive force — can invert the ABS modulator seals. These are internal rubber seals in the ABS hydraulic unit that aren’t designed for reverse pressure surges. Apply steady, gradual pressure, not sudden force.
2. Front vs. rear pistons are different. Front caliper pistons push straight back (simple compression). Many rear caliper pistons on vehicles with integrated parking brakes must rotate clockwise as they retract. A standard C-clamp will not work on these — it’ll feel like the piston is bottoming out when it’s actually just resisting rotation. Use a wind-back tool.
ℹ How to Tell If Your Rear Calipers Have Wind-Back Pistons
Look at the piston face when the caliper is off the car. If there are two notches cut into the face (used to engage the wind-back tool), it’s a rotating piston. If the face is smooth, it’s a simple push-back type. Common wind-back applications: most GM, Chrysler/Stellantis, and many European rear disc systems. Most Honda, Toyota, and Subaru rear calipers use push-back pistons.
Should You Replace or Resurface Brake Rotors?
You don’t always need new rotors when you replace pads. Here’s the decision:
Replace the rotor if:
- Thickness is below the minimum discard spec stamped on the rotor hat — typically 22–24mm for most passenger cars, 28–30mm for trucks
- Lateral runout (wobble) exceeds 0.004 inches when measured with a dial indicator
- Deep scoring grooves are visible — grooves deeper than 0.060 inches or ones you can catch a fingernail in
- Surface has blue heat spots or hard spots from overheating — these don’t resurface away
Keep the rotor if:
- Thickness is above minimum spec with at least 1–2mm of margin remaining
- Runout is below 0.002 inches
- Light surface rust (normal from sitting) or minor surface scratches — these polish away within the first few stops
⚠ New Pads on Warped Rotors
Installing ceramic pads on a rotor with 0.006 inches of lateral runout increases stopping distance by up to 12% under hard braking. The vibration also transfers brake pedal pulsation that passengers feel immediately. New pads won’t fix a warped rotor — the rotor needs replacement.
How to Bed In New Brake Pads
Bedding in — also called break-in or burnishing — transfers a thin, even layer of pad material onto the rotor face. This transfer layer is what actually does the braking. Without it, stopping performance is reduced and uneven.
The process:
- Find a quiet road or parking lot with no traffic behind you
- Accelerate to 40 mph using moderate throttle
- Apply firm but not panic-stop braking pressure down to 10 mph — don’t stop completely
- Accelerate back to 40 mph
- Repeat 8 times total
- Allow 5–10 minutes for the brakes to cool before driving normally
⚠ Never Come to a Complete Stop During Bed-In
When pads are hot and transfer material is forming, stopping completely imprints pad material onto one spot of the rotor. That spot becomes slightly thicker than the rest — creating disc thickness variation (DTV). DTV causes the pedal to pulsate every time the rotor makes a full rotation under braking. You’ll feel it as a rhythmic shimmy through the pedal. Fix requires rotor replacement. Avoid it by rolling slowly instead of stopping during the first 8 passes.
Common Mistakes That Cause Premature Brake Pad Failure
| Mistake | What Happens | How to Avoid It |
|---|---|---|
| Skipping slide pin cleaning and lubrication | Caliper drags on one side, causing rapid inner pad wear and pulling under braking | Always remove, clean, and regrease slide pins during every pad replacement |
| Not cleaning caliper bracket contact surfaces | Rust scale under pad ears causes taper wear — pad wears thick on one end, thin on the other | Wire brush all contact ledges to bare metal before installing new pads |
| Grease on friction material or rotor face | Glazes pad surface, drastically reduces friction, causes noise and extended stopping distance | Apply grease only to metal-to-metal contact points; keep it away from all friction surfaces |
| Under-torquing caliper bolts | Caliper shifts under braking load, causing uneven wear and return squealing noise | Torque slide bolts to spec (25–35 ft-lbs) with a calibrated torque wrench |
| Skipping bed-in procedure | Uneven transfer layer, reduced initial stopping power, potential noise | Complete the 8-stop bed-in protocol before normal driving |
| Replacing only one pad on an axle | Imbalanced braking causes pulling and uneven rotor wear | Always replace both pads on the same axle together |
| Installing rear pads without checking piston type | Forcing a wind-back piston straight in damages caliper internals | Identify whether rear pistons are push-back or wind-back before tool selection |
Brake Pad Replacement Cost: DIY vs. Shop vs. Dealer
DIY Cost Per Axle
| Service Type | Cost Per Axle | What’s Included |
|---|---|---|
| DIY | $40–$120 | Parts only — your labor is free |
| Independent Shop | $180–$300 | Parts + 1–1.5 hours labor at ~$120–$150/hr |
| Dealer | $250–$450 | OEM parts + book rate labor (1.5–2 hours) |
The savings between DIY and dealer on a full four-wheel brake job typically run $400–$700. That’s real money. And once you’ve done it once, the second time takes half as long.
Brake Pad Replacement FAQs
Can you replace brake pads yourself?
Yes. This is one of the most beginner-accessible brake jobs you can do at home. The job requires basic hand tools, a floor jack, and jack stands — all available at any auto parts store or through free loaner programs. The one thing that matters most is following torque specs and taking your time on the piston retraction step. If you’ve done an oil change, you have the mechanical awareness needed for this job.
How often should brake pads be replaced?
Inspect every 20,000–25,000 miles. Replace when friction material is below 3mm, or when the wear indicator begins squealing. Ceramic pads typically last 50,000–70,000 miles on a daily driver. Semi-metallic pads last 30,000–50,000 miles. Organic pads last 20,000–30,000 miles. Driving style matters — frequent hard stops and stop-and-go city driving wear pads significantly faster than highway miles.
What is the best brake pad installation for daily driving vehicles?
For most daily driving vehicles, ceramic brake pad installation is the right call. Quiet, low-dust, and long-lasting (50,000–70,000 miles). Wagner ThermoQuiet, Bendix Premium, and Bosch QuietCast are all consistently well-reviewed. For the installation itself, the two steps that matter most for daily drivers: clean the caliper bracket contact surfaces with a wire brush before fitting the new pads, and complete the 8-stop bed-in procedure after you’re done. Those two steps determine how long the pads last and whether they’ll be quiet. If you tow a trailer regularly or drive a heavy truck, semi-metallic pads handle higher heat loads better than ceramic.
Should I replace rotors when replacing brake pads?
Only if they’re below minimum thickness, show excessive runout, or have deep scoring grooves. Measure rotor thickness with a micrometer and compare to the discard spec stamped on the rotor hat. If the rotor is above spec and within runout tolerance, new pads alone is the right call. Automatically replacing rotors with every pad change is unnecessary unless you’re near the minimum spec anyway.
How do you bed in new brake pads?
Eight moderate stops from 40 mph down to 10 mph — without coming to a complete stop. Let the brakes cool for 5–10 minutes after. This deposits an even transfer layer on the rotor and sets the pad surface. Skipping bed-in doesn’t cause immediate problems, but it reduces initial stopping performance and increases the chance of brake noise during the first week of driving.
What torque should caliper bolts be tightened to?
Caliper slide bolts are typically 25–35 ft-lbs depending on the vehicle. Lug nuts are typically 80–100 ft-lbs for passenger cars and 100–120 ft-lbs for light trucks. Always verify against your specific vehicle’s service data — torque specs vary. The single most common DIY mistake I see is undertorqued caliper bolts, which causes noise and uneven wear within the first few thousand miles.
Why are my new brake pads squealing?
A few common causes: missing or improperly seated anti-squeal shims, grease contamination on the friction surface or rotor, slide pins that weren’t cleaned and lubricated, or pads that haven’t been bedded in yet. New pads often squeal slightly for the first 100–200 miles as the transfer layer forms — this is normal. Persistent squealing after that points to a hardware or installation issue.
Final Word
Brake pad replacement is the right starting point for anyone new to DIY car maintenance. The parts are cheap. The tools are basic. The process is repeatable and builds useful intuition for everything else on the car.
The details that matter most: clean the slide pins, clean the bracket contact surfaces, use a torque wrench on everything, don’t get grease near friction surfaces, and bed the pads in properly before driving hard. Get those right and the brakes will be quiet, effective, and long-lasting.
The short version: Two ceramic pads, a wire brush, fresh slide pin grease, and 25 ft-lbs on the caliper bolts. Eight smooth stops from 40 mph after you’re done. Retorque the lug nuts at 25 miles. That’s the whole job.